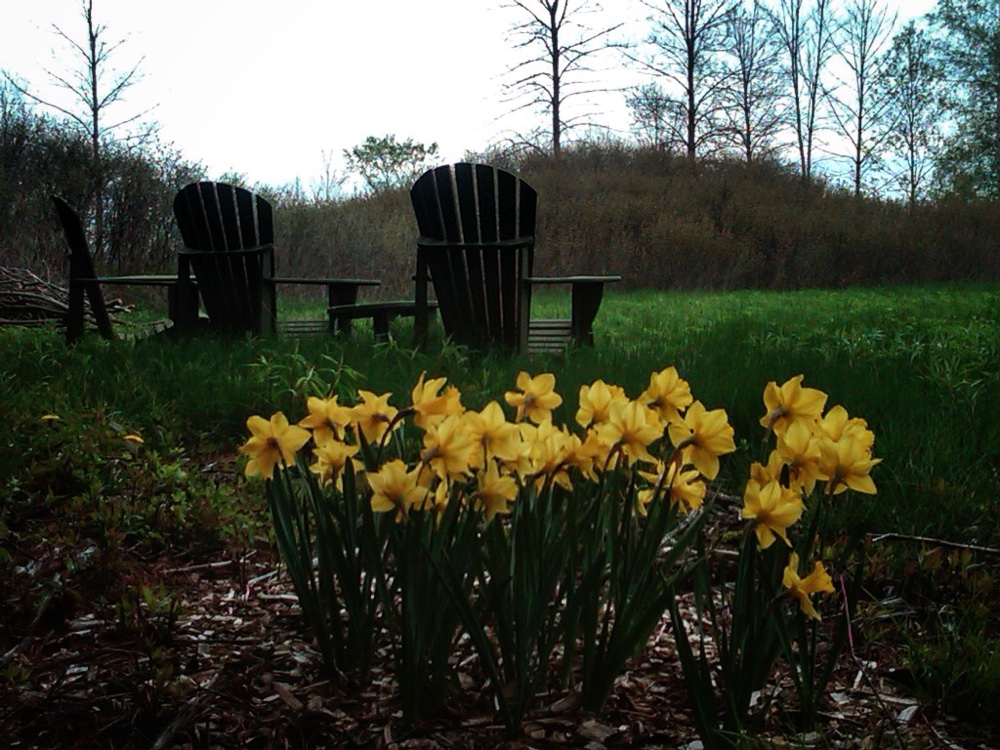
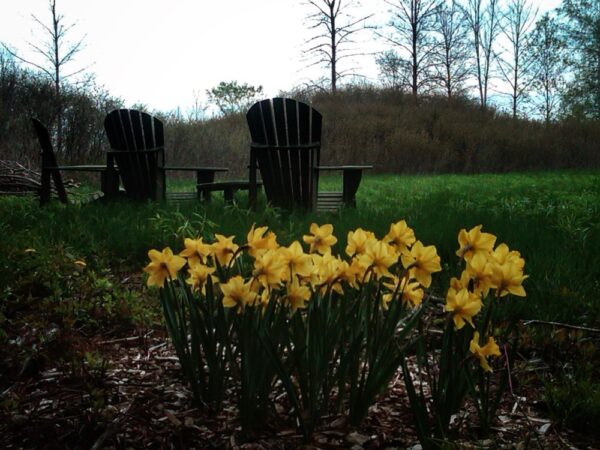
Hallelujah! The daylilies (Hemerocallis fulva) are blooming. That, THAT is the color and exuberance of early summer. Sometimes known as Fourth of July Daylilies because their bloom time (in the northeast) roughly corresponds to Independence Day, Hemerocallis fulva have begun to erupt into spectacular fireworks-esque blossoms about a week ahead of schedule. Must be the intermittent but persistent rain.
Hemerocallis Fulva (Photo: Geo Davis)
Daylilies Abloom
Although my floral polyamory (flower zealotry?) is wide ranging and broadly inclusive, summertime vibes are captured in a quasi Norman Rockwell way when Hemerocallis fulva joins the fête. What?!?!
No, that wasn’t a challenge — can you work, polyamory, zealotry, inclusivity, and Norman Rockwell into the same sentence? — but I concede a slightly self indulgent surrogate *MAY* have hijacked the keyboard. But I’m back at the helm. Back to basics…
Hemerocallis fulva, the orange day-lily,[3]tawny daylily, corn lily, tiger daylily, fulvous daylily, ditch lily or Fourth of July lily (also railroad daylily, roadside daylily, outhouse lily, and wash-house lily),[citation needed] is a species of daylily…
A daylily by any other name. Hemerocallis fulva by rights (but least applied name.)
Just beginning to bloom in the last couple of days. Should be a tiger orange riot by Indepence Day. And then a chance to gather the expired blooms for a meal or two.
What?!?!
Hemerocallis Fulva (Photo: Geo Davis)
Daylilies are not only edible, they are spectacular…
Let me start by saying that edible daylilies are the common daylily, Hemerocallis fulva, as well as its various Hemerocallis friends and relatives…
Perfect. Hemerocallis fulva is exactly what we have in abundance at Rosslyn, so I declare a feast. But how?
According to Shaw, the best way to dine on Hemerocallis fulva is to sauté the unopened flower buds in butter and salt.
Delicious. Briefly cooked, the buds have a bit of knacken, a German expression meaning a “pop.” Yet the insides reminded me of squash blossoms. The taste? Green, with a whiff of radish and a dash of green bean. Honestly, I’d eat this as a side dish any day, any place. It needs nothing else.
That’ll be clarified butter (aka ghee) for me in order to juggle my lamentably dairy free diet. I’ve also read that the post-bloom flowers are tasty, especially when dried and added to soups and stews. Time for a little experimentation…
Summer solstice is upon us, and it seems all too poetic that our return to Rosslyn after far flung vagabonding coincided with the end is spring and beginning of summer.
Summer Solstice, 2023 (Photo: Geo Davis)
Summer Solstice?!?!
The official start of summer, the longest day, the shortest shadow… What exactly is the summer solstice?
The June solstice marks the exact moment when the noon sun appears directly over the Tropic of Cancer, a line of latitude 23.5 degrees north of Earth’s equator. It’s the northernmost point where the sun can be seen straight overhead (90 degrees above the horizon) all year.
In the Northern Hemisphere we see the sun take its longest and highest path across the southern sky. The high sun angle means you will cast your shortest midday shadow of the year on the summer solstice.
Solstice means “sun standing still” in Latin. On the summer solstice, the sun’s daily northward movement in the sky appears to pause… (Source: Washington Post)
Sun standing still. Yes, an illusion, but an engrossing illusion. And such lovely language! Found poetry pollinating the day.
Shortest Shadow
And what about casting our shortest shadow? Neat. But a little bit challenging to witness convincingly.
In India, cities like Ujjain and Gandhi Nagar witness a zero shadows moment when shadows disappear at noon. (Source: The Weather Channel )
I’m pretty certain that casting no shadow at all would make an impression. But such luck isn’t ours at Rosslyn. Our summer solstice is the shortest shadow day. Midday, mini shadow.
Solsticing… Again
Today’s celestial inception prompted a fleeting reverie, winter solstice, half a year ago. Seems like yesterday. And looong ago. A peculiar trick of time.
Welcome to day one of the Adirondack Coast‘s coldest season. Today is the winter solstice, the first official day of winter, and — more importantly for the likes of my mother and others who favor longer days and shorter nights — the threshold between the briefest day and the most prolonged night and imperceptibly-but-steadily lengthening daylight. (Source: Winter Solstice: Longer Days Ahead)
And tonight we’re on the flip side of imperceptibly-but-steadily lengthening daylight. Tomorrow the nights begin to lengthen and the days shorten. Imperceptibly. But inevitably…
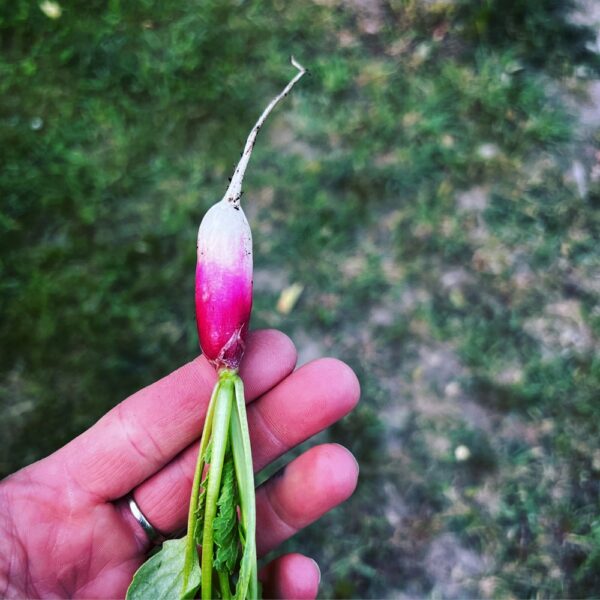
Spring-into-summer is a celebratory parade of gastronomic gateways. Nettles, ramps, fiddleheads, asparagus, rhubarb,… So many seasonal ingredients and tastes. And now it’s radish time!
Ready for Radish Time? (Photo: R.P. Murphy)
These early French Breakfast Radishes are almost impossibly delicious. Crisp and spicy. Uniquely refreshing.
The French Breakfast Radish (Raphanus sativus) is [an] early summer classic — and perennial staple of Rosslyn’s vegetable garden — [that]… tends to be mild (less “spicy” than other standard radishes) if harvested and eaten early…(Source: French Breakfast Radish)
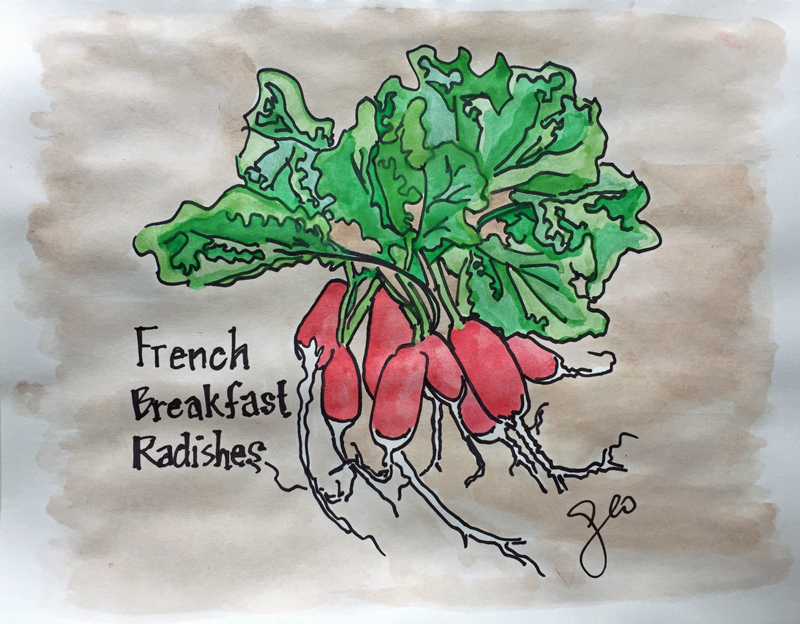
Ready for French Breakfast Radish time? (Illustration: Geo Davis)
Perhaps four years living in Paris account for my preference, but these early season benisons — as enticing to the eyes as to the tongue — beguile me year after year.
Radishes (my favorite are French Breakfast Radishes) celebrate precocious summer’s spicy return with vibrant, bye-bye-mud-season colors, a super satisfying crunch, and tastebud reviving explosions of peppery sweetness. (Source: Radishes and Radish Greens)
Such sweet springtime seduction. Love at first crunch. New and invigorating each year despite familiarity and anticipation.
And that’s just the red and white taproot. To be sure, the tuberous vegetable is what we envision when radishes are on the menu. But they’re only part of the radish time rewards.
Radishes aren’t just crunchy eye candy for crudités. Radishes are nutritious. Especially the radish greens! (Source: Radishes and Radish Greens)
That’s right. The lush greens you snatch to lift a ripe radish from the soil are a delight themselves.
As with standard radish varieties, the “radish greens” of the French Breakfast Radish can also be eaten. Washed and tossed into a saucepan of olive oil (or avocado oil), garlic, and onion, this wilted green is a delicious accompaniment…(Source: French Breakfast Radish)
Whether wilted alone or mixed with spinach and shredded Swiss chard, these nutrient rich greens will improve your plate. And radish greens sautéed then puréed with cream (or nondairy alternative such as Macadamia milk) make a delicate soup as pretty as it is piquant.
After the rainiest spring/summer in years, the summer of 2012 appears to be one of the driest, and Rosslyn gardens have mostly profited. Time for an update on our mid-July veggies, plus an important question about squash blossoms at the end.
Lake Champlain water levels are plummeting (waterfront/dock/boating update soon) and lawns are either crispy, crunchy or perpetually showered by sprinklers. With the exception of new grass we’re starting as part of ongoing repairs to the damaged waterfront, we’re trying to minimize our environmental impact by letting the lawns dry up but drip, drip, dripping the vegetables, herbs and orchard.
Eggplant and Blossom, Rosslyn Gardens
It’s a curious twist of fate that we were just beginning to repair our waterfront from flood damage at this point last year, and this year we’re experiencing a sustained drought. But we’re taking advantage of the heat for lots of Lake Champlain watersports and Adirondack Coast bike rides. Life is good!
What about that mid-July veggies update I promised?
So far, the drought winners in the vegetable garden appear to be the zuchini and yellow squash (Are they are channeling their “inner tropics”?!?!), Imperial Star Artichokes, eggplant, peppers and tomatoes. Although I keep expecting the watermelons and cantaloupes to explode, they’ve been sluggish. Bizarre. Many years our seasons are too short for them, and yet when we blast them with dry heat day after day, they get logy. Why?
The leeks are also struggling. I suspect they need even more water than they are getting… Will try to keep them wetter this week. The pumpkins and cucumbers are also way behind where they’d normally be at this point in the summer. I’d hoped to trellis the cukes this year. Never done that before, but intrigued by the smaller plot and self-shade possibilities as well as the opportunity to keep the cucumbers up off the earth so they’ll be less vulnerable to pests. Unfortunately the plants are still so small I haven’t been able to train any of them up onto the cedar trellises yet. Soon, I hope!
Zuchini Squash Blossom, Rosslyn Gardens
The good news is that we’ve been devouring radishes (see French Breakfast Radish) and greens for over a month. Already finished with the first radish and lettuce patches and making good headway through the second patches. Will plant more lettuce this week along with beans and another squash crop. No more radishes. I think I’ve already hit my limit.
Why so much squash? Yes, we too get sick of squash, but each year I plan to harvest and prepare squash blossoms. But so far it’s never happened. This year I’ve vowed to learn several good ways to prepare squash blossoms. I have some interesting recipes, but would love to hear your favorite way to prepare squash blossoms. And I need to figure out the best way to clean the squash blossoms before cooking. Seems that ants in particular love to get inside. How do you prepare your squash blossoms?
Thanks to Sacha Marcucci for her tasty sounding recommendation:
@virtualDavis one of our favorite restaurants stuffs them with ricotta, then lightly batters and frys (fries?sp.) them. delish.
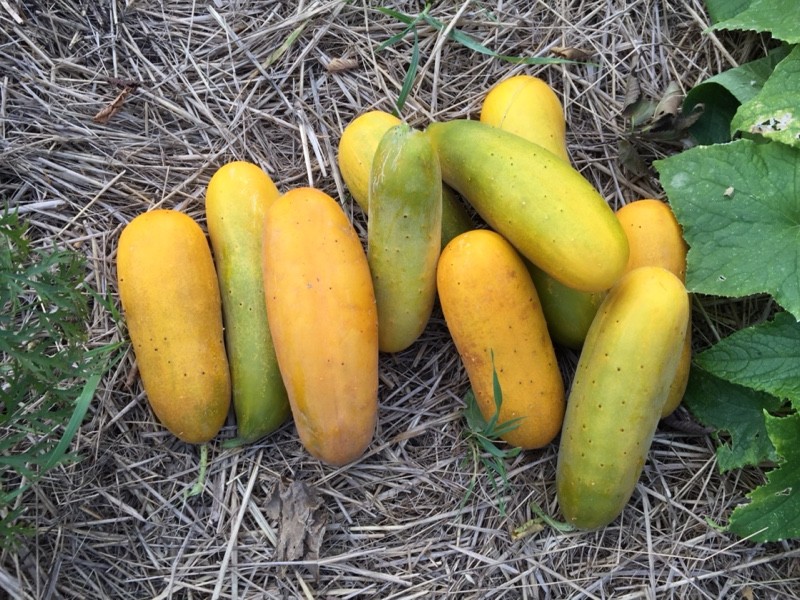
Why are my cucumbers orange? They’re turning yellow-orange, to be precise…
This summer we have enjoyed more productive cucumber plants than ever before, but recently the enormous fruit are discoloring from green to yellow to orange before we can eat them. Here’s the reason why.
Cucumbers turn orange when they grow excessively ripe before harvesting, explains Veggie Gardener. The cucumbers first turn yellow, and if left on the vine, they quickly develop a vibrant orange hue. This happens because chlorophyll levels decrease past the point of peak ripeness… [They become] very bitter and unsuitable for human consumption. (Source: Ask.com)
Bitter. It’s true. I taste tested just to make sure they were no longer suitable for human consumption. They aren’t, though our caretaker assured us that his wife can still turn them into pickles. I encouraged him to take all he could haul!
Our yellow and/or orange cucumbers are an unfortunate result of the extended heat wave and drought we’ve been enduring. It’s true we may have overplanted. But our beautiful cukes growing, greening, and spoiling before our eyes is heartbreaking. What to do?
The only way to prevent cucumbers from turning yellow and orange is to harvest them at the proper time. Ripe cucumbers have firm flesh with a medium-green rind and feel heavy for their size. Most varieties ripen between 50 and 70 days after planting. Size is also an important indicator of ripeness. Each cucumber variety has a different optimal size and quickly develops a bitter flavor if allowed to grow larger. Some cucumbers, such as those used for pickling, are naturally smaller than other varieties. Consequently, gardeners must know what type of cucumber they have planted and the target size for ripe specimens in that category. The most common cause of orange and yellow cucumbers is over-ripening, but the discoloration is sometimes a symptom of the Cucumber Mosaic Virus. According to Gardening Know How, the Mosaic Virus produces soft, mushy cucumbers with mottled patches and curled, withered leaves. This incurable virus also affects peppers. When a cucumber displays symptoms of the Mosaic Virus, the best course of action is to remove it from the garden. (Source: Ask.com)
The good news is that we don’t have Cucumber Mosaic Virus. But the bad news is that our compost is becoming overwhelmed with yellow and orange cucumbers. Perhaps we should redistribute these technicolor cukes to our wild neighbors for their enjoyment? (See Woodchucks & Cucumbers!)
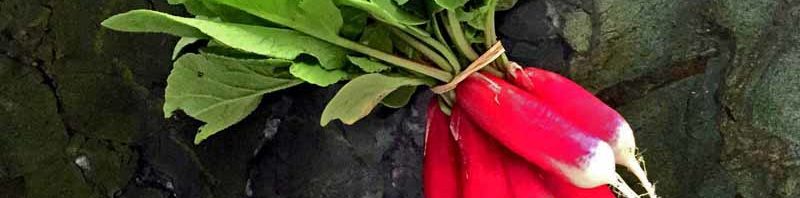
On this technicolor Tuesday I present to you one of our flashiest May garden treats, French Breakfast Radishes.
French Breakfast Radishes: The peppery-but-sweet taste of spring.
Field and forrest foraged veggies — like stinging nettles, wild ramps, and fiddleheads — are nature’s charitable reminder that winter has once again yielded to spring. Then our vegetable gardens begin to awaken with asparagus and spinach that spoil our palates with succulent, vitamin packed hints of warmer days.
Radishes (my favorite are French Breakfast Radishes) celebrate precocious summer’s spicy return with vibrant, bye-bye-mud-season colors, a super satisfying crunch, and tastebud reviving explosions of peppery sweetness.
French Breakfast Radishes: The peppery-but-sweet taste of spring.
And radishes aren’t just crunchy eye candy for the crudités. Radishes are nutritious. Especially the radish greens!
My ever-curious, ever-creative, ever experimenting mother introduced me to cooked radish greens a year or two ago, and I’ve been a fan ever since.
French Breakfast Radish Greens: Don’t compost this nutritious spring green!
Radish Greens Recipe
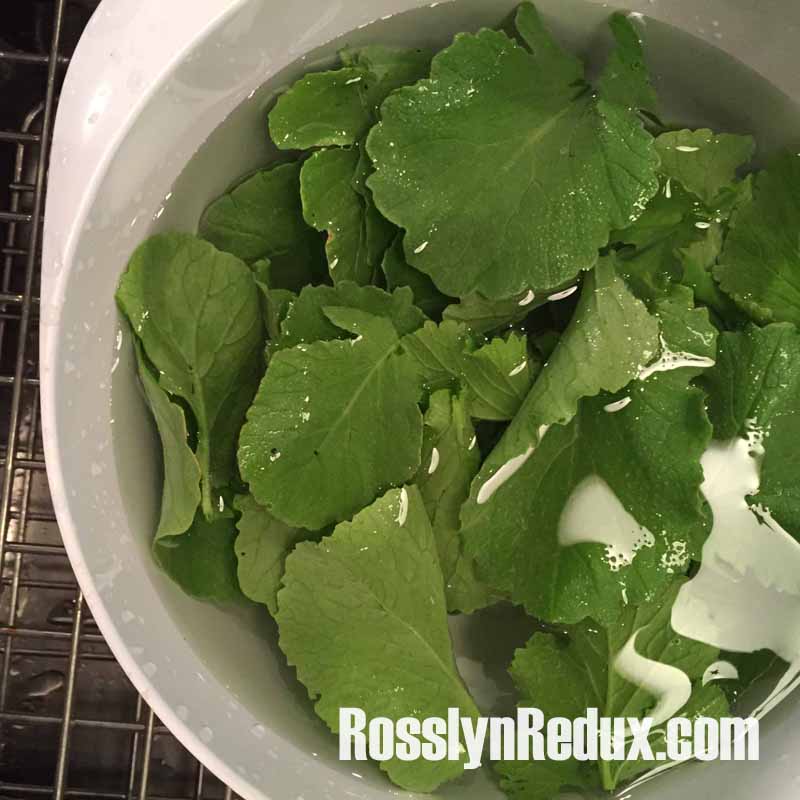
This evening’s sautéed radish greens were prepared by my bride, a far more gifted cook than she willingly admits. I pulled about nine large French Breakfast radishes from the garden, scrubbed them up and separated the bulbs from the best greens. The second and third photographs above show you what my wife inherited.
Preparing sautéed radish greens is quick, easy, and delicious. I’ll offer you the steps I offered my bride, but duplicating the perfectly peppery and garlicky side dish she served is up to you.
Clean radish greens and soak in cold water
Lightly chop greens and remove any “woody” stems
Heat olive oil in a sauté pan
Crush 1-2 garlic cloves; add to olive oil
Brown the garlic and add radish greens
Stir gently with a splash of white wine
Add balsamic vinegar and/or soy sauce
Salt and pepper to taste
My bride chopped and sautéed a yellow bell pepper with the radish greens which added a subtly caramelized nuance (and intriguing texture variety) to the radish greens. It was delicious!
Radishes (and Radish Greens) are Nutritious
[Note: I won’t pretend to be an expert in matters nutritional, especially when it comes to Raphanus sativus. But I’ve stumbled upon an inspiring article from Full Circle that helps fills in some gaps. I’ve excerpted some of the best below.]
As a cruciferous vegetable like broccoli, radishes have a host of health benefits but are typically under-appreciated… However, for both their health benefits and amazing array of flavors radishes top our list of foods to start paying more attention to and eating on a daily basis… here are nine reasons to “eat your radishes!”
Naturally cooling Radishes are… highly regarded in eastern medicine for the ability to decrease excess heat in the body…
Sooth sore throats [Radishes] can help eliminate excess mucus in the body and… help clear the sinuses and soothe soar throats too.
Aids digestion Radishes are a natural cleansing agent for the digestive system…
Prevents viral infections … regular consumption of radishes can help prevent viral infections.
Eliminates toxins [Radishes] break down and eliminate toxins and cancer-causing free radicals in the body.
Protects against cancer … radishes contain phytonutrients, fiber, vitamins and minerals that are cancer protecting.
Relieves indigestion Radishes… can help relieve bloating and indigestion.
Low in calories, high in nutrients [At] less than 20 calories in an entire cup, radishes are a great way to add nutrients, fiber and tons of flavor to your meals…
Keeps you hydrated With a high water content and lots of vitamin C as well as phosphorus and zinc, radishes… can help keep your body hydrated… (Source: Full Circle)
Cooked Radishes
I’ve been hearing more and more about cooked radishes. Not radish greens. Radishes. So far I haven’t tried grilling or roasting radishes. Have you? I’m looking for advice…
It’s time for a follow-up to my Organic Orcharding post, specifically a detailed look at how to use Tanglefoot for non-toxic pest control in a holistic fruit tree orchard. For readers wondering about zone compatibility and looking for a regional reference to help you evaluate the relevance of this post to your individual growing conditions, our orchard is located in Essex, New York along the Adirondack Coast of the Champlain Valley. We are purists when it comes to holistic orcharding and gardening (despite challenges unique to growing fruits and vegetables in the North Country) and we have come to rely on Tanglefoot summer after summer. (You may also want to check out my post, “How to Apply Tanglefoot to Trees“ for a simple, straightforward how-to video. Your holistic orchard will thank you in abundance!)
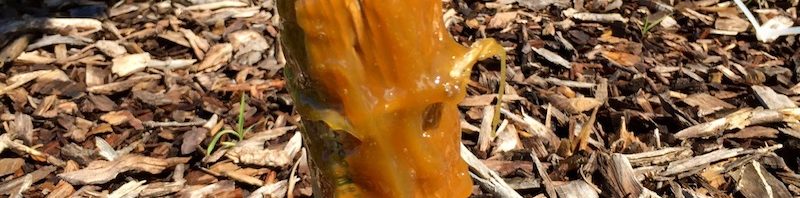
Pre-Goo & Post-Goo
Here’s a glimpse at the first two phases of Tanglefoot installation, documented in Rosslyn’s 100% organic orchard. This first photo was taken just before the sticky goo was lathered onto the corrugated paper.
Tanglefoot Installation: wrap trunk with corrugated paper (Source: Geo Davis)
So tidy, right? Not for long! Here’s what it looks like after the sticky Tanglefoot is installed.
Tanglefoot Installation: lather ultra gooey Tanglefoot on the corrugated paper wrapped around tree trunk. (Source: Geo Davis)
Yuck! Hopefully the noisome critters that like to climb up the trunks of fruit trees agree.
It’s a messy installation process, but it seems to work pretty well.
How to Use Tanglefoot
I’ll prologue the most important part of this post by saying two things:
Applying Tanglefoot to fruit trees a messy but relatively straightforward task.
Better instructors have already explained application, so I’ll defer to their able guidance rather than overlook something important.
One of the best step-by-step Tanglefoot installation videos was made by San Diego master gardeners Carol Graham (unfortunately no longer available online). Similarly thorough written instructions are provided by the products’s manufacturer, Contech-Inc:
We recommend using 4” wide wrap of waterproof paper or tape on the trunk of the tree and applying Tree Tanglefoot over the wrap. Tree Tanglefoot is oil-based and the oils will soak into the bark. Banding material eliminates staining of the tree and offers quick, complete removal of the sticky material. In addition, Tree Tanglefoot will remain sticky longer when applied on top of a surface resistant to oil. For rough bark trees it may be necessary to plug the gaps between the tree trunk and the banding, this can be done by using insulation or other materials.
Apply Tree Tanglefoot Insect barrier in a uniform fashion. It can be applied in a heavy or light coat. Heavy coats are approximately 3” wide and 3/32” thick. A heavy coat is used when the insects to kept from the tree foliage are large or numerous, or when there is little time available to maintain the band. Light coats are 3” wide and 1/16” thick. A light coat is good as a general barrier against smaller or less numerous insects, or when the band can be maintained regularly.
Generally, Tree Tanglefoot will remain sticky and effective until it is covered with insects, dust or other debris. A build-up of debris or insects will create a bridge for other insect to cross. This debris requires removal and possible re-application in spots. If an area is unusually dusty or the surface of the barrier is stiffened, Tree Tanglefoot can be rubbed around to expose a new sticky layer beneath. Remove bands at end of season. (Source: Tree Tanglefoot Insect Barrier Products – Contech Inc)
Still a little uncertain? (Or just procrastinating to avoid making a gooey-sticky mess?) Here’s another resource I’ve also relied upon for amazing step-by-step Tanglefoot guide with photographs. Here are the simple, straightforward instructions.
Using a putty knife or a cake decorating spatula. If you choose a putty knife be very careful with the edges and corners as they are very sharp and can easily damage the bark of the tree. I recommend using a cake decorating spatula because they have rounded edges at the tip.
1. Wrap your tree in plastic film
2. Soften up a glob of Tanglefoot with the spatula
3. Work it into a smooth lump without strings back to the bucket
4. Apply the product in a thin 1″ wide band a few inches from the top of the plastic all the way around the tree creating a complete circle
5. Drag your spatula in the same direction that you wrapped the tree with the plastic. If you go the other way you’ll just pull the plastic right off
6.Make another band of Tanglefoot a few inches down from the first band. This creates 2 barriers that work together to stop the pests from walking up your tree (Source: How to Use Tanglefoot – Backyard Food Growing)
I use the paper “tape” version and have not yet tried the plastic film, but I’m intrigued. However this post made me wary.
I got some Tanglefoot this year for my apple trees, had a lot of problems with ants last year. I tried attaching bands of saran wrap around the tree trunks and applying the Tanglefoot that way. That was a complete disaster/mess, so I called the Tanglefoot manufacturer and asked if it would harm my trees to apply their product directly to the bark. They said that other than a dark ring/stain around the tree, no, it should not harm the tree at all to be directly applied. So, that is what I did. Did it about a month ago. No signs of any tree trouble yet. (Source: Putting tanglefoot on trees directly – GardenWeb)
I decided to ask the author, Stacy, the about plastic wrap vs. paper banding.
Great post, and the photo play-by-play is the best resource I’ve found online! Thank you. This is my first foray into fruit tree pest tangling (wrangling?), and I’m curious about your preference for plastic wrap instead of the paper/cardboard option proposed by the manufacturer. I’m guessing you’ve tried both and decided that the plastic wrap works better? Would you be willing to explain the pros and cons of plastic instead of paper? Hoping to get this right the first time! Thanks.
Stacy answered my question the very same day (Wow! Thanks, Stacy.) as follows:
Thank you! I’m happy the pictures are helpful for you. You’ll do just fine, the hardest part is keeping it off of yourself and your clothes! I have a few reasons for the plastic.
The method that I show here (with the two stripes/plastic/cotton balls) was the way I was taught during my first experience with Tanglefoot, I didn’t even know about the cardboard at that point. It wasn’t until I started working in a retail nursery a few years later that I found out about the cardboard wrap.
I think the cardboard wrap could be good if your tree is perfectly smooth, as it leaves gaps that the bugs can walk under unobstructed. It might work ok if you put cotton balls under it and secure it tightly to close those gaps though.
Also, I don’t choose the cardboard because I live in a very rainy climate and the cardboard would disintegrate in no time at all. If your area is less rainy then it would probably be ok. I prefer the plastic too because it holds tight to the bark and stays put for the month or two that it’s on there.
I’ve just continued to use the plastic/cotton balls method because it was simple and used items I already had at home, there wasn’t an additional product that I needed to buy.
It’s just important to get the plastic off when the season is done or when the Tanglefoot becomes ineffective, the plastic allows no airflow for the bark. This would be a benefit to using the cardboard. (Source: backyardfoodgrowing.com)
Thanks again, Stacy.
Needless to say, I still haven’t tried the plastic film. Three years of installation with paper wraps, and the approach seems to be working. So, if it ain’t broke don’t fix it!
This morning I spied a Colorado Potato Beetle (Leptinotarsa decemlineata) or three in the vegetable garden. Here’s a fuzzy snapshot of one Colorado Potato Beetle contentedly munching away on young eggplant leaves.
Colorado Potato Beetle on Eggplant Leaf (Source: Geo Davis)
Do you see the yellow striped beetle? It’s approximately center frame.
Here’s a closeup of another Colorado Potato Beetle once I flicked him/her onto the ground.
Colorado Potato Beetle (Source: Geo Davis)
Despite the fact that these pests are aren’t questionably distractive to the vegetable garden, I find it difficult to kill such a beautiful creature. Somehow it’s easier to squish a slug that it is to crush this handsomely striped beetle.
Despite my aesthetic misgivings, I dispatched each Colorado Potato Beetle and made a mental note to doodle or perhaps watercolor one. Or two. (See above.)
This post, the latest installment in my friend or foe series, will endeavor to demystify Colorado Potato Beetle (Leptinotarsa decemlineata).
Description: The mature beetles are around 1/3″ long and their hard, rounded shell (think modern VW bug) is yellow with black stripes (body) and orange with black spots (head). Although I haven’t seen any yet, the Colorado Potato Beetle larvae “are plump orange grubs with two rows of black dots on each side of the body.” (Source: Great Garden Companions: A Companion Planting System for a Beautiful, Chemical-Free Vegetable Garden, Sally Jean Cunningham)
Damage: They defoliate potatoes, eggplant, tomatoes, peppers, etc.
Prevention: Straw mulch and row covers. Remove and crush larvae and adults.
Enemies: According to Cunningham, the Colorado Potato Beetle appeals to lots of predators including: “ground beetles, spined soldier bugs, and two-spotted stinkbugs, as well as birds and toads.” She offers plenty of additional options for gardeners interested in introducing/encouraging predators.
Companions: Bush beans ostensibly discourage Colorado Potato Beetle infestations, as do garlic, horseradish, “tansy, yarrow, and other Aster Family plants…”
I’ll start by hunting, doodling, and crushing. And then I’ll hustle up on installing our straw mulch (we’re WAY behind!) and adding some companion plants. Fingers crossed.
It’s Tanglefoot time again. Actually, we’re late — really late! — due to this rainy, soggy summer. But better late than never, especially since I’ve begun to spy the first tent caterpillars of the 2017 season.
First a quick refresher. A little over a year ago I explained how to use Tanglefoot and I explained why holistic orcharding benefits from this goopy ritual.
It’s a messy installation process, but it seems to work pretty well… Applying Tanglefoot to fruit trees a messy but relatively straightforward task. Better instructors have already explained application, so I’ll defer to their able guidance rather than overlook something important. (Source: How to Use Tanglefoot (And Why Fruit Trees Need It))
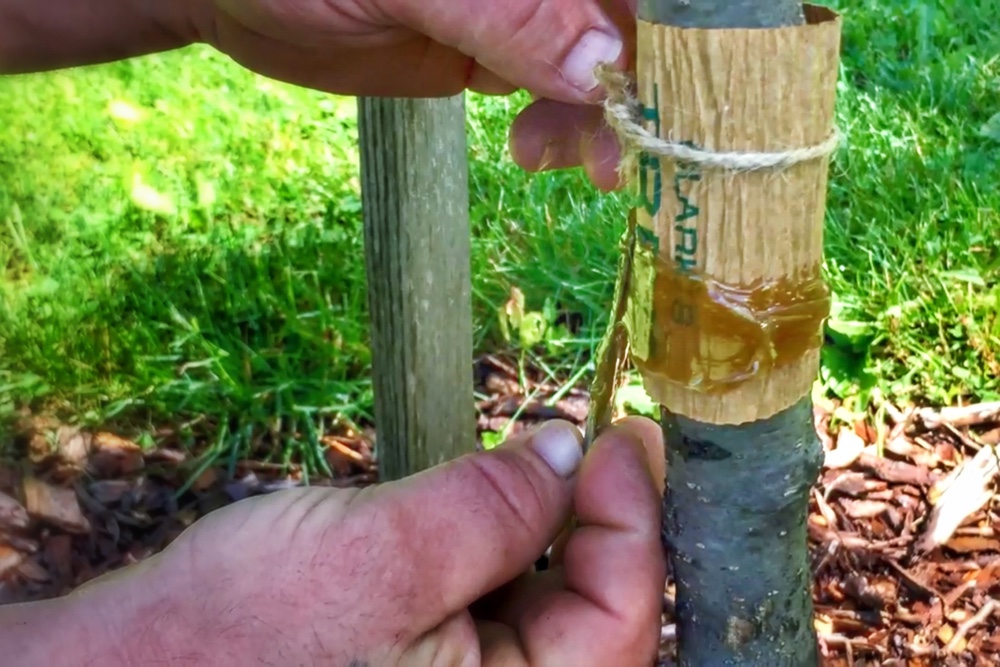
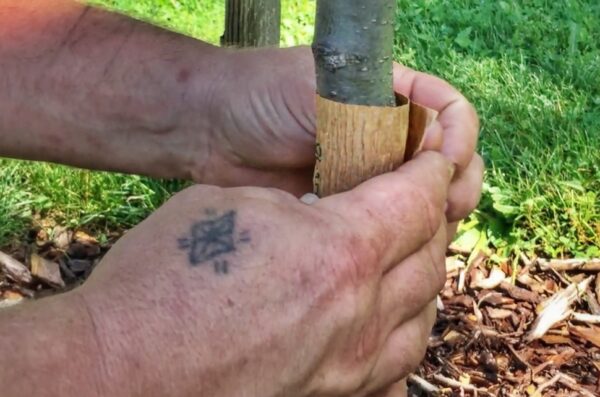
That post includes the excellent advice of “better instructors”, but I wanted to follow up with a quick visual instructional to show you how to apply Tanglefoot. Consider it a supplement. Quick tips.
How to Apply Tanglefoot (Source: Geo Davis)
How to Apply Tanglefoot
In the previous post I discuss using plastic film to wrap the tree trunk, but four years into our Tanglefoot adventure, we’re still using paper/cardboard wraps like in the photo above. It’s simple, quick, biodegradable, and it seems to work perfectly. And it’s a little less plastic to use and put into a landfill!
After securing the cardboard wrap with a piece of hemp twine, the only challenge is to sear Tanglefoot around the circumference of the tree without getting it all over your hands…
Following is a quick video / slide show intended for orchardists, fruit tree hobbyists, or basically anybody who wants quick and easy instruction for how to apply Tanglefoot on young (i.e. slender trunk) trees. Many thanks to Jacob for letting me photograph his hands during installation.
I hope you find the video helpful. We’ve been extremely satisfied with the results year-after-year, and we’re happy to recommend Tanglefoot (and confident in our recommendation) for other fruit tree growers. And if you’re looking for a little broader perspective on why we use and recommend this somewhat unconventional pest prevention solution in our organic orchard, definitely check out my post, “How to Use Tanglefoot (And Why Fruit Trees Need It)“. I’m confident you’ll be pleased with the results. Good luck!
I missed my mark — Earth Day, April 22, 2023 — with this post extolling the poetry of earth. It was germinal then, and it remains germinal today (albeit marginally more mature?)
Sometimes a seed germinates with exuberance, practically exploding into existence as if overcome with the glory of imminent bloom and fruit. Other times a seed lingers dormant — cautious or reticent or simply, inexplicably vigorless — for so long that its potential is overlooked, obscured by the foliage and flowers and harvest of its neighbors.
And through it all nature’s song endures. Just when we are lulled into torpid tranquility it swells in symphonic crescendo.
“The poetry of earth is never dead.” — John Keats, “On the Grasshopper and Cricket” (Source: Poetry Foundation)
Poetry of Earth, May 2, 2010 (Photo: Geo Davis)
Often a blog post is sketched out with a few simple strokes that distill the essence for what I expect to write about. A mini map yo I de ate my route. As I develop the post, filling in the voids, perhaps adding texture and color and context, I approach the anticipated narrative scope. Upon arriving at my destination I publish and share. But exploring a preliminary sketch or fleshing out a rough outline sometimes occasionally renders surprises. Wayward adventures lurk in the most unlikely places. I plan to take journey A, but I end up taking journey B.
And then there are the posts that linger dormant. A seed is planted, but it doesn’t leap to life. Perhaps the ground is still too cold, the earth isn’t sufficiently fertile, or the rain and sun remain elusive. A sketch, an outline, a map. Perhaps even a journey — or several journeys — but they are abbreviated and fruitless. False starts.
It is wise on these occasions to move on. Maybe circle back in the future. Try again. Or compost the effort that it might fertilize another seed. For this is the wisdom of nature and the gardener. This is the poetry of earth.
My mind meanders from Pollyanna printemps — nature reaching and bursting, reinvigorating all that withered and laid dormant these frosty days and nights of winter — to autumn’s harvest. Symphonic crescendo and resounding applause. Such success and such succession. Sweet reward and bitter decline. Decadence and decay.
This seasonal swan song’s poignance is the marriage of expiry and infinity, waning and immortality.
As when winter succumbs
to spring’s tender caresses,
thawing and refreezing,
thawing and refreezing,
melting into muddy mess,
then gathering composure,
turning etiolated
tendril toward the sun
begins to warm, to green,
toward foliage and
flower and fruit and… fall.
The poetry of earth is a consoling refrain. It is a reminder that beginnings end and endings seed new beginnings. Out of the mud, a sprout. From the sprout a life full of wonder and another generation of seeds.
“The poetry of earth is ceasing never…” — John Keats, “On the Grasshopper and Cricket” (Source: Poetry Foundation)
Keats’ poem delivers where I have come up short. Perhaps grasshoppers and crickets and birds lend themselves more willingly to the poetry of nature. Perhaps not. Perhaps this still muddled effort is destined for the compost where it’s decomposition will enrich a subsequent effort to compose this song of seasonality that so far eludes me. To convey the tragic beauty, and the profoundly consoling inspiration of the poetry of nature…
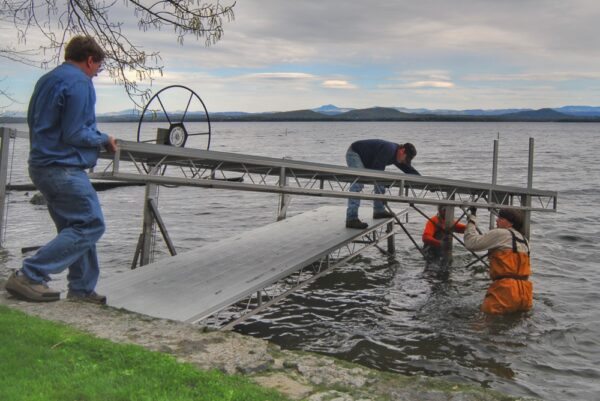
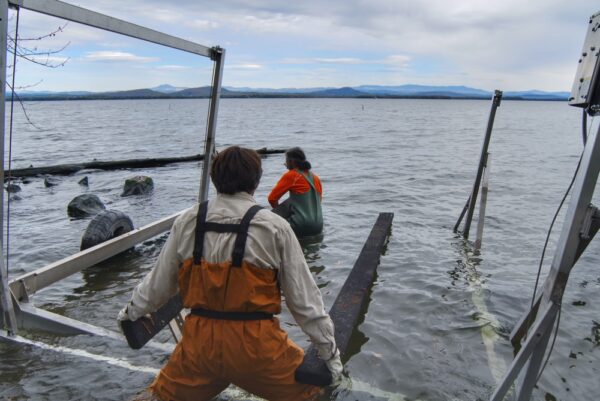
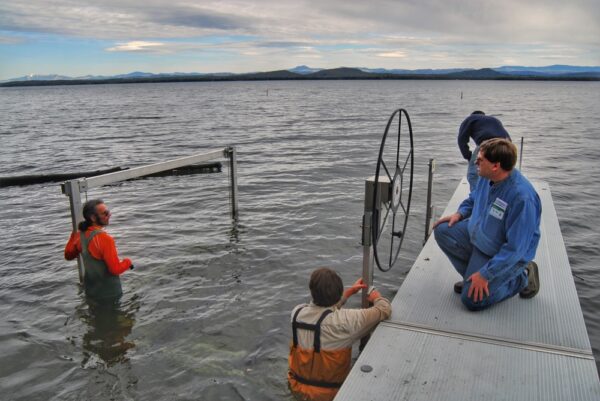
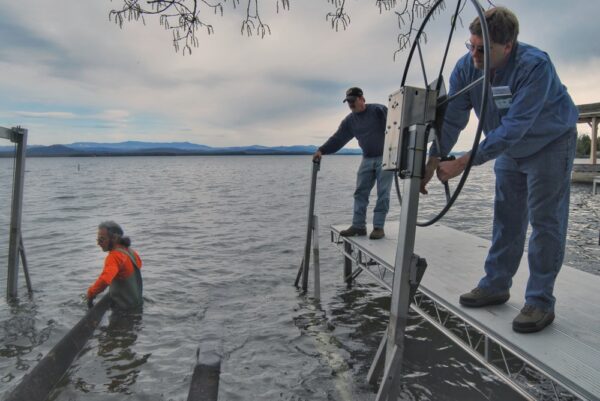
This morning my friend, Mark, sent me a photo snapped exactly thirteen years ago (where does the time go?!?!) after we launched the dock and boat lift for the start of the boating season. In addition to a timely hint that spring is starting to flirt with summer — a meta metronomic rhythm reminder, if you will — another note struck me: friendship is the common denominator in so many of our Rosslyn memories. So at its core, this “photo essay” flash back thirteen lucky years ago is a meditation on seasonality and friendship.
Installing Dock with Tom and Griffin on April 30, 2010 (Photo: Susan Bacot-Davis)
Dock & Friends
Rosslyn seasonality is a year-round singalong, the metronomic melody I suggested above. Highest water level. Lowest water level. Docks and boat lift in. Docks and boat lift out. The photos in this post tell the springtime refrain of Rosslyn’s waterfront singalong, or at least part of it. The other is the voices joining in the singalong.
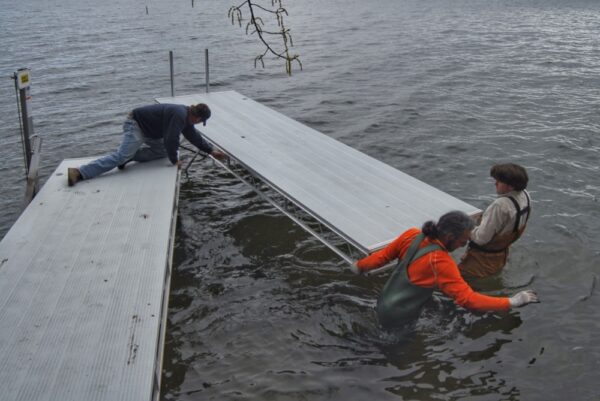
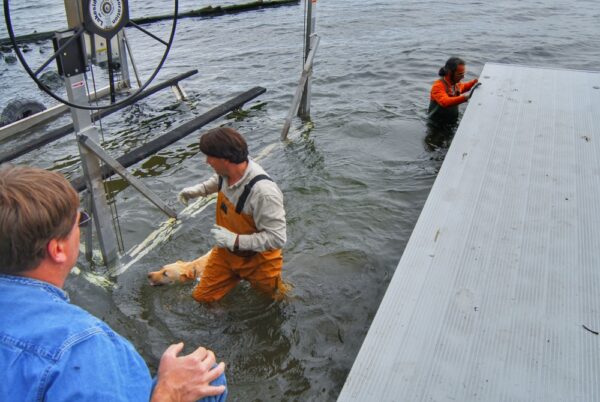
Installing Dock with Doug and Mark on April 30, 2010 (Photo: Susan Bacot-Davis)
The inspiration for today’s post, a retrospective photograph texted to me by Mark, sent me digging deep into my photo history. I pulled up the photos that Susan had snapped thirteen years ago while we were readying the waterfront for an incoming boating season.
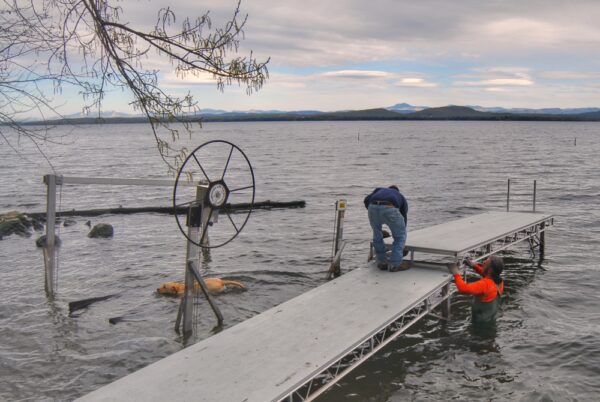
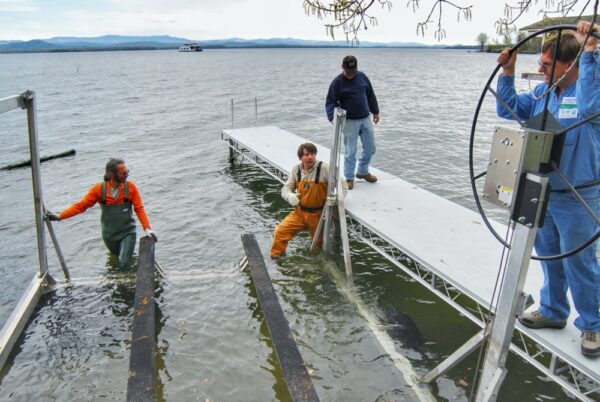
Installing Dock on April 30, 2010 (Photo: Susan Bacot-Davis)
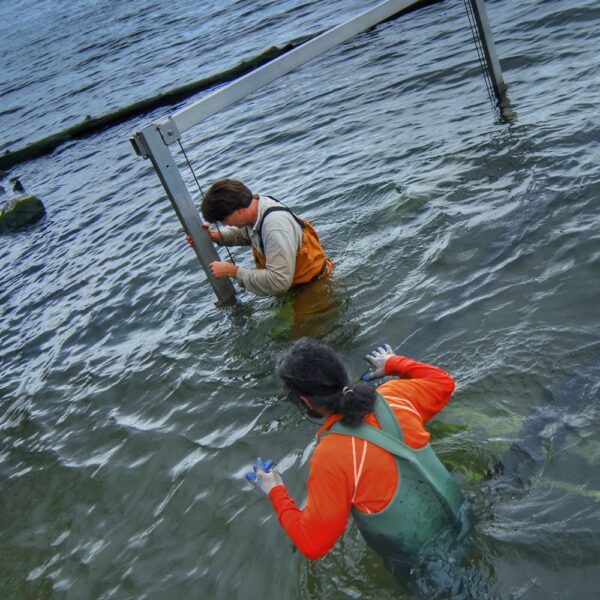
Upon locating these images I was struck far less with the docks and the boat lift and much more with the three friends braving the cold lake on an inclement day to help us get ready for months of boating, waterskiing, etc.
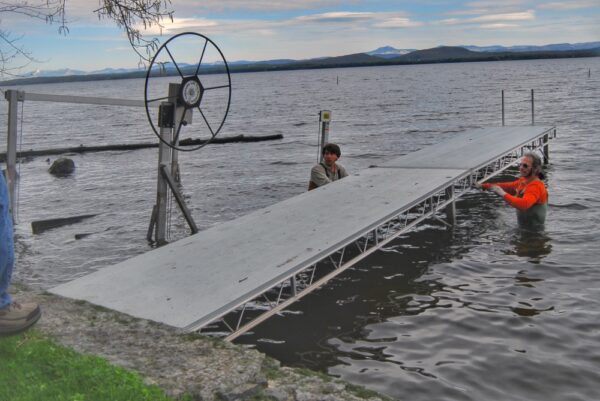
Installing Dock with Mark, Tom, and Doug on April 30, 2010 (Photo: Susan Bacot-Davis)
While I couldn’t ignore the fact that peeling a decade and change off our faces and physiques made me nostalgic for younger days, the more poignant sensation was of gratitude for the camaraderie.
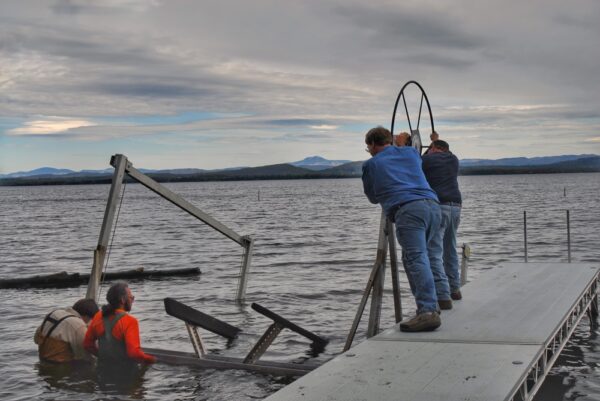
Installing Dock with Doug and Tom on April 30, 2010 (Photo: Susan Bacot-Davis)
Mark Englehardt, Tom Duca, and Doug Decker, I thank you. These fuzzy old photos trigger a great gusher of gratitude to you three. Yes, there’s gratitude aplenty for you waterfront assistance. Plenty! We couldn’t enjoy much of our Rosslyn lifestyle without the generous participation of so many. But there’s also something even more fundamental. Friendship. Rosslyn has, since our earliest days, been interwoven with a wondrous web of friendships.
Installing Dock with Doug, Tom and Griffin on April 30, 2010 (Photo: Susan Bacot-Davis)
Over the past year that I’ve been revisiting our almost seventeen years at Rosslyn it’s become abundantly obvious that first and foremost this place is a nexus of friendships, memories made, and memories still-to-be-made. Rosslyn is so much more that bricks and mortar, beach and meadows, gardens and orchard. Rosslyn is connectedness, relationships, people, stories,…
Installing Dock with Tom on April 30, 2010 (Photo: Susan Bacot-Davis)
The photos so far, a 2010 dock launch “documentary” of sorts, are interspersed with stream of consciousness notes that, upon rereading, are more gush than good. Unfiltered. Unedited. And perhaps a little over the top. Perhaps. But I’m going to leave them. For now at least.
And I’ll get out of the way as we shift from dock to boat lift.
Boat Lift & Friends
Here’s the photo essay I promised at the outset (sans the sentimental soul dump that infiltrated the preceding. Thanks for your forbearance!)
Installing Boat Lift with Tom, April 30, 2010 (Photo: Susan Bacot-Davis)Installing Boat Lift with Mark, Tom, and Carley on April 30, 2010 (Photo: Susan Bacot-Davis)Installing Boat Lift with Mark, Tom, and Doug on April 30, 2010 (Photo: Susan Bacot-Davis)Installing Boat Lift with Mark, Tom, and Doug on April 30, 2010 (Photo: Susan Bacot-Davis)Installing Boat Lift with Mark, Tom, and Doug on April 30, 2010 (Photo: Susan Bacot-Davis)Installing Boat Lift with Mark, Tom, and Doug on April 30, 2010 (Photo: Susan Bacot-Davis)Installing Boat Lift with Mark, Tom, and Doug on April 30, 2010 (Photo: Susan Bacot-Davis)Installing Boat Lift with Mark, Tom, and Doug on April 30, 2010 (Photo: Susan Bacot-Davis)Geo and Tom Installing Boat Lift, April 30, 2010 (Photo: Susan Bacot-Davis)
Acknowledgements
Thank you, Mark, Tom, and Doug. Thank you, Griffin, who made several appearances in these photos. We still miss you. And thank you, Rosslyn, for continuing to connect amazing people (and dogs!)
Daybreak: Lake Champlain sunrise through “wavy glass” in late August, summertime slipping through the hourglass. (Source: Geo Davis)
Since my earliest Rosslyn intrigue, wondering if the house and property might one day become a home for us, daybreak was my fixation. Perhaps it was just my lifelong affinity for early morning. As an early riser dawn has long been my favorite time of time, a world of possibility… Perhaps it was just curiosity what Rosslyn would feel like, look like, wandering room-to-room early in the morning. Although the front hallway was still in decidedly unfinished condition when we first visited, I imagined the walls painted a pale yellow, transporting the sunrise inside, warming the house with the brightening day.
Daybreak Discernment
This summer has been marked with singularly spectacular sunrises (and sunsets), and I’ve written much and often about these liminal states. This morning, however, catching sight of daybreak through wavy glass in the front parlor, I was struck concurrently with two thoughts.
The wave-rippled surface of Lake Champlain was refracting dawn’s beacon, distorting the beam of fiery orange sunlight into a row of burning “puddles” that wavy glass in the parlor windows was further altering into a dancing mirage. Searing reality transformed into a optical illusion. I was reminded that Rosslyn has often altered my way of seeing and experiencing.
These summer days are filtering faster and faster from anticipation to happening to memories. Just as the fleeting illusion of fiery puddles or bonfires or — pushing possibility to it’s breaking point — fiery cairns guided my eye to the rising sun, wobbling up out of Vermont’s Green Mountains like some hallucination, almost as quickly mellowing to a buttery yellow before vanishing altogether in the cloud bank above, just as quickly this summer is reaching its conclusion.
And these bittersweet realizations, as if coupling and procreating, gave birth to a daybreak haiku.
A window view early on a Sunday morning. A blazing daybreak. Wavy lake and wavy glass. Near, familiar silhouettes framing a veritable mirage. Dawn within. Dawn without.


")
")


")
")

")
")
")
")


")