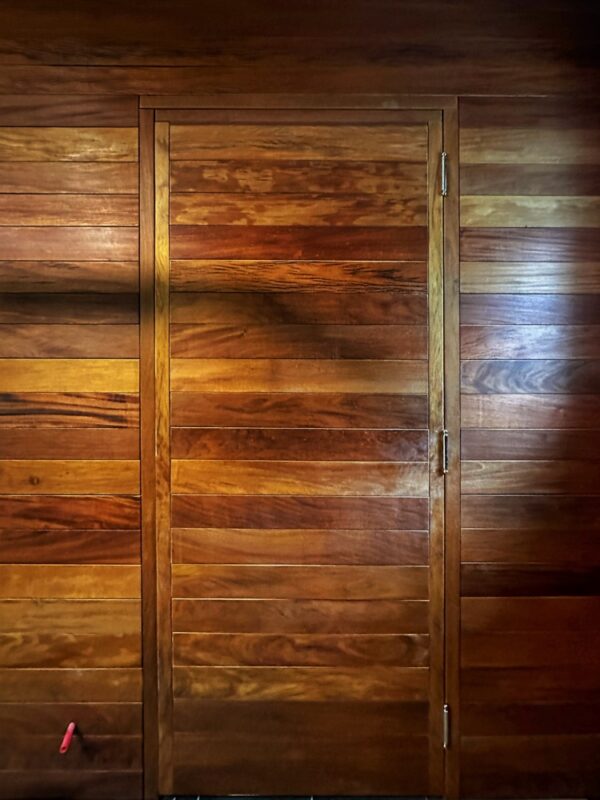
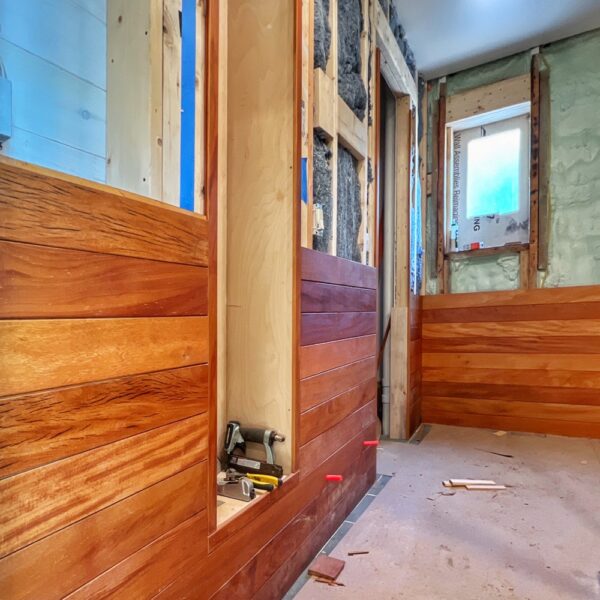
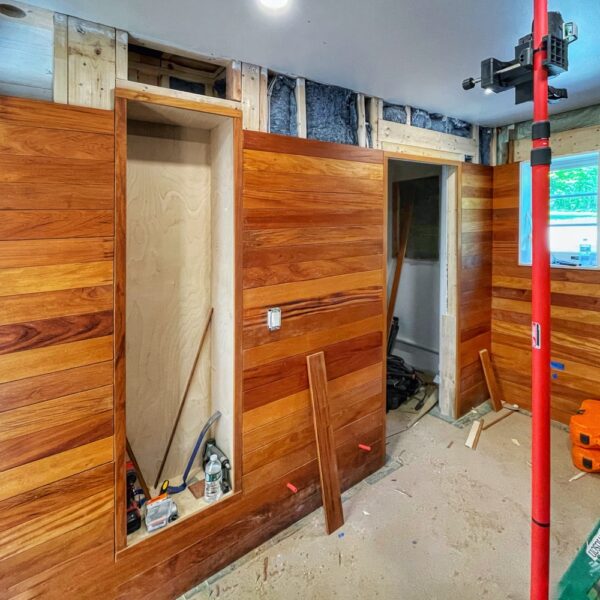
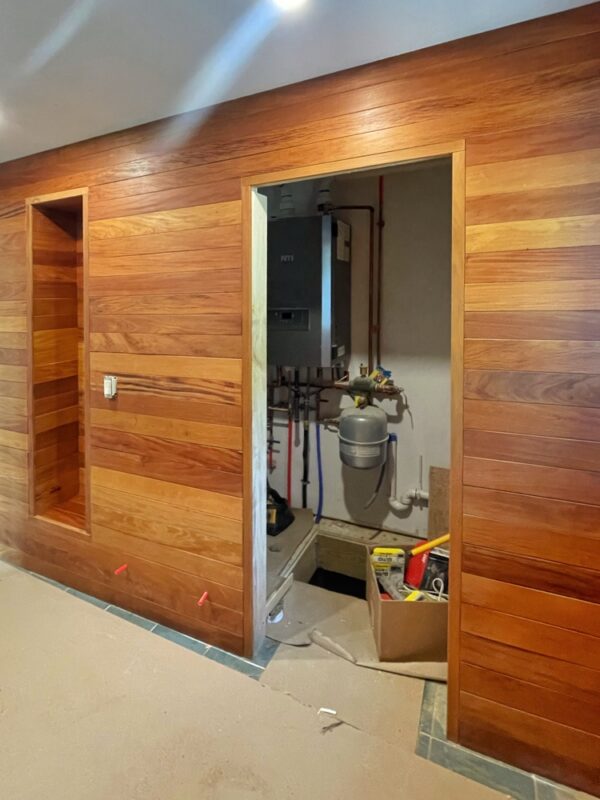
For such a small scope of work, the icehouse rehabilitation has included some remarkably creative one-offs. The garapa door is one such project: a challenging initiative to upcycle reclaimed garapa decking from Rosslyn’s house deck into a minimalist mechanical room door perfectly camouflaged into tbe bathroom walls.
Today I can report that it’s been a triumph!
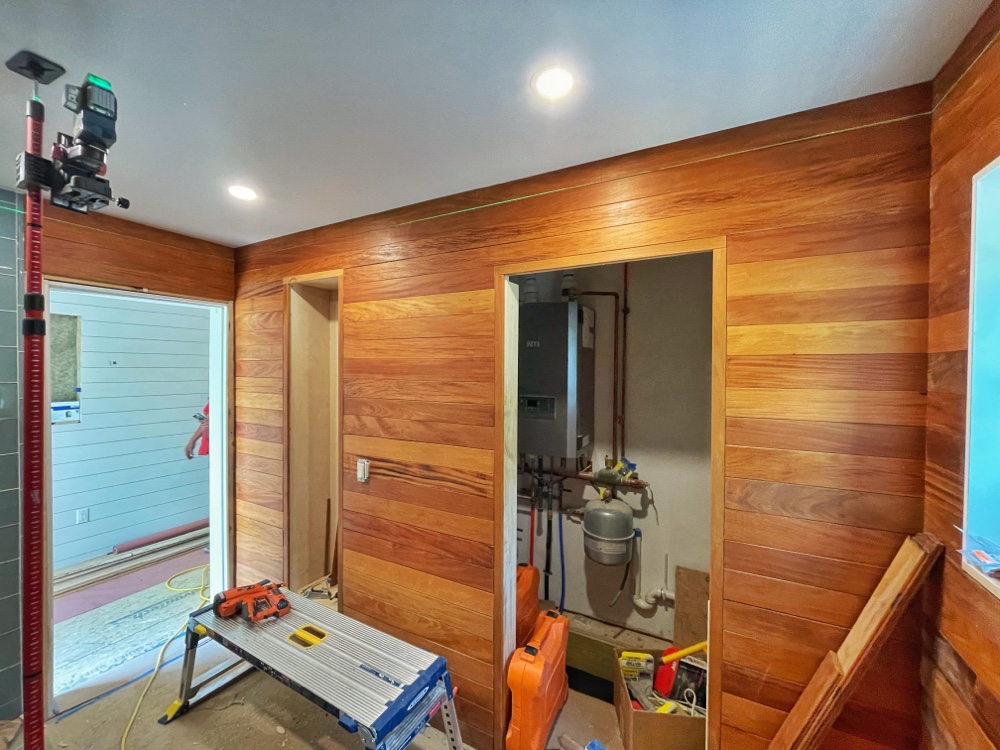
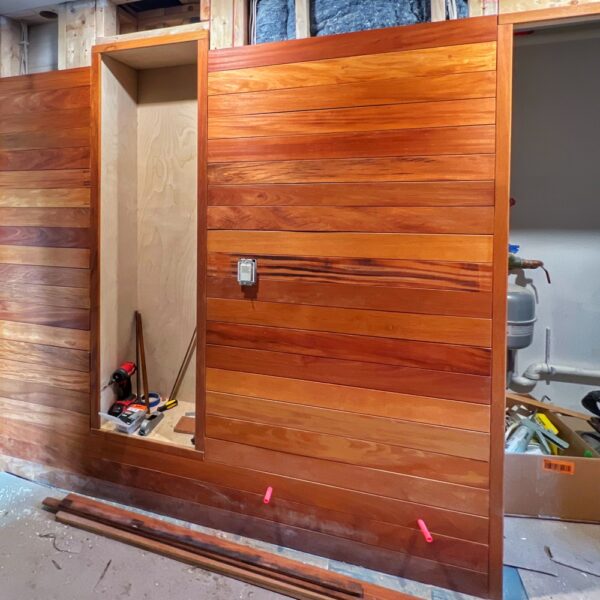
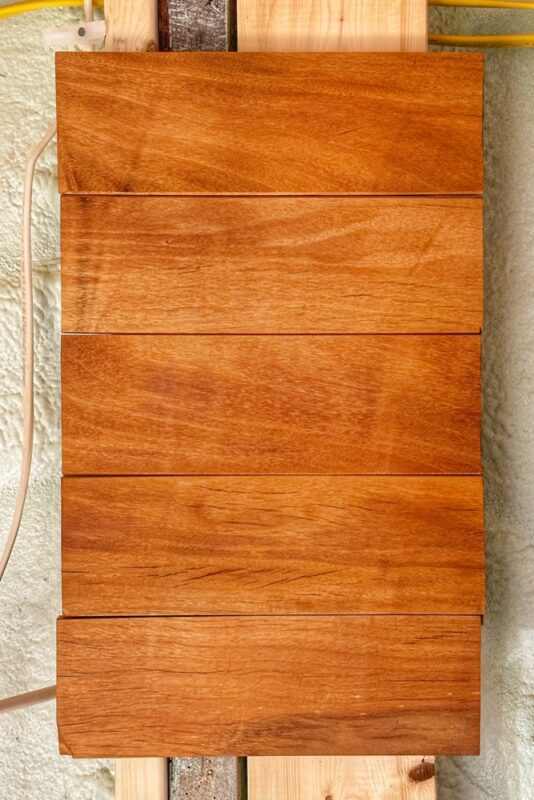
Garapa Door (Photo: Geo Davis)
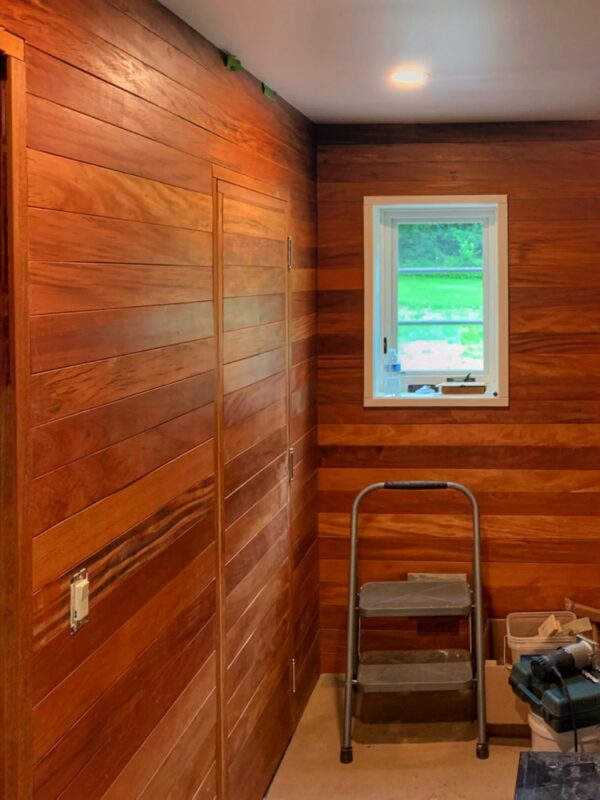
Dramatic lighting sure brings the oiled garapa to life! Amber grained, horizontal continuity, just barely framed, an intriguing section of the wall that will allow discrete access to the mechanicals. Polished nickel hinges and passage set, but nominal attention drawing exception to the otherwise seamless expanse of repurposed garapa.
Garapa Door (Photo: R.P. Murphy)
I’ll update with a photo once the rest of the hardware is installed…
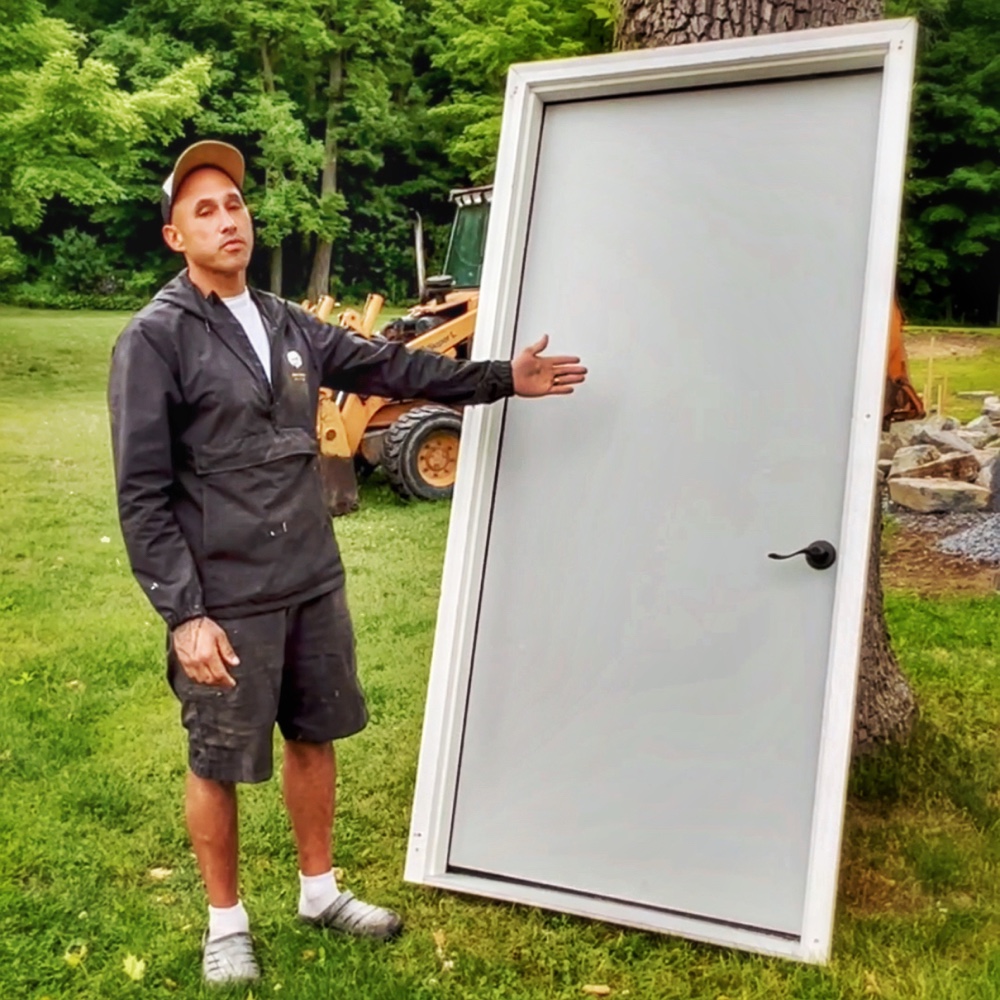
After months of icehouse rehabilitation, this door is no longer needed. But it still has plenty of life left in it. Given Tony’s commitment to this project since day one, it feels especially appropriate that he’ll be able to re-home this ready-to-hang door. Architectural salvage with an individualized backstory!
Re-Homing & Reusing
Baked into the icehouse rehab (and sooo much of our +/-17 year love affair with Rosslyn) is the inclination to salvage and rehabilitate, to recycle and upcycle, to repurpose and reuse. Whether the old piano we discovered in the carriage barn or the stone cistern/cesspool that was disinterred during replanting of an evergreen hedge last summer, we’ve been keen to reimagine obsolete and abandoned artifacts in new, useful ways.
Do you remember this?
We’re hoping to “re-home” our AMT 626 John Deere “truckling”… While… a reliable workhorse since, well, since forever (1990-ish, maybe?!?!) it’s old enough that we’re not feeling like a sale is the right option. We’re less interested in trading it for your hard earned loot and more interested in finding the best next chapter for this handsome beast of burden. Who can offer the most idyllic retirement (gentle work, lots of love, and maybe a nice nickname?) for this decades’ old John Deere? (Source: Re-Homing John Deere AMT 626)
Here’s a quick attempt to explain one of the many inclinations for our reuse commitment.
So much of our good fortune as Rosslyn’s stewards has been inherited from generations before us. Responsible ownership, conscientious preservation, and magnanimous spirits account for the life we’ve enjoyed on this property. We endeavor to follow in that tradition… (Source: Re-Homing John Deere AMT 626)
In other words, Rosslyn has tutored us in the merits of conservation and preservation, rehabilitation and reinvention, generosity and sharing. That this temporary means to secure and insulate access during our icehouse rehab will now be re-employed year round at Tony’s home is an apt destiny for this door.
More Re-Homing Soon…
Please note that I will be announcing additional re-homing opportunities in the weeks and months ahead. Are you interested?
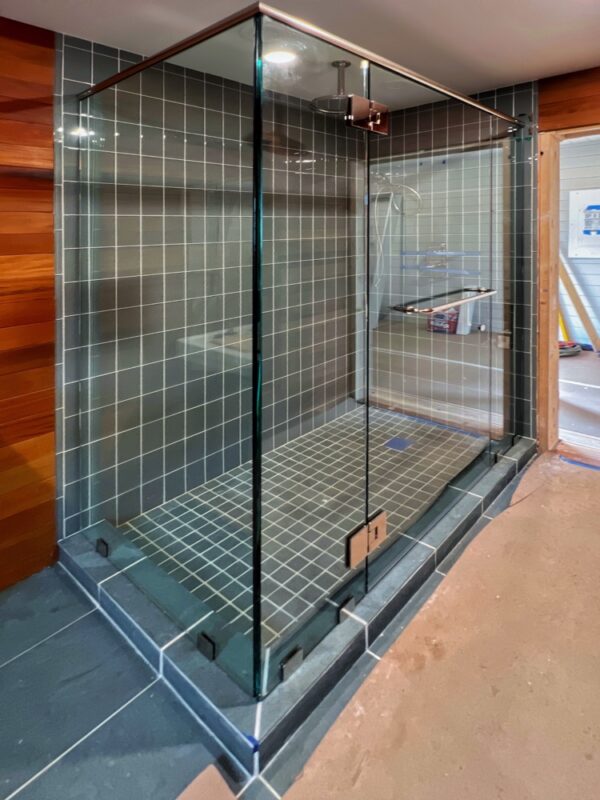
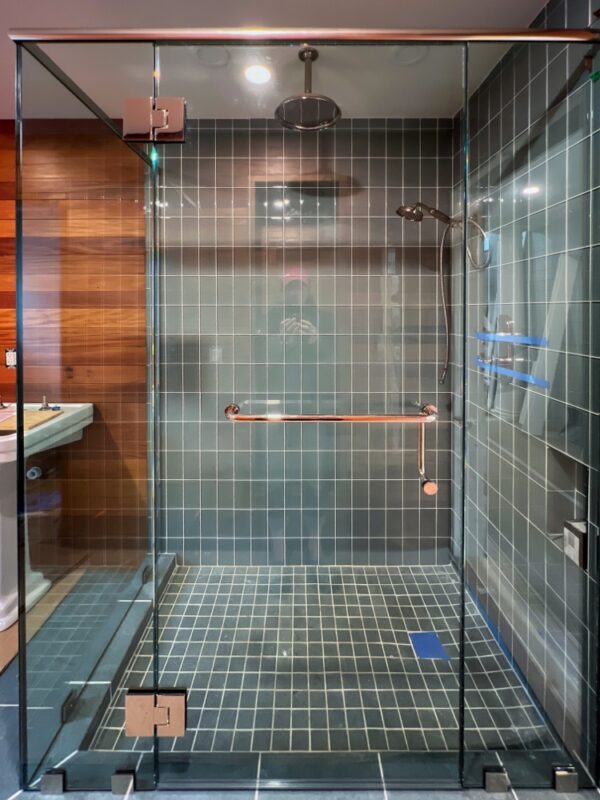
Another exciting, we’re-getting-close communiqué to share today: the glass shower enclosure in the icehouse bathroom has been installed. While these photographs may not do the shower justice (a little bit of perspective distortion, perhaps?), the progress is worth trumpeting because it represents one more notable stride toward completion.
The glass and polished nickel shower enclosure looks ample in the snapshot above. It’s not. The entire building is diminutive, and the bathroom is super compact. The shower? Even more so! But for now we’ll enjoy the exaggerated perspective, a little eye candy to balance the snug proportions of the *REAL* (ie. not distorted by the mysterious magic of digital photograph) glass shower enclosure.
The photo below provides greater verisimilitude, and it helps orient the pedestal sink adjacent to the shower, a sneak peek at the bathroom as it will appear once complete (if we can manage to photograph this small space without continuing to distort dimensions and proportions, a challenge when quarters are tight.
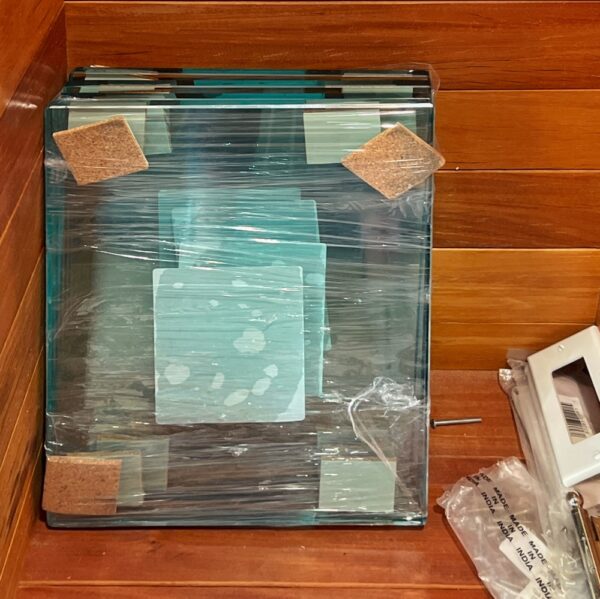
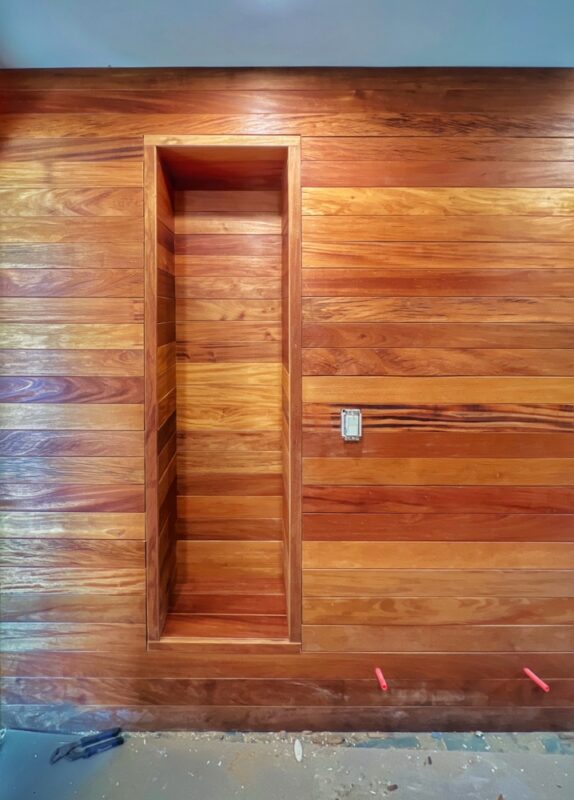
Speaking of glass and nickel, I requested that Superior Glass Company (who templated, fabricated, and installed the glass shower enclosure) match the shower enclosure’s 1/2” clear tempered glass and gently beveled edges with glass shelves that we’ll be floating inside the garapa niche. Here are the shelves, ready to install.
Glass Shelves for Niche (Photo: R.P. Murphy)
I’m still sourcing polished nickel pins (or similar shelf supports) albeit unfruitfully so far. Soon I’m hoping to locate minimalist hardware finished in polished nickel suitable to support these rather stout shelves. Proportion is important, and so far I’m only finding undersized pins…
Just over a week ago I posted a prologue to today’s garapa paneled bathroom update. I apologize if it felt a little half baked.
For just a little longer, I’ll keep you in suspense before I share photos of the now completed garapa installation. Remember, anticipation is half the pleasure! (Source: Garapa Paneled Bathroom, Pt. 1)
I wasn’t teasing out the update for the sake of suspense. I promise. And today’s post will hopefully offer some recompense for your patience. But there was a lot — a LOT — to pack into a single post, so I felt it more reasonable to subdivide it into a couple of installments.
I’m dividing this… update into two posts to fairly review and showcase a project that has taken the better part of a year from beginning to finish… (Source: Garapa Paneled Bathroom, Pt. 1)
Besides, I was about to head into the Gila Wilderness when Eric Crowningshield gave me the good news, and I simply couldn’t squeeze it all in before going off-line adventuring for a week sans connectivity, computer, etc.
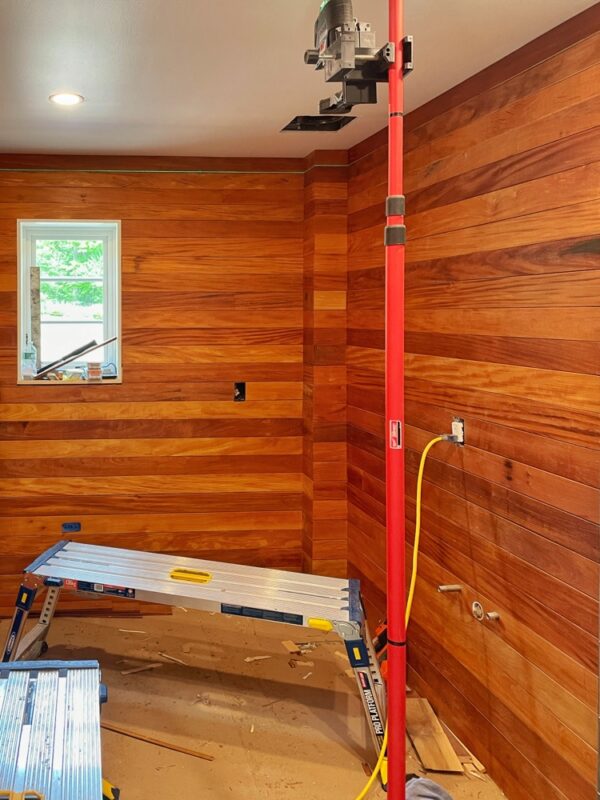
But now it’s time to celebrate completion of the icehouse bathroom’s garapa paneling, to showcase the photos, and to sing praises for the carpenter behind this monumental accomplishment.
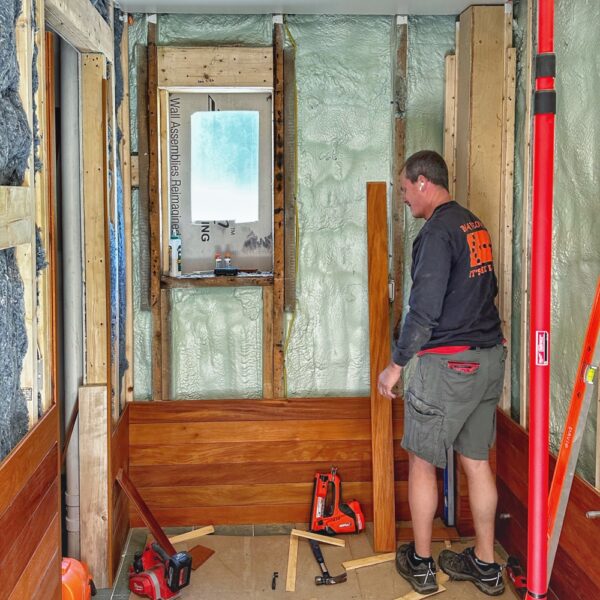
Eric Crowningshield Installing Garapa Paneling in Icehouse Bathroom (Photo: R.P. Murphy)
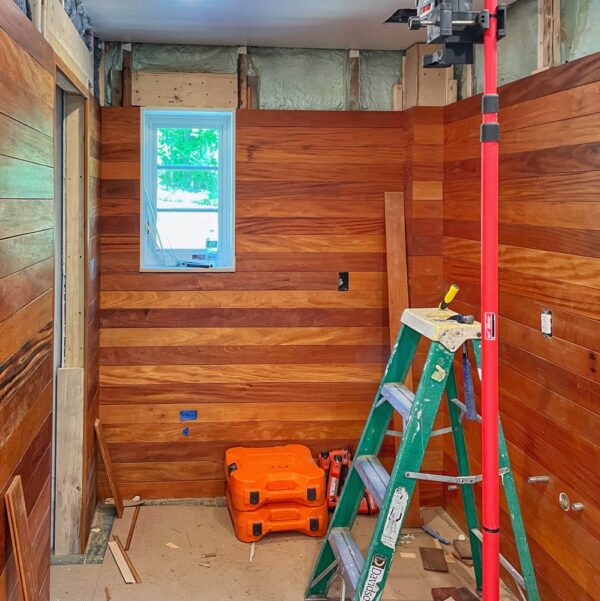
Garapa Paneling the Bathroom
Upcycling Rosslyn’s deconstructed garapa decking into interior paneling has occupied many members of the icehouse rehab team for months. It’s been a challenge. Every. Single. Step. From demo’ing the old deck (while painstakingly deconstructing, selecting, and grading the most reusable and aesthetically pleasing garapa) to troubleshooting, iterating, and finally re-fabricating the decrepit, timeworn decking into elegant interior finish material, this upcycling endeavor has been an epic quest. And the exacting preparation demanded even more exacting installation.
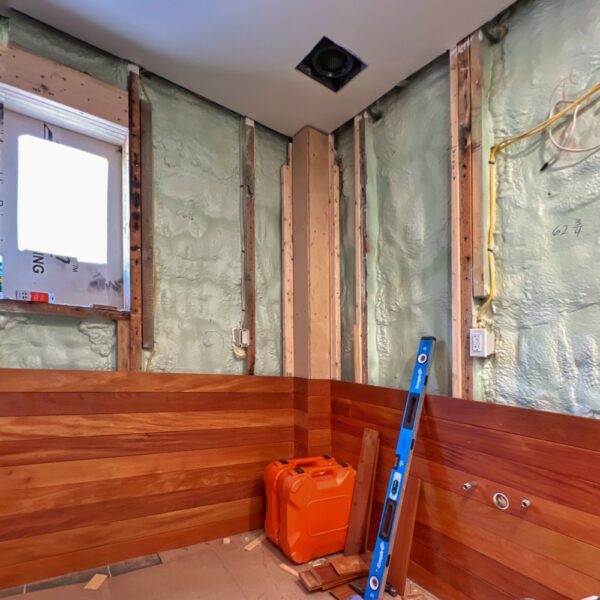
Garapa Paneling Progress in Icehouse Bathroom (Photo: R.P. Murphy)
Today we celebrate Eric’s conscientious carpentry and dogged determination, shepherding the garapa paneling to its exquisite completion! (It’s worth noting that Matt Sayward assisted in the early stages of installation, but Eric soon took ownership of the project to ensure 100% consistency.)
Garapa Paneling Progress in Icehouse Bathroom (Photo: R.P. Murphy)
The following excerpts and photos offer an interesting perspective as Eric worked through installation of the garapa paneling.
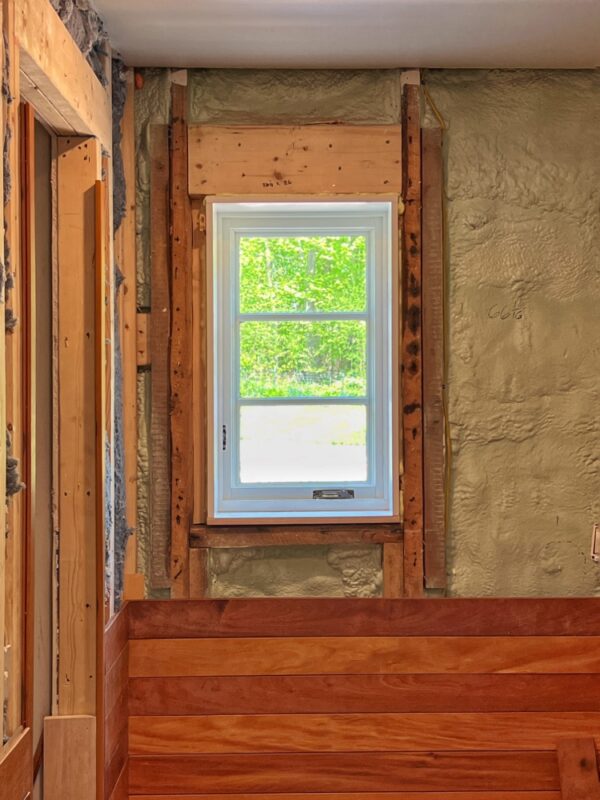
Garapa Paneling Progress in Icehouse Bathroom (Photo: R.P. Murphy)
It should go a little quicker now with the breaks in the runs [and] not needing to lineup 4 miters in one location. Nothing about this is easy but my gosh probably one of the most rewarding project thus far… — Eric Crowningshield
Garapa Paneling Progress in Icehouse Bathroom (Photo: Eric Crowningshield)
On the left side of this door it is 3-1/8” from the inside of the door jam to the tile. Do we not put garapa and run a 3” trim around the jam leaving a 1/8” reveal? On the other side we only have about 2”, so I’m guessing it may look odd with wider trim on the left and top. — Eric Crowningshield
The best way to handle the garapa around the door is difficult to determine from afar. My suggestion is that you and Peter look at it together and come up with the best solution. We have some asymmetry to deal with. Tricky. — Geo Davis
I’m going to put horizontal pieces on the left side before trim because the trim on the other side is around 1 3/4” so I think it would look better keeping the same size around the door. — Eric Crowningshield
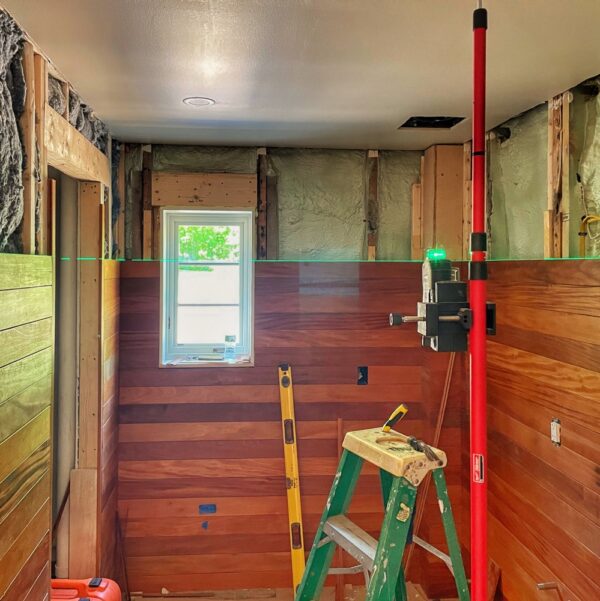
Garapa Paneling Progress in Icehouse Bathroom (Photo: R.P. Murphy)
I went down tonight for a few hours and ripped some [garapa] down to the same width so the last 4 rows will be the same. Otherwise we were going to end up with a 1” or so piece around the ceiling. I put another row of that up so only 3 rows left. — Eric Crowningshield
How much did you have to takeoff of each of the boards for the last four courses? Or, better question, how different will they be from the rest of the words? — Geo Davis
About 3/8 of an inch. The boards I put up throughout the whole wall ranged from 4” down to 3-5/8” and a few at 3-1/2”. I had 13” left so I was doing 3-1/4” for the last 4 rows. — Eric Crowningshield
Garapa Paneling Progress in Icehouse Bathroom (Photo: R.P. Murphy)
It is completed!!! I love saying that. — Eric Crowningshield
Superb! Congratulations, Erik. It really looks amazing. I hope you’re proud of the results. I know this has been an almost endless process from demoing the deck to installing the paneling, but a worthwhile adventure. Well done. Is everything wrapped up around the door as well? — Geo Davis
No, we are going to adjust the casing so it is the same size trim on each side. Yes, super excited about it and everything it means to you and the story behind it all! — Eric Crowningshield
Garapa Paneling Progress in Icehouse Bathroom (Photo: R.P. Murphy)
Bravo, Eric Crowningshield, for completing installation of the glorious garapa paneling in the icehouse bathroom. What a tour de force! It’s hard to believe that this is the same decking your team deconstructed from Rosslyn’s deck a year ago. Many months of brainstorming, experimenting, re-milling, oiling, and installing later this masterpiece is born. Hurrah! — Geo Davis
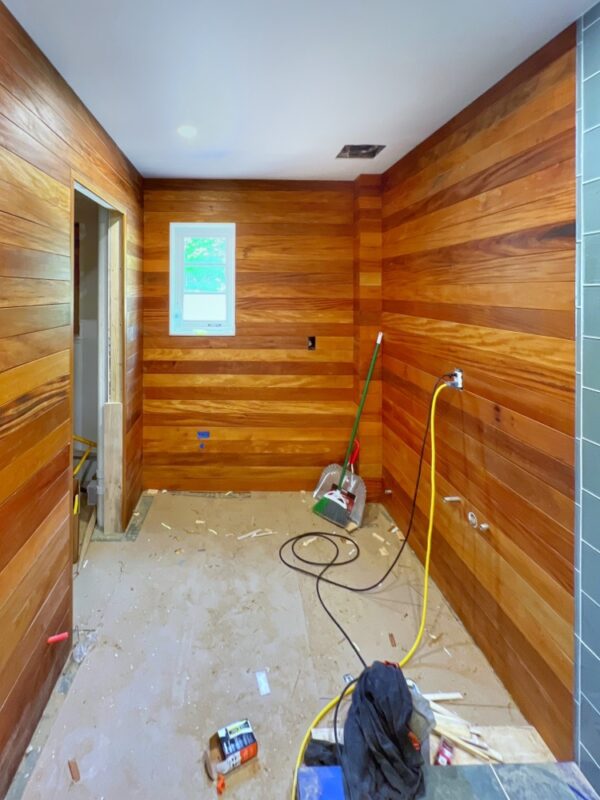
Garapa Paneled Bathroom (Photo: R.P. Murphy)
It was a task for sure, but the end result more than makes it worth the struggles. It is a must see in person although the pictures capture how amazing it looks, [though] it’s even more impressive in person! — Eric Crowningshield
Garapa Paneled Bathroom (Photo: Eric Crowningshield)
I forgot to tell you. I found one board with plugs still in it, so if you look close it is about midway up the wall between the utility and niche. A couple small ones in the niche as well. I thought that would be pretty cool to help tell the story about it being old decking. Wish I found more. — Eric Crowningshield
Garapa Paneled Bathroom (Photo: Eric Crowningshield)
Thanks for letting me know. I will hunt for them next time I’m back. Although you should’ve left it to see if I noticed! — Geo Davis
Garapa Paneled Bathroom (Photo: R.P. Murphy)
This subtle upcycling/repurposing souvenir isn’t quite discernible in the photo above, but it thrills me. Can’t wait to inspect in person!
Garapa Paneled Bathroom (Photo: R.P. Murphy)
I look forward to sharing more photographs of the icehouse bathroom as it approaches completion. It’s so close… Until then, I’d like to express my profound gratitude to Eric for transforming this vision into reality. What an extraordinary accomplishment!
Eureka! After many months of brainstorming, experimentation, painstakingly protracted preparation, troubleshooting, oiling, and meticulous installation, the garapa paneling in Rosslyn’s icehouse bathroom is complete. What a remarkable journey it’s been, and the final results are breathtaking.
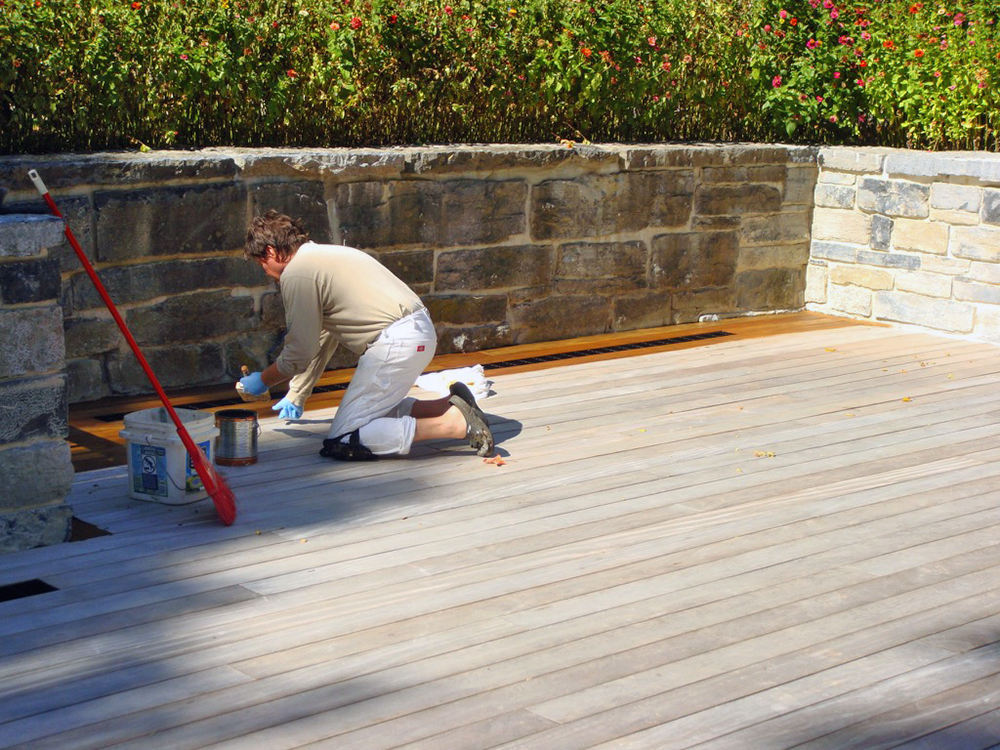
Wayne Oiling Deck in 2009 (Photo: Geo Davis)
Garapa Backstory
Our garapa backstory has its beginning waaayyy back when we built the original garapa deck on the west side of Rosslyn’s ell.
Let’s start by rewinding the timeline to 2008-9. Building the new deck and installing garapa decking was the proverbial caboose in a virtually endless train of construction that started in the summer of 2006. (Source: Garapa Decking 2008-2009)
A touch melodramatic, but the metaphor was (and is) 100% appropriate. It was nothing short of triumphant to finally complete the deck, a real and symbolic final frontier between construction site and comfortable home. It was a much anticipated extension of our indoor living space, a convenient way to access three entrances to the home, and a private exterior zone to dine and relax and entertain.
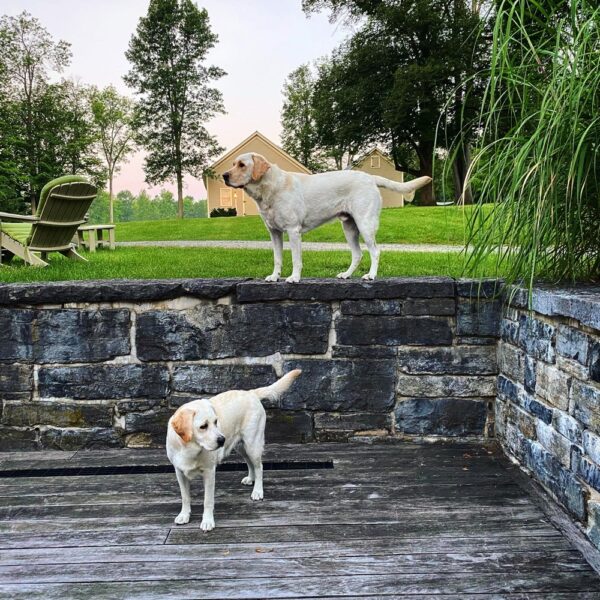
Carley & Bentley on Old Deck (Photo: Geo Davis)
Fast forward a couple of years, and the triumph began to tarnish.
Long story short, the original deck failed. Not the garapa decking which performed admirably year-after-year. But the substructure.
[…]
Rather than dwelling on the achilles heal that lamentably undermined the integrity of three critical substructures — Rosslyn’s house deck, boathouse gangway, and waterfront stairs — I’ll just say that all three experienced premature decay and rot of the structural lumber…
[…]
Because the substructures began rotting virtually immediately after construction, we spent a decade and a half chasing the problem, scabbing in new lumber, etc. But within the last few years the failure was beginning to outpace our ability to provide bandaids and we scheduled replacement. (Source: Deck Rebuild)
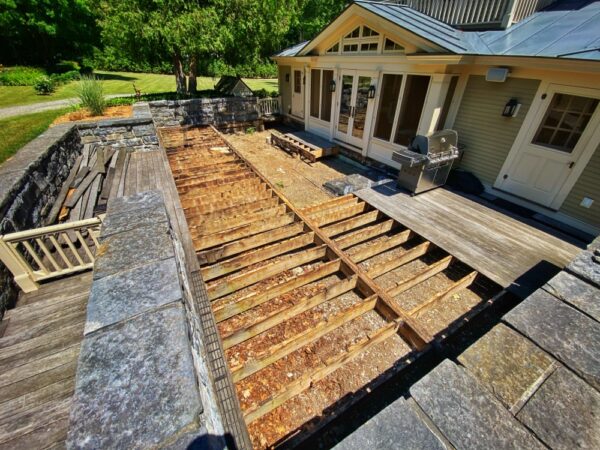
Carley Overseeing Demo of Old Deck (Photo: Geo Davis)
Eric Crowningshield’s team deconstructed much of the deck during the late spring of 2022. When Hroth Ottosen and David McCabe joined them at the beginning of the summer they determined that it was necessary to fully replace rather than repair the existing deck.
Old Deck Demolition (Photo: Geo Davis)
The deconstructed garapa was separated from the structural demolition debris, the highest grade (ergo most salvageable) material was graded, and the best preserved and most character-rich garapa was stored for repurposing in the icehouse rehab project. Then began a lengthy, painstaking upcycling journey.
We’ve been upcycling garapa decking from Rosslyn’s 2008-9 deck that we salvaged and laid aside this past summer. Spanning half a year so far — from deconstructing and culling reusable material midsummer to multiple experiments determining optimal dimensions for adaptive reuse as bathroom paneling — we’re now scaling up production and the results are impressive. (Source: Upcycling Garapa Decking)
By “multiple experiments” I mean empirically evaluating the most aesthetically pleasing, most practical, most installable, and most structurally durable form for the Garapa decking-turned-paneling. Yes, that’s a lot of *mosts* to undertake, but it’s not even the full scope of the challenge.
In addition to devising a perfect product, we needed to coordinate an upcycling process that could be undertaken successfully on site. No loading, trucking, unloading, offsite milling and finishing, reloading, trucking, unloading, storing, etc. It might have been more affordable, and it certainly would’ve been less time consuming, to outsource this project. But that would’ve shifted several variables:
Increasing carbon inputs would have been inconsistent with our reuse objectives.
Transferring oversight to a third party would have reduced our design supervision (while necessitating excess production to ensure sufficient quality during installation.)
Undertaking the upcycling process at Rosslyn allowed for agility and flexibility during the fabrication process, enabling the team to repeatedly test samples in the icehouse, catching small details that might otherwise have been discovered too late, making small alterations, etc.
And despite the inevitable strain (as well as the potential for setbacks) that crept into the equation by committing to on-site fabrication, tackling this challenge in house ensured maximum creative control, significant learning opportunities, rewarding problem solving scenarios, a personalized sense of ownership for those who participated in this project, and a heightened sense of accomplishment upon completion.
In short, upcycling our old garapa deck into the paneling that now distinguishes our icehouse bathroom was a vital, integral component of this adaptive reuse adventure. It was important to me that our team of makers and re-makers have the opportunity to invest themselves fully in this rehabilitation project, that each individual who verily toiled and trusted our vision experience a profound pride of ownership and accomplishment, and that the hyperlocal DNA of this two century old property be honored by favoring ingenuity and endurance over convenience.
From the outset several were intrigued with the potential for this salvaged lumber.
Hroth was an especially good sport, planing board after board and trimming the edges to determine what would work best. (Source: Upcycling Garapa Decking)
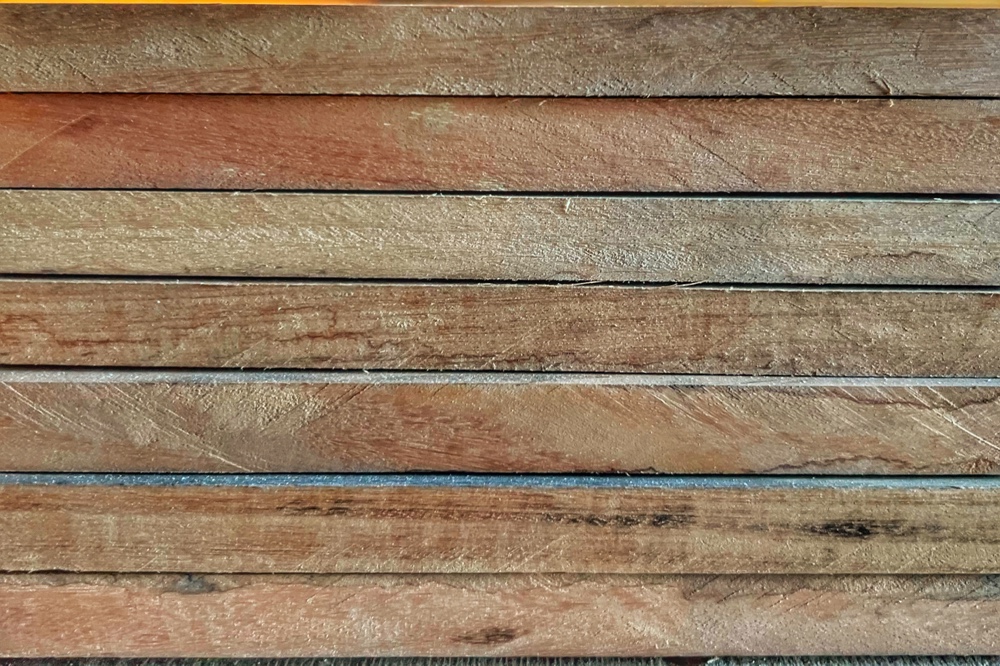
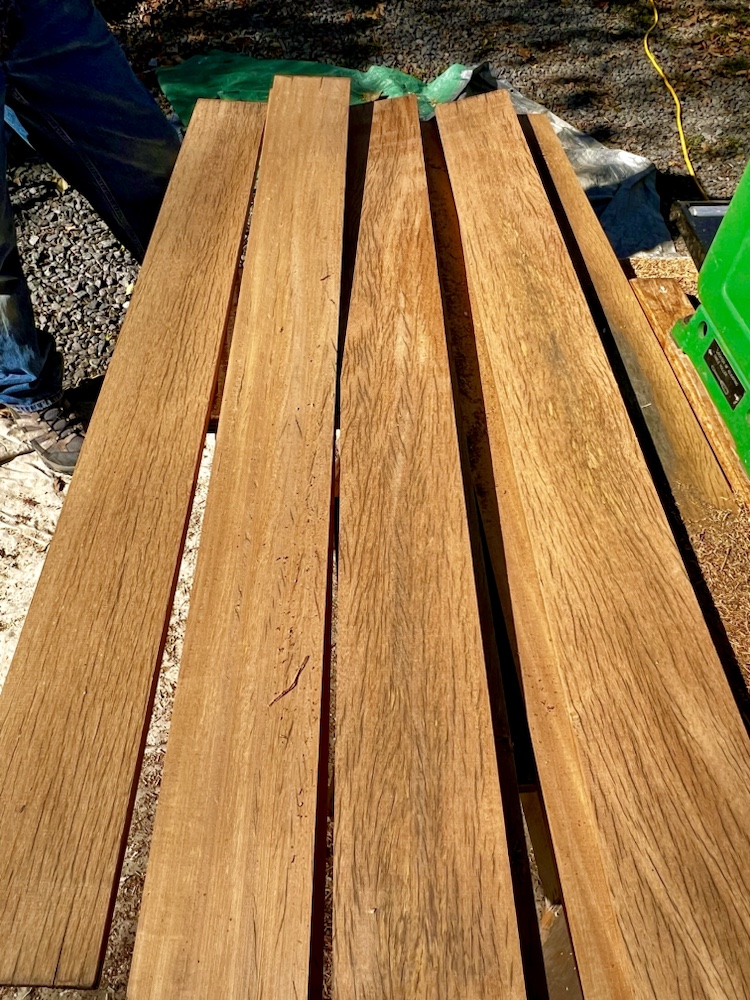
Upcycling Garapa (Photo: R.P. Murphy)
As the wear and tear of a decade and a half— heavy foot traffic, enthusiastic labrador retrievers, hardy North Country winters, group grilling and furniture dragging, wine spills and miscellaneous mementos from lots and lots of living — was gradually milled away, the garapa’s handsome heart began to re-emerge.
We have begun re-milling and re-planing garapa decking salvaged from Rosslyn’s summer 2022 deck rebuild. These sample boards are among the many weathered specimens carefully removed this spring and summer prior to rebuilding Rosslyn’s deck substructure and re-decking with new garapa. Hroth’s patient exploratory experimentation is the first phase in our effort to adaptively reuse this character-rich material in the icehouse. (Source: Upcycling Decking Debris)
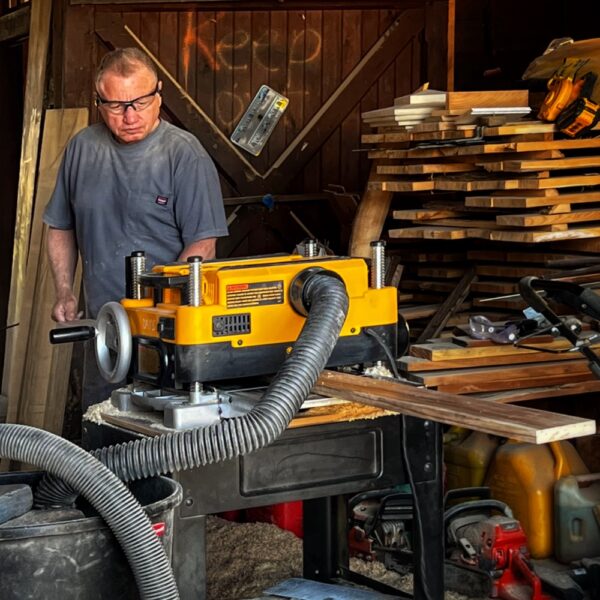
At last, Hroth perfected the prototype. He then developed a process, a repeatable protocol, for which we could standardize the results primarily relying upon a tablesaw and bench planer. Then he taught Tony how to reproduce the same results in sufficient quantity to panel the still unframed icehouse bathroom.
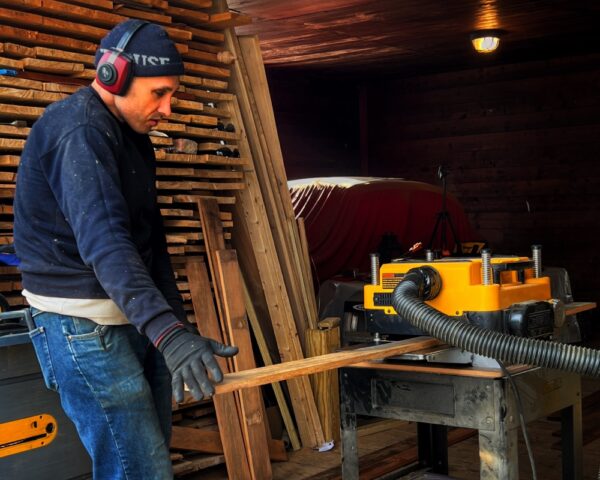
Tony Upcycling Garapa Decking (Photo: R.P. Murphy)
Tony is beavering away industriously… upcycling garapa decking into pristine planks for paneling.
[…]
It’s a slow and painstaking process that demands plenty of patience and focus, but… transforming debris into beautiful finish paneling will prove rewarding, for sure… Tony is even beginning to appreciate what magnificence he is bringing into existence. (Source: Upcycling Garapa Decking)
And so began a winter quest to reinvent debris as functional design-decor.
Time for a progress report on the garapa paneling that will soon embellish the icehouse bathroom. We started out gently easing the edges, but several iterations later we’ve settled on a full roundover. (Source: Garapa Roundover: Easing the Edge)
Months into this painstaking re-manufacturing process, several others had helped Tony from time to time, but there was no illusion. Tony had taken ownership of the garapa upcycling quest!
I joke with Tony that he’s investing lots of love into transforming this material. From debris to centerpiece… he’s literally been working and reworking [this upcycled garapa] since last September or October. That’s a LOT of love! (Source: Garapa Roundover: Easing the Edge)
By late winter Tony had finished planing (down to 9/16”) and dimensioning (down to 4”) the garapa decking. At almost a thousand linear feet we paused and reevaluated the quantity to be certain we would have sufficient usable material for the entire interior of the icehouse bathroom (walls, niche, and mechanical room door).
We revisited options for joining the paneling. To be fastened horizontally to the studs with concealed fasteners, joining the boards would be an important way to stabilize and visually address the gaps between boards. We considered tight lap joints and nickel gap lap joints, eventually settling on a nickel gap T&G type joint. But how best to accomplish this?
Peter’s solution for the ash and elm flooring seemed like our best option for the garapa paneling. We would create garapa splines that would fit into grooves in the sides of the paneling boards. If expansion and contraction (think visible gaps, between boards, etc.) weren’t an issue it might have been viable to just but the boards up against each other. But it’s a bathroom, so fluctuating humidity levels definitely needed to be factored into the equation. The splined joint would be a perfect solution.
And finally there was the question of edging. I wanted to ease the edges just enough to accentuate horizontal shadow lines (which stylistically echo the T&G nickel gap in the rest of interior) while deemphasizing dimensional disparity between boards. So a router joined the production protocol as Tony uniformly finished the visible edges of the paneling.
Garapa Edge Profiles v2.0 (Photo: Geo Davis)
And then there was the final step, oiling the garapa. As often, we turned to Bioshield Hard Oil for a hand rubbed, ecologically responsible finish. Eric’s team tackled the oiling, and the photo above gives you a preview of the garapa, edged and oiled. This was the final sample that we greenlighted before installation began.
And, for just a little longer, I’ll keep you in suspense before I share photos of the now completed garapa installation. Remember, anticipation is half the pleasure!
Installation of Garapa Paneling
I’ve dividing this monumental update into two posts to fairly review and showcase a project that has taken the better part of a year from beginning to finish. Thanks for your patience. I promise you that the photos you’ll witness soon, the finished bathroom paneling, will be worth the wait.
Child’s play, you say? Legos are a perfect proof of concept when it comes to children’s instinct to construct and then deconstruct, reuse instead of demolish.
Children intuitively understand adaptive reuse:
Legos teach reuse at a young age. You build, take apart and rebuild using the same pieces. You wouldn’t throw away your Legos would you? So why throw away your home’s valuable materials? (reusenetwork.org)
This quirky little video (published on Oct 30, 2009 by the Deconstruction & Reuse Network) is a clever reminder why we should practice more sustainable building and renovation. It’s not rocket science, folks. Reuse! The organization’s mission statement is:
We’re an environmental and humanitarian public benefit corporation, promoting and empowering deconstruction practices and the reuse of quality building materials 501(c)(3). (Source: Deconstruction & Reuse Network)
Too bad they’re in California! I wonder, is their an equivalent deconstruction, salvage, reconstruction, repurposing and/or reuse organization in our area? All tips welcome.
Rosslyn & Reuse
In the early months of Rosslyn’s historic rehabilitation, adaptive reuse was not only environmentally responsible (think green renovation and green building) and architecturally responsible (think preservation of historic heritage), it was also a sentimental inevitability. We inherited such a vast array of architectural salvage from the previous owners — installed and in-use in all four buildings, but also stored away in the carriage barn. Such treasures! We couldn’t even identify everything (mysterious artifacts surface all the time), but we suspected that some day, one day many of these items would serve us (and Rosslyn) well.
One of the items that we removed from the previous owner’s woodshed was a pair of Greek Revivalcolumns. They’re stored away in the carriage barn, hibernating, awaiting a creative reuse. Stay tuned for their next chapter. And, though most passersby are unaware, the flagpole mounted atop Rosslyn’s boathouse was once a sailboat mast!
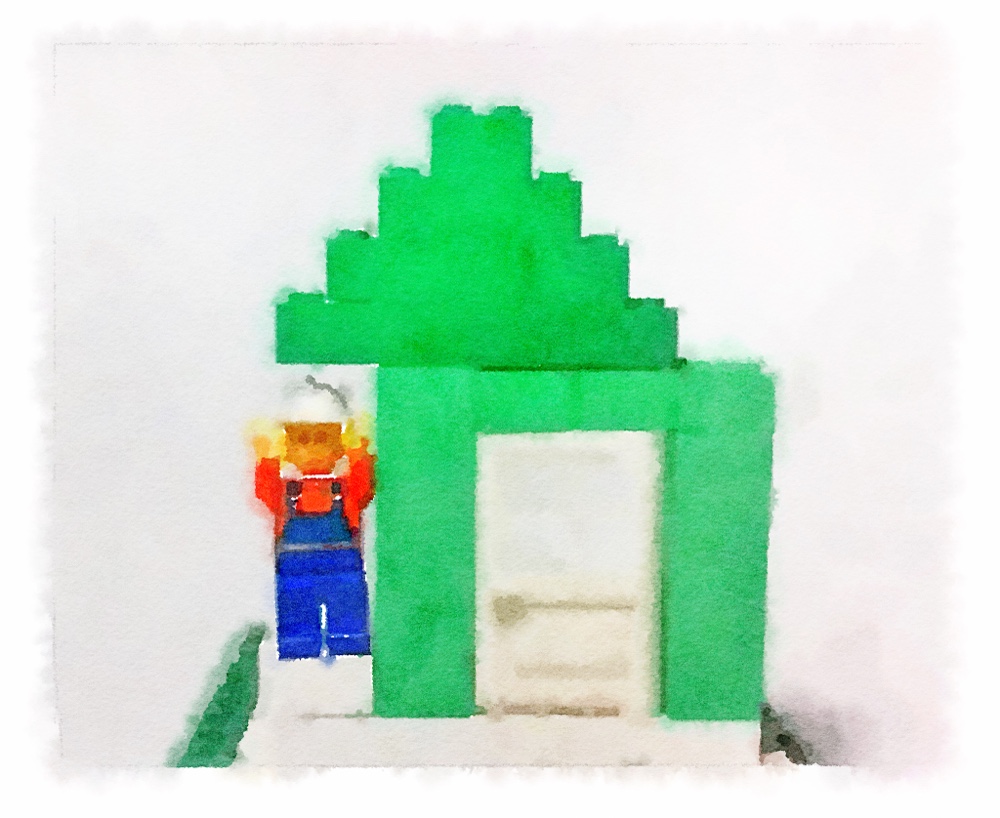
Reuse is Child’s Play: digital watercolor derived from a video still (Image: Geo Davis)
Legos & DIY
In addition to the handy look at deconstruction and reuse, I also like the video above because it uses Legos. Legos! So accessible, and for many of us, so familiar. This ubiquitous children’s toy is one of our first introductions to the DIY way of thinking, subtly exposing youngsters to the idea of making, encouraging experimentation (and occasional failure) as well as reminding us then when it’s all said and done we can just deconstruct our creation back into its pieces in order to make something new. This ethos guides so much of Susan and my interest in and aptitude for what we call “greenovation” (responsible remodeling). We were both “Do it myself” kids, and now we’re a couple of “Do it myself” adults (who still feel like kids!)
Carriage house horse stall door (Source: Geo Davis)
Horse Stall Haiku
Carriage house stall door, pockmarked, patinated, but hale, relates tenants past.
— Geo Davis
Wabi-sabi Horse Stall
Patina. Rust. Wear-and-tear. The horse stall door in the photograph above abounds in visible reminders of imperfection and impermanence. And yet beauty brims. The image, indeed the horse stall and the horse stall door themselves, exude warmth and comfort and reassurance. No frisky filly within. No stately stallion. Yet life has invested this space with memories and, as Donna Baribeau pointed out, “Authentic Beauty”. The bumps and bruises of horses and those who tend them are part of this carriage barn story. But for much of the last 200+ years that Rosslyn has presided over Merchant Row there were no carriages and no horses in this barn. The stables were repurposed for storing firewood, bicycles, lawn mowers, lumber, tools, children’s forts, and possibly briefly even as a bedroom (if firsthand accounts are accurate.) All of this, and more, has left marks and stories. All of this contributes to the wabi-sabi allure of this space (and this photograph of the space.)
In traditional Japanese aesthetics, wabi-sabi (侘寂) is a world view centered on the acceptance of transience and imperfection. The aesthetic is sometimes described as one of appreciating beauty that is “imperfect, impermanent, and incomplete” in nature… Characteristics of wabi-sabi aesthetics and principles include asymmetry, roughness, simplicity, economy, austerity, modesty, intimacy, and the appreciation of both natural objects and the forces of nature. (Source: Wikipedia)
Wabi-sabi is at the root of my attraction to time-worn buildings and artifacts. I consider aging utility buildings — barns, boathouses, ice houses, sugarshacks, etc. — to be at least as intriguing as old houses. More sometimes. So many relics, unselfconscious, candid. Less penchant for concealing, fewer makeovers, more concurrently present years and lives. Sometimes it’s the old, banged up subjects and objects that look the best. Thank goodness for that!
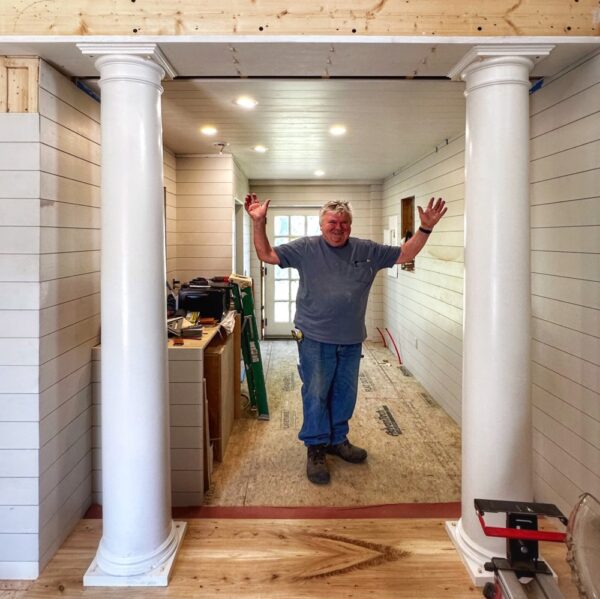
Tucked into the folds of the icehouse rehab scope of work some accomplishments stand out more than others. The garapa paneling in the bathroom, for example, has been a long, slooow labor of love many months in the making. Many stages and many hands have shaped this initiative, so anticipation has been building for many months. The column flanked vestibule (and the bookmatched ash threshold upon which they rest) is different. I’ll try to explain why this installation is momentous for me.
Justin Installing Columns (Photo: Geo Davis)
[Let’s start with the] architectural salvage [of]… Greek Revival columns that we salvaged from Rosslyn’s future dining room back in 2006 in the early days or our renovation project. (Source: Architectural Salvage: Repurposed Columns)
Icehouses didn’t historically rely upon columns for structural support, of course. They were utilitarian buildings purpose built to preserve ice cut from lakes, ponds, and rivers during winter to ensure access to ice (and cold storage) during more temperate seasons. Icehouse design was practical. Embellishments like Greek Revival columns would have been impractical, perhaps even frivolous.
But, needless to say, Rosslyn‘s icehouse rehabilitation is not an historic preservation project. It is an adaptive reuse project. It’s heart and soul is relevance to us today. Think dynamic, multipurpose, vibrant. Think simple and minimalist, but beautiful. Think inviting. Think whimsical. Straddling an unlikely divide — home office (though I prefer the connotations of study/studio) and recreation/entertaining space — the icehouse we’re conjuring into existence will blend productivity, creativity, wellness, and the largely outdoor lifestyle that we favor.
Why, you might well ask, would we need two imposing columns inside the diminutive icehouse? While the question is reasonable, perhaps *need* is not the most appropriate evaluation. After all, adaptive reuse of a utility building originally constructed to fulfill a highly specific (and outdated) function obviously doesn’t *need* handsome embellishments for structural support. And yet the opportunity to re-integrate these historic Rosslyn elements into an otherwise utilitarian barn has presented a whimsical challenge that at some level echoes the unlikely marriage of work space and recreation hub we’re imagining into existence with this newest rehab project. (Source: Re-tuning Columns)
Just as fusing work and play in a single space might initially seem incompatible, designing a column flanked vestibule inside an icehouse might evoke concerns of incongruity. Fair concern. And final judgment will be for you to make once we reach completion.
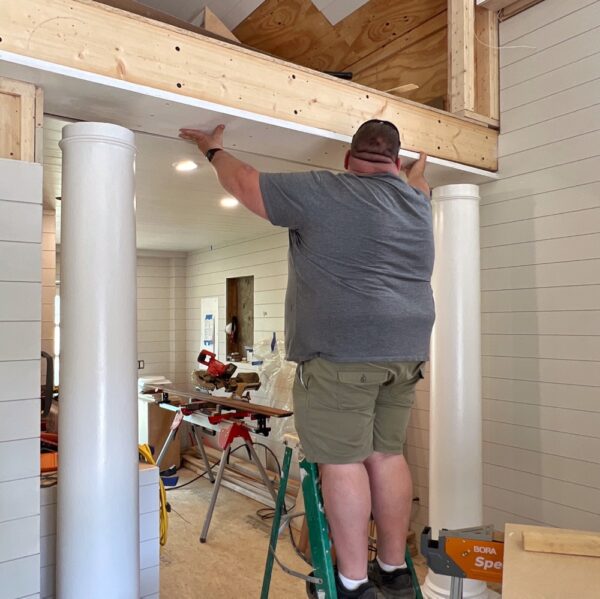
Peter in Column Flanked Vestibule (Photo: Geo Davis)
And so as we stride toward completions of the icehouse rehabilitation I draw your attention not only to the finally repurposed columns that once supported a beam in Rosslyn’s dining room. Now let your eyes drift down to the floor, to the bookmatched ash threshold crafted byPeter from some of our homegrown stump-to-lumber hardwood. Yes, it’s breathtaking. And, yes, the charactered grain forms a large stylized heart (and an enormous grin!)
Columns, threshold, and header are finally coalescing in a long envisioned “spatial transition from the more intimate entrance and coffee bar into the loftier main room”. Witnessing this accomplishment after so many months of planning and anticipation filled me with joy. It affirmed hopes and plans, it rewarded a risky design decision, defining and framing two functionally distinct spaces without losing the transparency and porosity. It instills a playful unlikelihood in an otherwise mostly predictable environment. It filters light dramatically, adding sensuous silhouettes to an otherwise geometric linearity. It delineates without restricting. It is a suggestion. It is poetry.
And, although there’s more work to be completed before a final assessment is justified, I am immensely pleased with the column flanked vestibule. Thank you, Peter. Thank you, Justin.
Today it’s commonplace in carpentry and construction to build with materials that are factory finished. In other words, raw materials (flooring, trim lumber, etc.) are delivered to a job site, pre-dimensioned, pre-surfaced, and ready for installation. While there are times (ie. custom windows and doors) that we rely upon the efficiency of offsite fabrication and factory finishing, the icehouse rehab has incorporated an extensive amount of field finishing — on-site material preparation such as re-milling garapa (upcycled from deconstructed deck) into wall paneling and transforming rough cut lumber into finished hardwood flooring — in an effort to repurpose surplus building materials and architectural salvage.
Calvin Field Finishing Woodwork (Photo: R.P. Murphy)
In the photograph above, Calvin Cumm is planing poplar that was harvested and rough-sawn on property approximately a decade ago. We’ve “high graded” the well seasoned poplar, culling the best quality material for finish trim, stair treads and risers, etc. Although the amount of field finishing we’ve undertaken for this project has increased labor inputs and drawn out the timeline, it was one of the defining principles for our scope from the outset. There are quicker and less expensive ways of rehabilitating an obsolescent icehouse into a 21st century work+play hub. But adaptive reuse and upcycling and repurposing are challenges worth investing in as much for ecological responsibility and the enduring value of quality, custom construction as for the merits of collegial collaboration and knowledge-sharing. We habitually eschew “cookie cutter” renovations for creative, consequential challenges that encourage team wide learning. We’re as concerned with process as product. And we love adventures! Reasserting creative control over the ingredients as much as the recipe can yield surprisingly rewarding results. As much for us, the homeowner, as for the remarkable collaborators who’ve contributed to this project.
The past lives on in art and memory, but it is not static: it shifts and changes as the present throws its shadow backwards. — Margaret Drabble
I return today to a recurring theme, a preoccupation perhaps, that wends its way through my Rosslyn ruminations and my collections of photographs and artifacts. While the past lives on, the present riffs, repurposes, and reimagines the past. Adaptive reuse. Upcycling. Reinvention. Art.
Buckle up. Or pour yourself a cocktail…
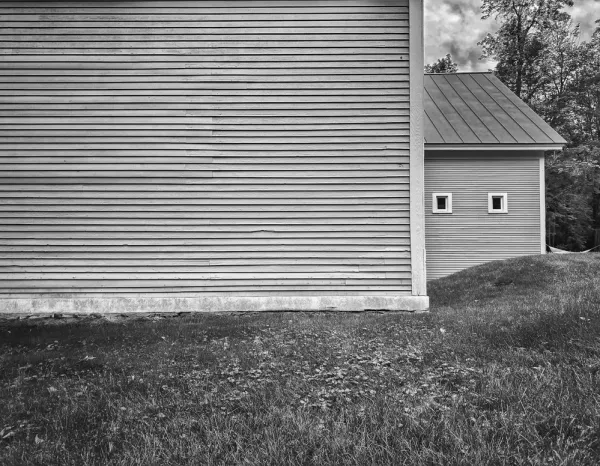
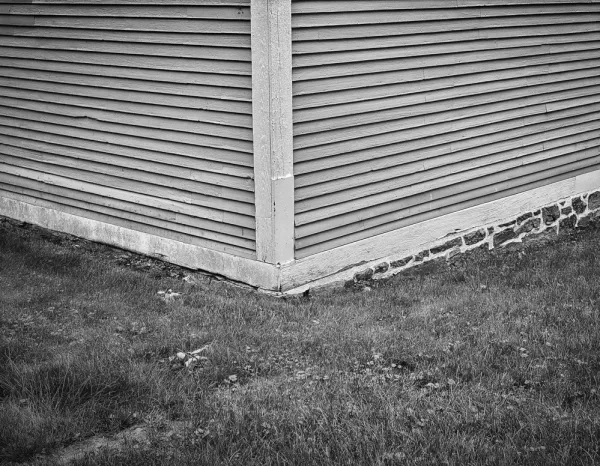
The Past Lives On: NW Corner of Icehouse and Carriage Barn, September 21, 2021 (Photo: Geo Davis)
NW Corner of Icehouse
Before tripping too far into the wilds of my imagination, let’s root the present inquiry in something a little less abstract, a little more concrete. Like, for example, the northwest corner of the icehouse about a year and a half ago, September 21, 2021. That’s what you see in the photo above as well as those below.
I’ve titled this post, “The Past Lives On”, and if you’ve been with me for any time at all you’re well aware that Rosslyn, the property around which this multimodal inquiry circumnavigates like a drunken sailor, is rooted in the past. And the present. Starting out in the early 1800’s and spanning almost exactly two centuries.
I’ve pilfered the title from the quotation above, ostensibly the perspective of Virginia Woolf filtered through the mind of Margaret Drabble. The broader context for Drabble’s perspective is landscape. Let’s look a little further.
The past lives on in art and memory, but it is not static: it shifts and changes as the present throws its shadow backwards. The landscape also changes, but far more slowly; it is a living link between what we were and what we have become. This is one of the reasons why we feel such a profound and apparently disproportionate anguish when a loved landscape is altered out of recognition; we lose not only a place, but ourselves, a continuity between the shifting phases of our life. — Margaret Drabble, A Writer’s Britain: Landscape in Literature, Thames & Hudson, 1987 (Source: Ken Taylor, “Landscape: Memory and Identity”)
In the photo above I’ve recorded the exterior of the icehouse and adjoining lawn as it has looked since approximately the 1950s which is when we understand that a clay tennis court was built behind the icehouse and carriage barn for the pleasure of Sherwood Inn guests.
Actually, I’m slightly oversimplifying the contours of history. Given what I understand, the clay court was installed for Sherwood Inn patrons, but at some point in the decades since, the court was abandoned. Or at least *mostly* abandoned. The +/-10′ tall wooden posts for an enclosure along the northern end of the court remained until we removed them early in our rehabilitation. And one of the two steel tennis net posts will at long last be removed in about a week when Bob Kaleita returns to tune up the site for hardscaping and landscaping. But a long time ago the clay surface was abandoned and a perfectly flat lawn replaced it. We’ve enjoyed using it as a croquet, bocce, and volleyball court for years.
If you look at the bottom right of the photograph at the top of this post you can see that there’s a topographical bulge in the lawn, sort of a grassy hummock that is crowding the building(s). In the photo below you can again see how the ground is higher than the framing on both buildings.
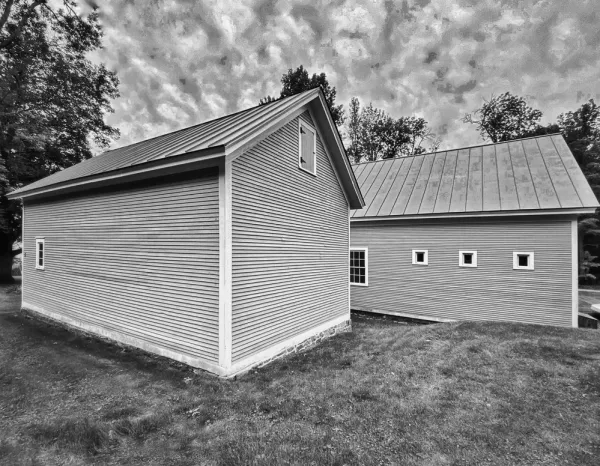
The Past Lives On: NW Corner of Icehouse and Carriage Barn, September 21, 2021 (Photo: Geo Davis)
Not an ideal situation when organics (lawn, landscaping, etc.) crowd wooden buildings. Unfortunately the tennis court was built above the sills of both buildings, and inauspiciously close. Moisture, snow, and ice buid-up over the decades compromised the structures of both buildings because of this miscalculation.
Today, both buildings have had their framing rehabilitated, and their structural integrity is better than ever. In addition, significant site work last autumn (remember “The art of Dirt Work“?) and again next week is restoring the ground level adjacent to the icehouse and carriage barn to more closely resemble what it likely looked like in the 1800s when both buildings were originally sited and constructed.
A landscape altered. A landscape restored.
A memory recreated with the art of landscaping. The past made present. And yet, not. The new grade has been reimagined as an outdoor recreation and entertaining area not likely resembling the environs a couple hundred years ago. And so it is that the past “shifts and changes as the present throws its shadow backwards”…
The Past Lives On: NW Corner of Icehouse, September 21, 2021 (Photo: Geo Davis)
Present Shadowed Past
What if innocence, in a sense, is less unbiased naïveté than wonder-wander, curiosity, and experiment? Or kneading gray clay dug behind the barn, behind the garden, before the forest (but barely before) after summer rain forty years ago. Stiff and cold at first, loosening with touch, oozing through cupped palms and playful fingers, shapes suggest themselves. Contours and textures echo yesterdays unrecorded and likely forgotten but re-emergent, confections conjured of sodded clay, and curiosity.
The Past Lives On
Indeed, something endures, but rarely should we be confident that we are knowing the past as it was. As it once was. We are informed and perhaps sometimes misinformed by our perspective sometime subsequent to the archival echo we fixate upon. And yet, perhaps allowing for reimagination, adaptive reuse, and even ahistoric reinvention, drawing upon the artifacts and memories we inherit but investing them with whimsy and wonder is one of the best ways of rehabilitating the past. Art from artifacts…
In the snapshot above, Peter is trimming the top off one of two Greek revival columns deconstructed and salvaged back in 2006 when we rehabilitated Rosslyn’s dining room. Although our vision was to repurpose these bold design elements, to upcycle them some way, somehow, it wasn’t until undertaking the icehouse rehab (after postponing it indefinitely 14 or 15 years ago) that this capricious concept presented itself: use them in the icehouse!
Why, you might well ask, would we need two imposing columns inside the diminutive icehouse? While the question is reasonable, perhaps *need* is not the most appropriate evaluation. After all, adaptive reuse of a utility building originally constructed to fulfill a highly specific (and outdated) function obviously doesn’t *need* handsome embellishments for structural support. And yet the opportunity to re-integrate these historic Rosslyn elements into an otherwise utilitarian barn has presented a whimsical challenge that at some level echoes the unlikely marriage of work space and recreation hub we’re imagining into existence with this newest rehab project.
And soon enough, you’ll be able to witness the capricious way in which this pair of columns (and an understated entablature) not only help support the loft where I’ll be composing these daily dispatches in coming months, but also define and frame a spatial transition from the more intimate entrance and coffee bar into the loftier main room of this small building.
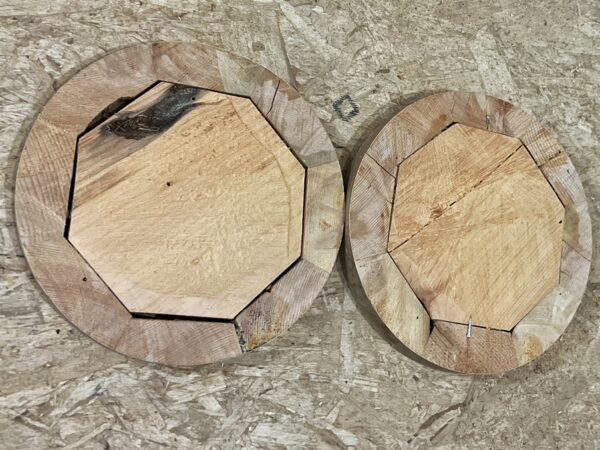
Offcuts from Re-tuning Columns (Photo: R.P. Murphy)
Those geometric discs above are actually offcuts from Peter’s column re-tuning. while it’s easy enough for me to conjure these quirky concepts, and similarly viable for Tiho to translate my ideas into drawings, it is left to the alchemy of Peter and other finish carpenters to ultimately morph busily s and plans into reality. Thank you, Peter!
Tuning, Haikus
Re-tuning columns
salvaged from a dining room,
once deconstructed.
Sometimes a few fingers full of words best communicate a notion nebulous enough to wiggle free of prosaic paragraphs. And other times image, sound, motion speak sounder than words. So I conclude with two haikus, the more familiar variety above, and a quirky mashup below. Enjoy.
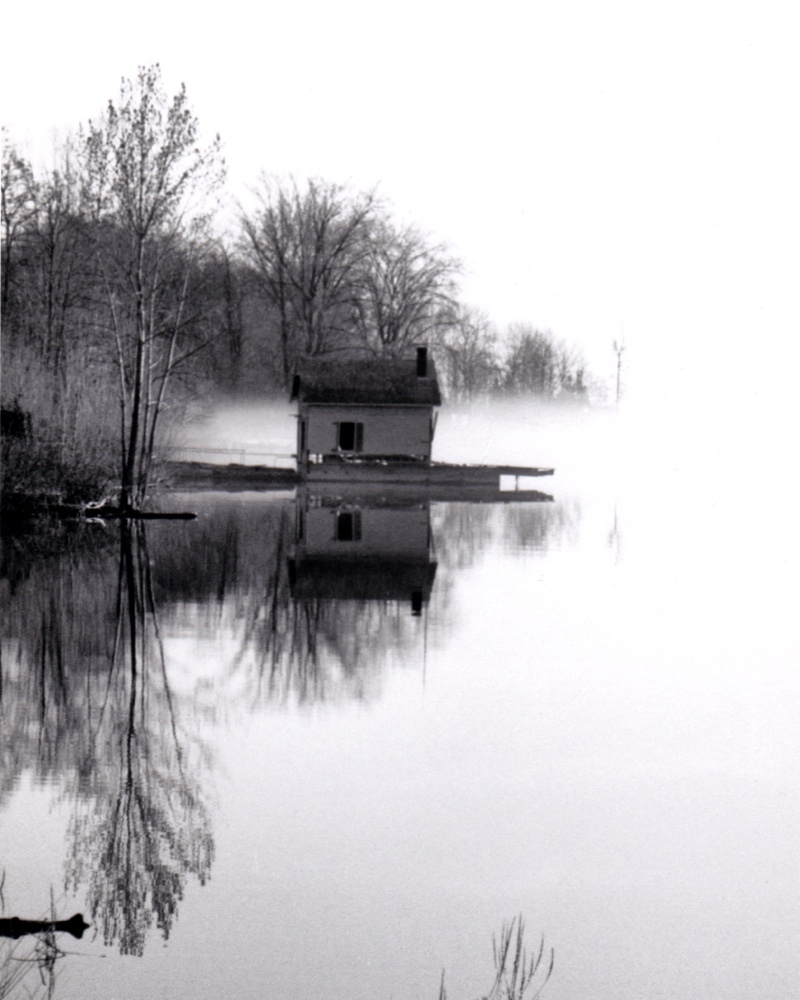
Melancholy Boathouse (Source: Douglas Peden, Essex Studios)
Melancholy much? Yesterday I posted this achingly evocative image on the Rosslyn Redux Instagram feed with thanks to our neighbor, Emma, who gifted the vintage photograph postcard to us. It was a gift to her from Michael Peden who, in turn credited his father, Douglas Peden, as the photographer. Here’s an excerpt from my caption.
Sometime in the early days of the millennium, perhaps. The condition of the boathouse suggested it may have been a few years prior to 2005 when we purchased Rosslyn. Such ethereal longing and melancholy in this painterly rendering. Hoping to learn more about this evocative photograph…
It turns out that my conjecture may have been off by a significant margin. There’s still no definitive date for when this melancholy moment in Rosslyn’s history was captured, but some interesting insights have emerged.
I’d guess that it is much earlier than 2005 – probably before 1985. If nothing else, the front porch doesn’t have its roof, and I don’t remember it ever being missing. The lack of the dock doesn’t mean anything, because with the water that high you wouldn’t see it, anyway. — Jason McNulty
I don’t recall the porch roof ever being missing either. Quick check from photos I have shows the roof there in 1969 and again in 2004. — George McNulty
Jason and George McNulty, two of the previous owner’s sons, have suggested that I’m probably off in my estimate by at least two to four decades. And George McNulty also shared another photograph doubling the subjects of my inquiry: when were these photographs taken?
Rosslyn Boathouse (Source: George McNulty)
Melancholy Boathouse Revisited
I’m grateful to Emma, Jason, and George for kindling this inquiry. And, as it turns out, the initial photograph gifted to Emma by Michael Peden (and ostensibly photographed by his father, Douglas Peden) which was in turn re-gifted to me has catalyzed even more intriguing feedback and photographs from Jason McNulty.
Jason McNulty followed up on Douglas Peden’s photograph at the top of this post with some feedback from his father, George McNulty, Sr. from whom we purchased Rosslyn sixteen years ago.
Sorry, but I really do not remember about the date. A good guess would be about 30 years ago. The photograph was taken by Doug Peden. It shows the dock house after I had rebuilt the cribbing but had not started to replace the roof. — George McNulty
Jason amended his own thoughts and another truly unique photograph of the boathouse.
For what it’s worth, if you fudge some numbers a little, this roughly corresponds with a picture that you posted on your site showing the dock house with its roof nearly destroyed by flooding in 1983. Given my parents’ finances at the time, it could easily have taken a few years to replace that roof. I’ve also found a picture in my collection from roughly 1989 showing a clearly new roof. — Jason McNulty
Boathouse 1989, original un-enhanced photo (via Jason McNulty)
Spectacular cinematic image! I’ve taken the liberty of tweaking the levels, etc. to improve the detail of the boathouse, pier, etc. Here’s the adjusted and enhanced version.
Boathouse 1989, adjusted/enhanced for detail (via Jason McNulty)
I was curious about the photo’s provenance, also wondered about the boats, etc. Jason offered some helpful insights. Although he wasn’t certain who originally took the photograph, he felt confident that the year was 1989 (i.e. seventeen years prior to our purchase of Rosslyn.)
When I added the file to my collection, I renamed it and added the year 1989 to the name. I wouldn’t have done so if I was uncertain about the year, although I have no idea now why I was so confident then. As for the sailboat, it was my father’s second sailboat during my lifetime. It was fiberglass and this picture must be relatively early in Dad’s ownership of the boat since he didn’t wait too long to replace the outboard rudder with an inboard one. This boat eventually disappeared from its moorings with no explanation, although the aluminum mast was still in the barn for years later. The first sailboat was a wooden boat, possible yellow in color, that sank on the other side of the dock (parts of its frame can still be seen), and its mast is now the flagpole for the dock house itself. The rowboat was one of three or four that Dad designed and built using plywood. Growing up, I rowed it all over the shoreline, going at least as far the marina. Unfortunately, part of the reason that Dad had to make so many was that they kept rotting out. — Jason McNulty
Although I’ve wandered afield to be sure, my curiosity’s been awakened. I told Jason that I recollected him (or perhaps his father) telling me about the sailboat that sank. As a boater and a sailer, the tragedy etched itself into my memory. But, I told Jason, I didn’t realize that another sailboat had vanished as well. Mysterious. Might it also have sunk?
It might have, but I doubt that it sank at its moorings. It was tied to a buoy not to far away from the dock itself, and I’m sure that Dad did things like check to see if the rope was still there or whether there was a large white blur underwater. Besides, unlike the wooden sailboat, the fiberglass one didn’t leak. Beyond that, though, I’m not sure. — Jason McNulty
I’m aware that Rosslyn’s boathouse flagpole is their former sailboat mast. A perfect story instance of repurposing. And I have salvaged a few other pieces from the sunken vessel. But now my wonder wanders to the second sailboat that disappeared. Hhhmmm…


")
")
")
