Finishing, not finished. Yet. But soon. I hope! The icehouse main floor and staircase are slinking slowly toward completion. Sashaying? No. Sauntering. Slowly sauntering. But at last I can say that we’re finishing the floor and the staircase in Rosslyn’s icehouse.
Finishing Floor (Photo: Geo Davis)
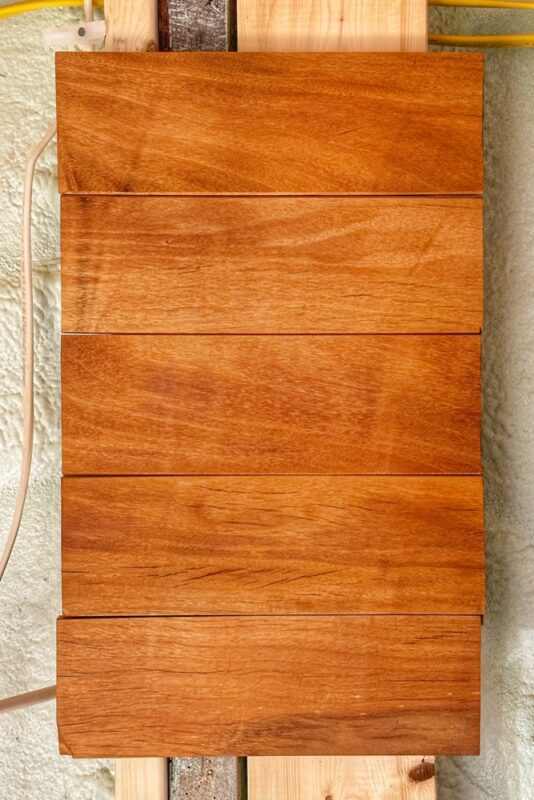
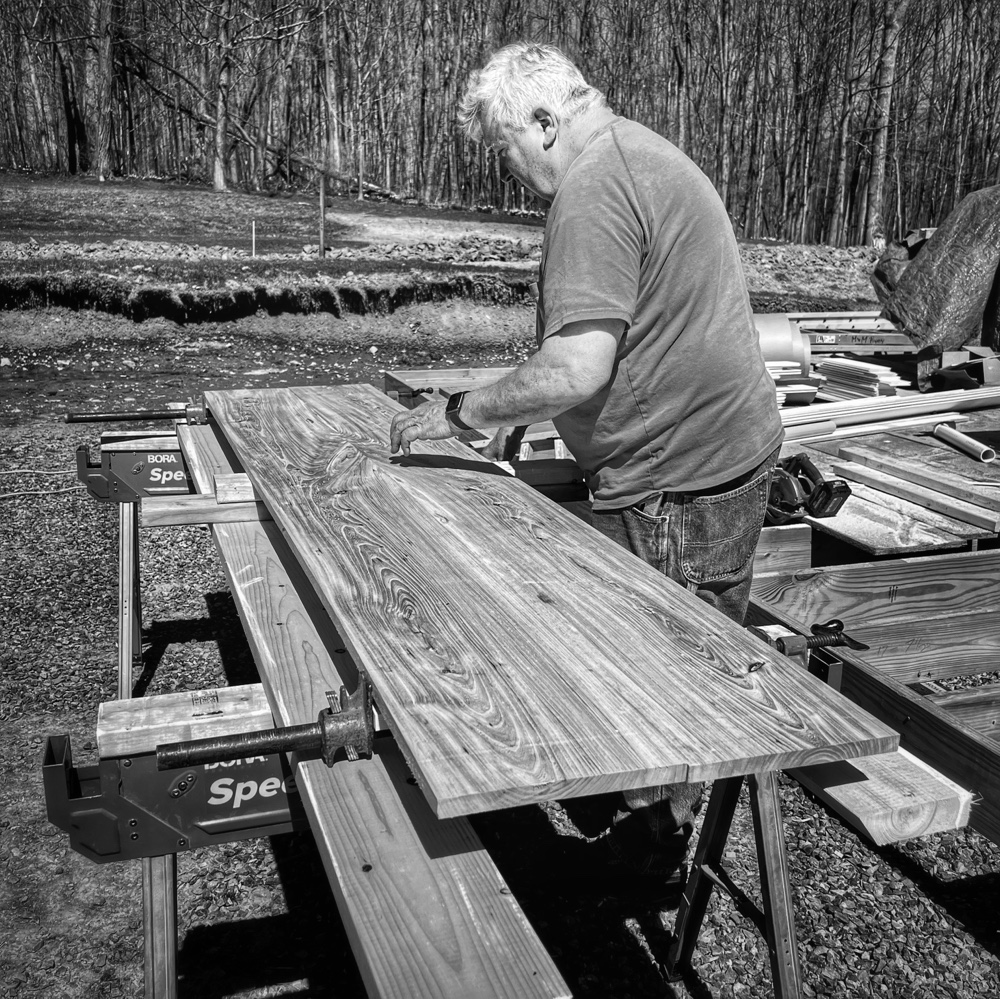
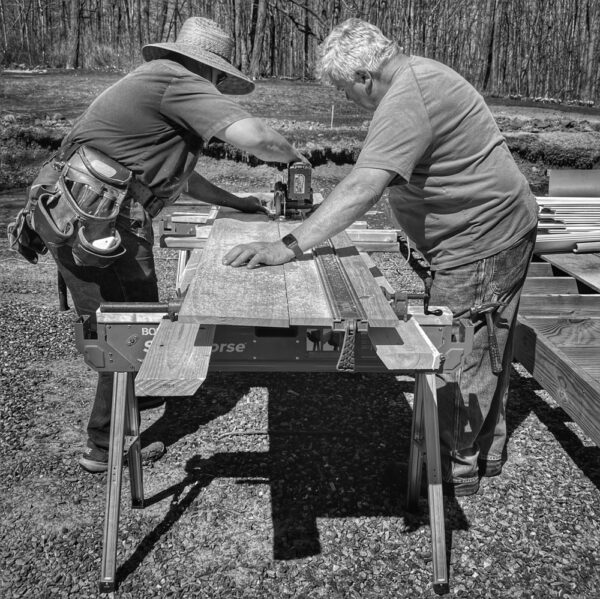
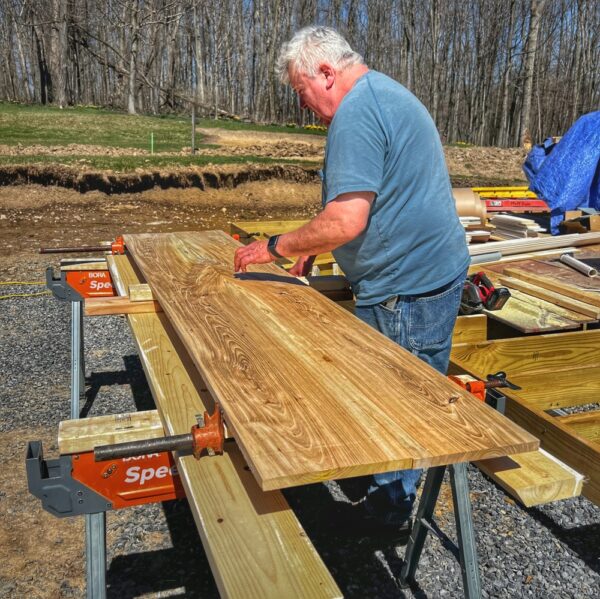
We’ve been using Safecoat® Polyureseal BP to seal our hardwood floors for about twenty years. It’s an almost zero VOC alternative to conventional polyurethanes, and it performs really well. For the mixed species, ash and elm, variable with flooring we’re applying six coats with light, fine grit sanding in between coats. We’re not done yet, but the photo above captures the unique character of this homegrown, stump-to-floor hardwood, revealed and enhanced in no small part by the Polyureseal BP. Tony has been responsible for sealing all of the floors in the icehouse including the downstairs ash and elm, and the upstairs beach. Thanks, Tony. Almost done!
Near the top edge of the photograph above, you can catch a glimpse of the last section of the staircase to be completed. Let’s take a closer look.
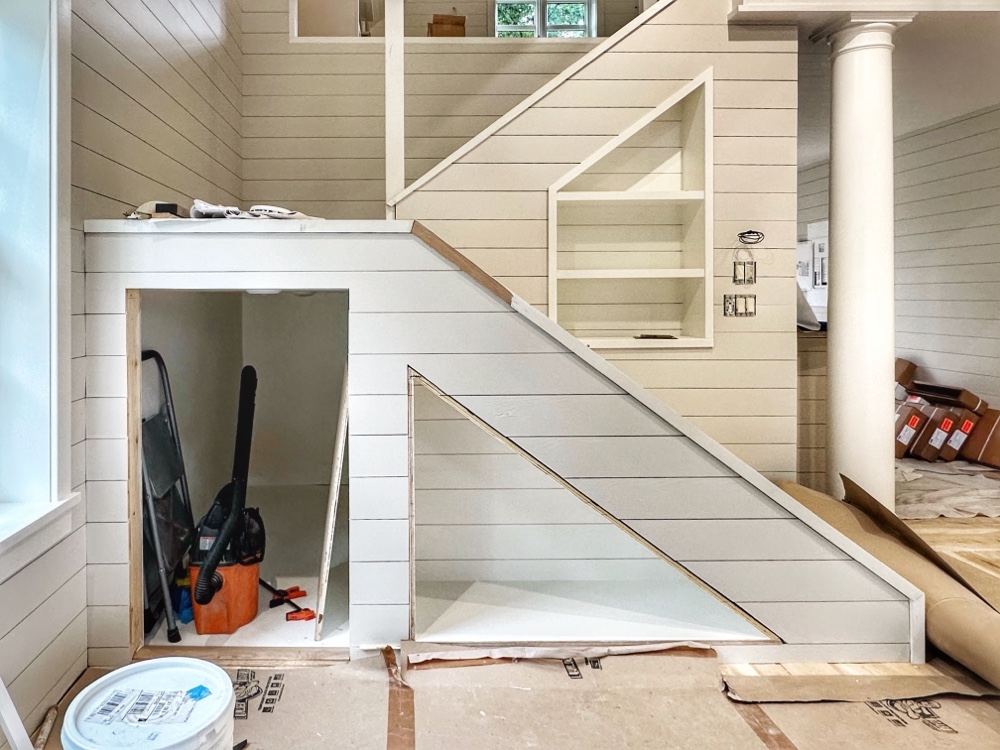
Finishing Staircase (Photo: Geo Davis)
Supi has recently finished installing the T&G nickel gap paneling. Glen has been following with the paint brush. And Peter is working on the trims, cabinet doors (left), and the bookshelf (right). Home stretch! Well, except for the railings and balusters…Back on February 14, 2023 I was assured by a cabinetry carpenter named Bernie that tackling the banister (+/-2 weeks) and staircase railings would be “a piece of pie”. Unfortunately it’s proven to be a very slooow pie preparation. Hopefully we’ll see the cabinets and railing soon.
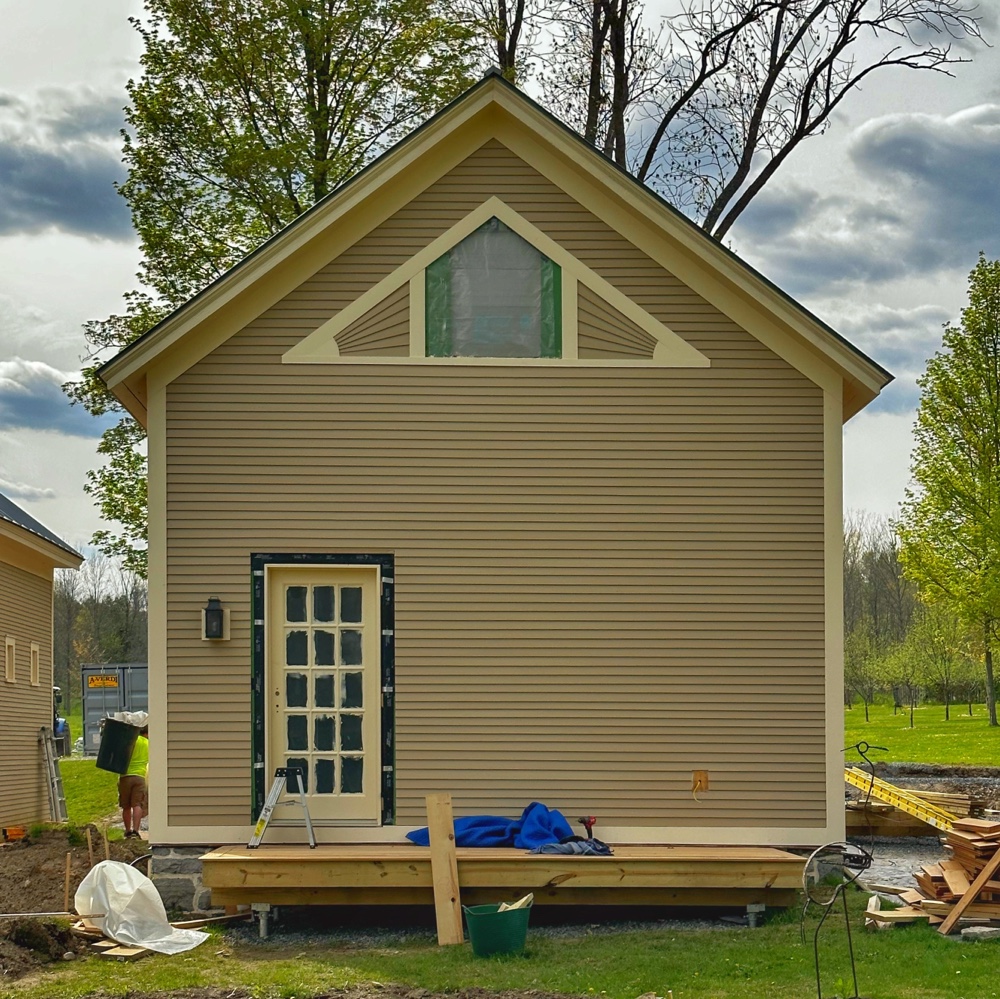
I’m thrilled to showcase the icehouse’s west facade with new double doors flanked with full-height side lites. What a transformation. With the west elevation doorway installed we’re approaching the point where reality resembles Tiho’s renderings.
Rendering for Icehouse Rehabilitation, West Elevation (Source: Tiho Dimitrov)
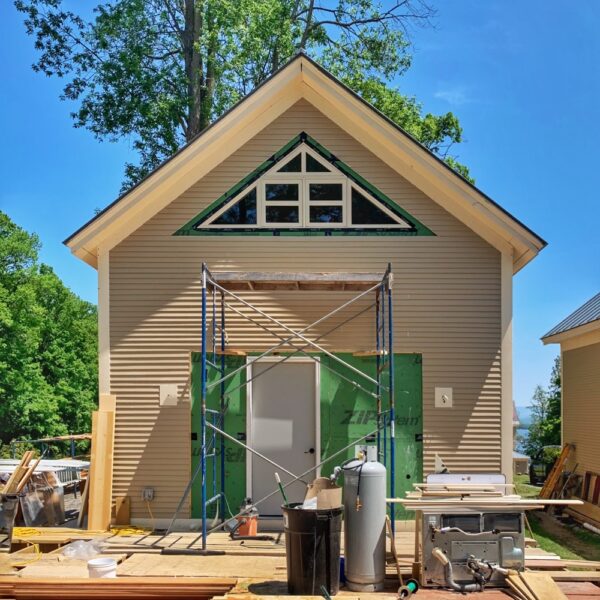
Remember that west elevation drawing Tiho created to help the team visualize where we were headed? The image below captures the same view, the partially fenestrated west facade, just prior to the day the west elevation doorway was installed.
Partially Fenestrated West Facade (Photo: R.P. Murphy)
I jumped the gun, announcing fenestration progress when we were still short of completion.
Aside from window and door trim, three out of four elevations — east (above), south, and north — are now exhibiting their close-to-final appearance. (Source: Fenestrated Facades)
One of the many workflow challenges we’ve navigated was delaying installation of the glass doors.
Only the west elevation (below) is still waiting on installation of the 1st floor double doors and flanking windows. And that’s on hold until flooring is complete. So, hopefully soon! (Source: Fenestrated Facades)
Once the double doors, flanked with windows, four glass apertures balancing the gable window above, are installed, this west-facing elevation will allow for a seamless interplay of interior and exterior living area. So long anticipated, these fenestrated facades are beginning to bridge the envisioned and the actual. (Source: Fenestrated Facades)
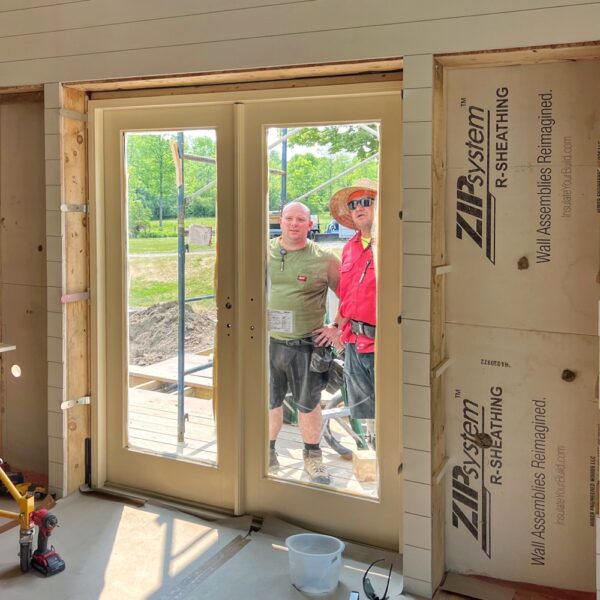
And here it is! West wall opening, doors being installed.
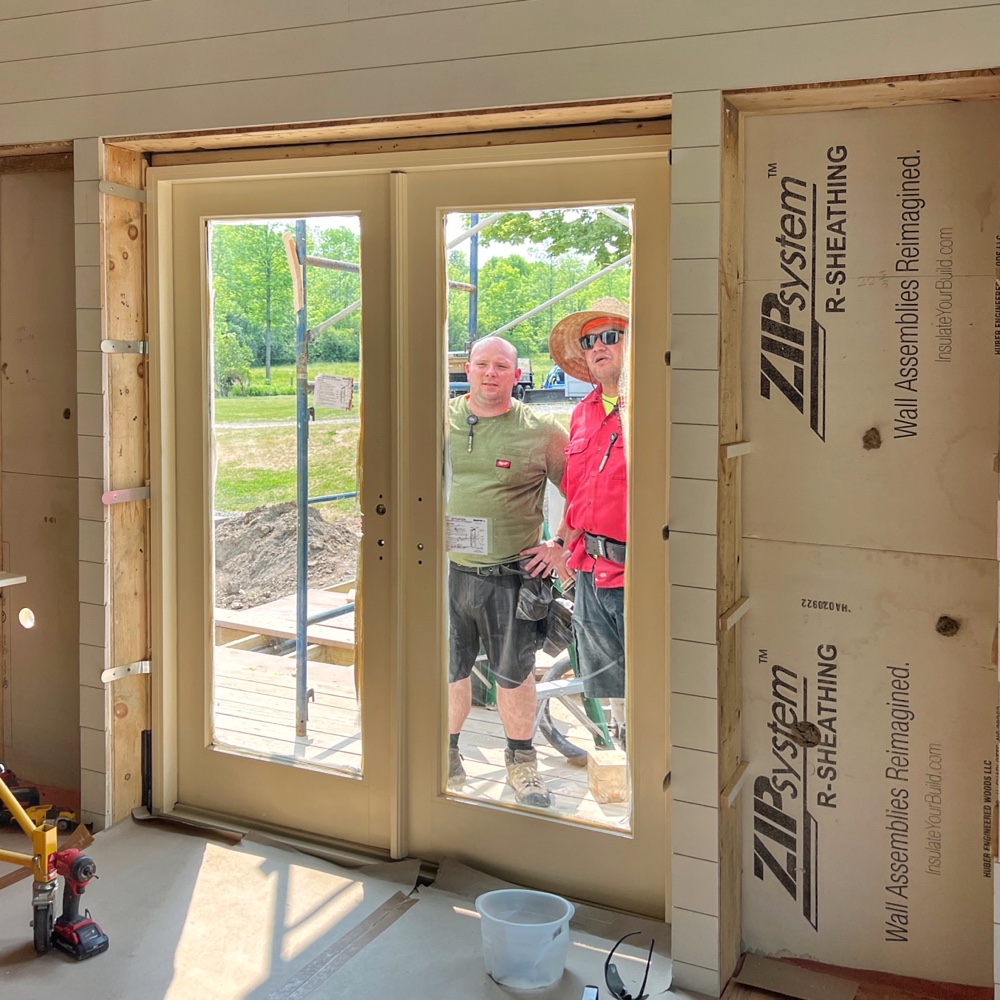
Installing West Elevation Doorway (Photo: R.P. Murphy)
With Peter overseeing, Matt (green shirt) and Supi (red shirt) secured and fine tuned the Marvin double door unit. In the photo below they appear to be celebrating their success. Actually, rather than a victory lap I think they’re troubleshooting to ensure the install was perfectly executed.
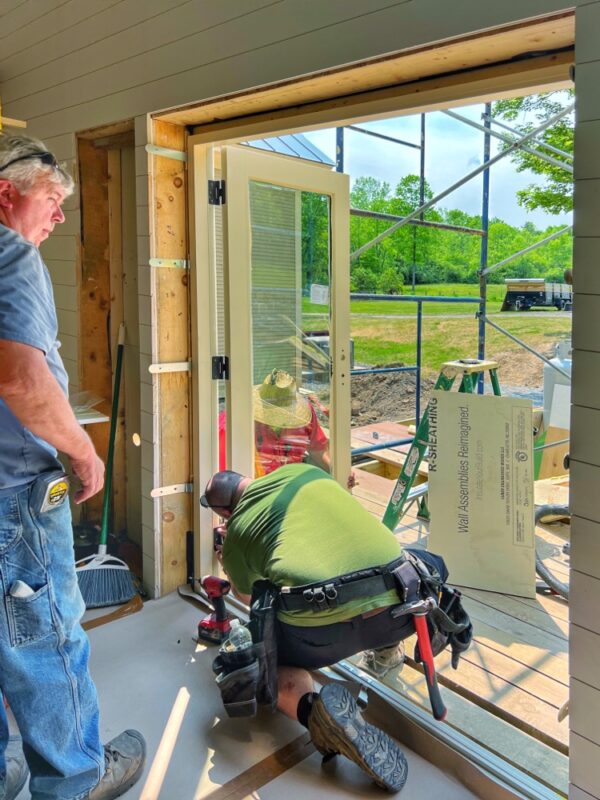
Installing West Elevation Doorway (Photo: R.P. Murphy)
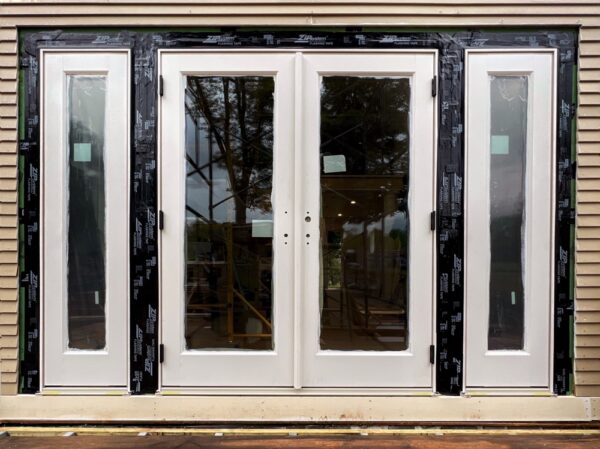
And then came the glass slabs flanking the doors.
West Elevation Doorway (Photo: R.P. Murphy)
Once trimmed, these four glass apertures will be mulled into a contiguous element that looks as handsome from without as within. Soon I promise to share the inside-out perspective!
Eureka! After many months of brainstorming, experimentation, painstakingly protracted preparation, troubleshooting, oiling, and meticulous installation, the garapa paneling in Rosslyn’s icehouse bathroom is complete. What a remarkable journey it’s been, and the final results are breathtaking.
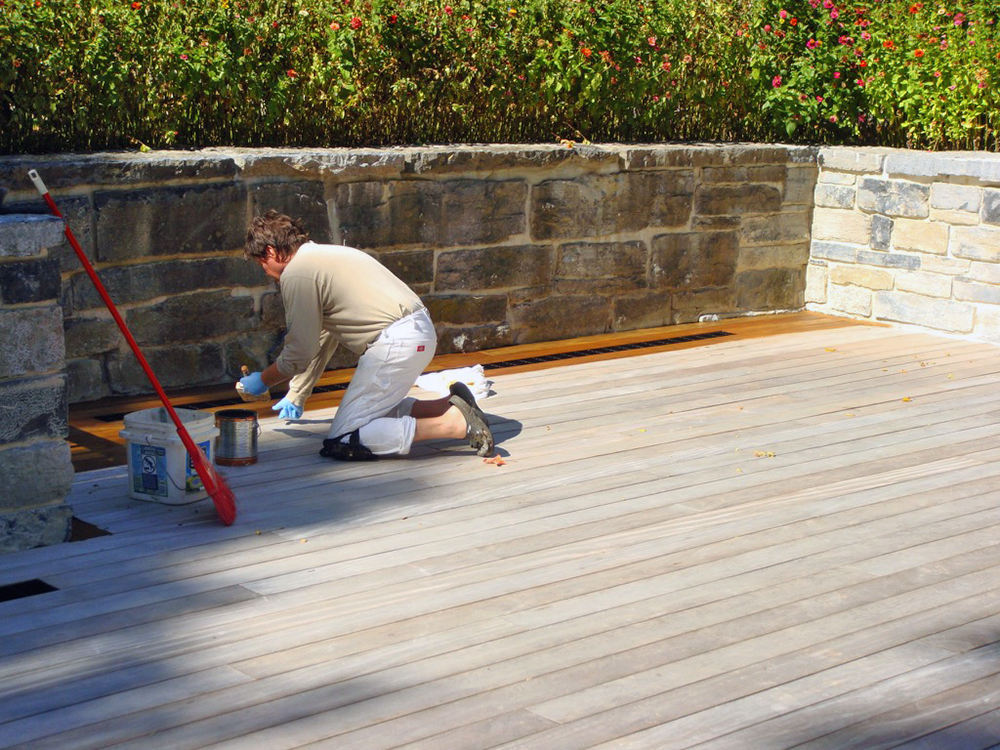
Wayne Oiling Deck in 2009 (Photo: Geo Davis)
Garapa Backstory
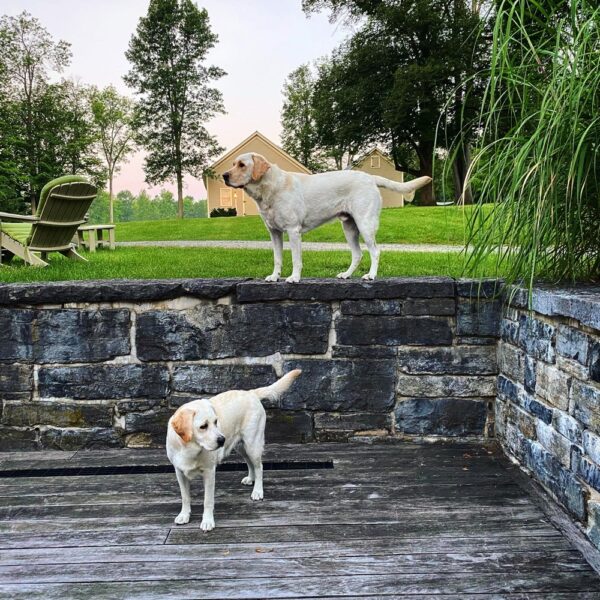
Our garapa backstory has its beginning waaayyy back when we built the original garapa deck on the west side of Rosslyn’s ell.
Let’s start by rewinding the timeline to 2008-9. Building the new deck and installing garapa decking was the proverbial caboose in a virtually endless train of construction that started in the summer of 2006. (Source: Garapa Decking 2008-2009)
A touch melodramatic, but the metaphor was (and is) 100% appropriate. It was nothing short of triumphant to finally complete the deck, a real and symbolic final frontier between construction site and comfortable home. It was a much anticipated extension of our indoor living space, a convenient way to access three entrances to the home, and a private exterior zone to dine and relax and entertain.
Carley & Bentley on Old Deck (Photo: Geo Davis)
Fast forward a couple of years, and the triumph began to tarnish.
Long story short, the original deck failed. Not the garapa decking which performed admirably year-after-year. But the substructure.
[…]
Rather than dwelling on the achilles heal that lamentably undermined the integrity of three critical substructures — Rosslyn’s house deck, boathouse gangway, and waterfront stairs — I’ll just say that all three experienced premature decay and rot of the structural lumber…
[…]
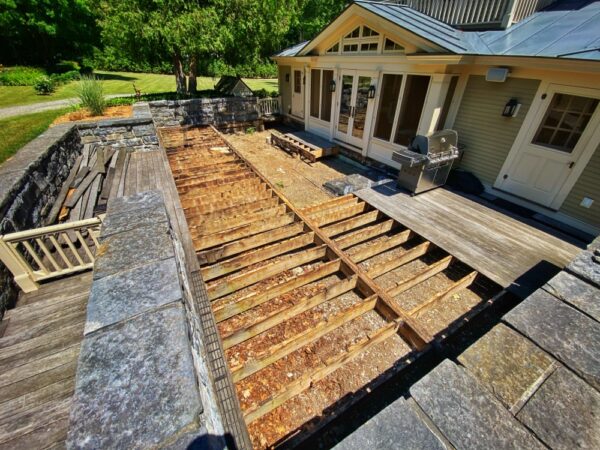
Because the substructures began rotting virtually immediately after construction, we spent a decade and a half chasing the problem, scabbing in new lumber, etc. But within the last few years the failure was beginning to outpace our ability to provide bandaids and we scheduled replacement. (Source: Deck Rebuild)
Carley Overseeing Demo of Old Deck (Photo: Geo Davis)
Eric Crowningshield’s team deconstructed much of the deck during the late spring of 2022. When Hroth Ottosen and David McCabe joined them at the beginning of the summer they determined that it was necessary to fully replace rather than repair the existing deck.
Old Deck Demolition (Photo: Geo Davis)
The deconstructed garapa was separated from the structural demolition debris, the highest grade (ergo most salvageable) material was graded, and the best preserved and most character-rich garapa was stored for repurposing in the icehouse rehab project. Then began a lengthy, painstaking upcycling journey.
We’ve been upcycling garapa decking from Rosslyn’s 2008-9 deck that we salvaged and laid aside this past summer. Spanning half a year so far — from deconstructing and culling reusable material midsummer to multiple experiments determining optimal dimensions for adaptive reuse as bathroom paneling — we’re now scaling up production and the results are impressive. (Source: Upcycling Garapa Decking)
By “multiple experiments” I mean empirically evaluating the most aesthetically pleasing, most practical, most installable, and most structurally durable form for the Garapa decking-turned-paneling. Yes, that’s a lot of *mosts* to undertake, but it’s not even the full scope of the challenge.
In addition to devising a perfect product, we needed to coordinate an upcycling process that could be undertaken successfully on site. No loading, trucking, unloading, offsite milling and finishing, reloading, trucking, unloading, storing, etc. It might have been more affordable, and it certainly would’ve been less time consuming, to outsource this project. But that would’ve shifted several variables:
Increasing carbon inputs would have been inconsistent with our reuse objectives.
Transferring oversight to a third party would have reduced our design supervision (while necessitating excess production to ensure sufficient quality during installation.)
Undertaking the upcycling process at Rosslyn allowed for agility and flexibility during the fabrication process, enabling the team to repeatedly test samples in the icehouse, catching small details that might otherwise have been discovered too late, making small alterations, etc.
And despite the inevitable strain (as well as the potential for setbacks) that crept into the equation by committing to on-site fabrication, tackling this challenge in house ensured maximum creative control, significant learning opportunities, rewarding problem solving scenarios, a personalized sense of ownership for those who participated in this project, and a heightened sense of accomplishment upon completion.
In short, upcycling our old garapa deck into the paneling that now distinguishes our icehouse bathroom was a vital, integral component of this adaptive reuse adventure. It was important to me that our team of makers and re-makers have the opportunity to invest themselves fully in this rehabilitation project, that each individual who verily toiled and trusted our vision experience a profound pride of ownership and accomplishment, and that the hyperlocal DNA of this two century old property be honored by favoring ingenuity and endurance over convenience.
From the outset several were intrigued with the potential for this salvaged lumber.
Hroth was an especially good sport, planing board after board and trimming the edges to determine what would work best. (Source: Upcycling Garapa Decking)
Upcycling Garapa (Photo: R.P. Murphy)
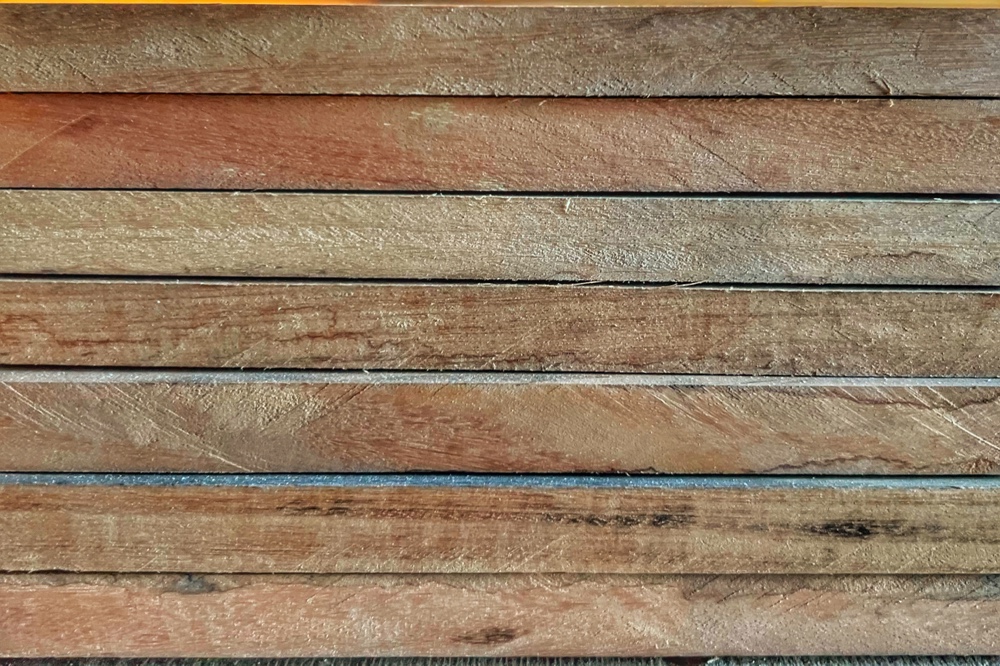
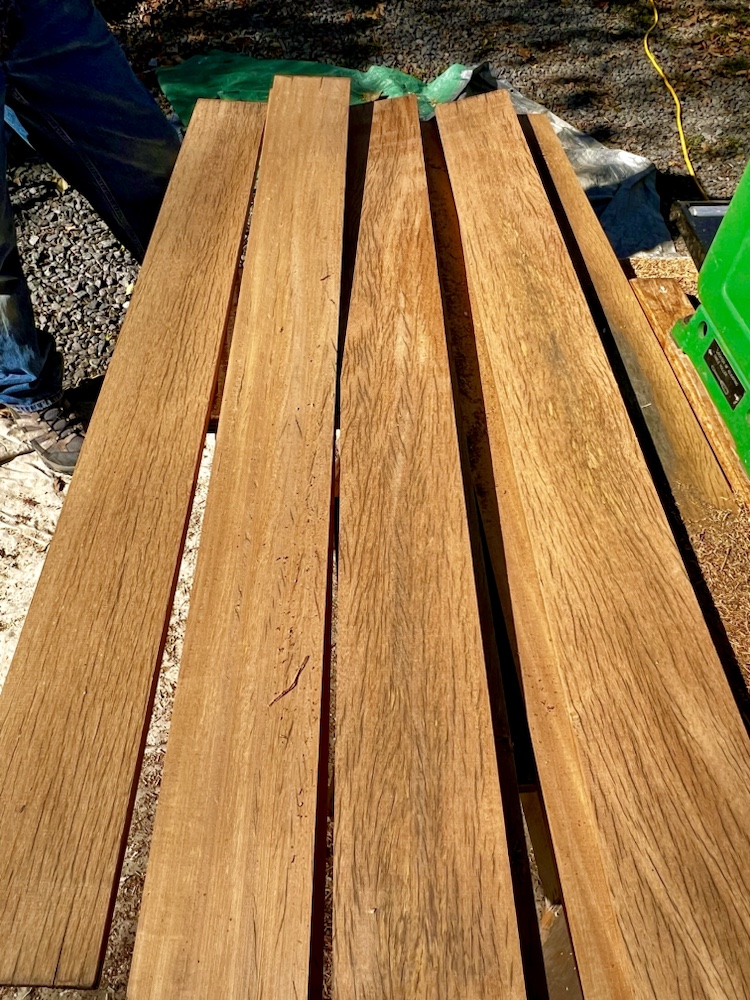
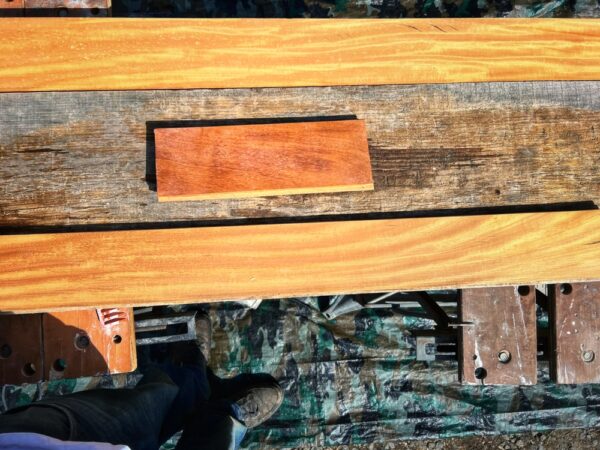
As the wear and tear of a decade and a half— heavy foot traffic, enthusiastic labrador retrievers, hardy North Country winters, group grilling and furniture dragging, wine spills and miscellaneous mementos from lots and lots of living — was gradually milled away, the garapa’s handsome heart began to re-emerge.
We have begun re-milling and re-planing garapa decking salvaged from Rosslyn’s summer 2022 deck rebuild. These sample boards are among the many weathered specimens carefully removed this spring and summer prior to rebuilding Rosslyn’s deck substructure and re-decking with new garapa. Hroth’s patient exploratory experimentation is the first phase in our effort to adaptively reuse this character-rich material in the icehouse. (Source: Upcycling Decking Debris)
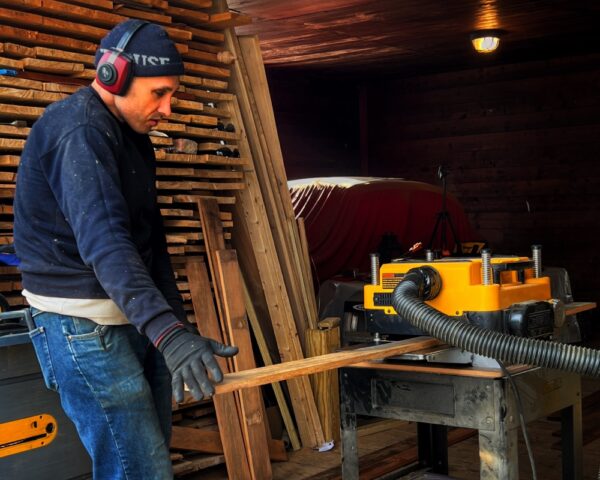
At last, Hroth perfected the prototype. He then developed a process, a repeatable protocol, for which we could standardize the results primarily relying upon a tablesaw and bench planer. Then he taught Tony how to reproduce the same results in sufficient quantity to panel the still unframed icehouse bathroom.
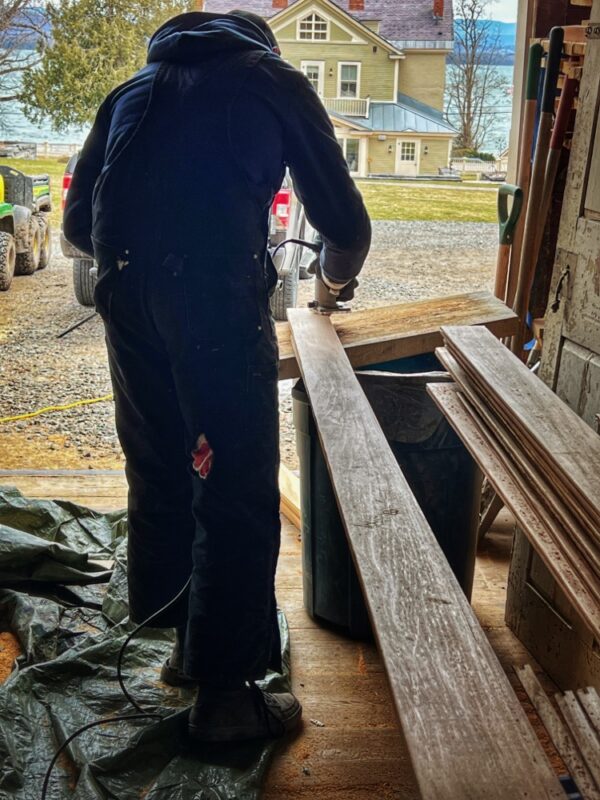
Tony Upcycling Garapa Decking (Photo: R.P. Murphy)
Tony is beavering away industriously… upcycling garapa decking into pristine planks for paneling.
[…]
It’s a slow and painstaking process that demands plenty of patience and focus, but… transforming debris into beautiful finish paneling will prove rewarding, for sure… Tony is even beginning to appreciate what magnificence he is bringing into existence. (Source: Upcycling Garapa Decking)
And so began a winter quest to reinvent debris as functional design-decor.
Time for a progress report on the garapa paneling that will soon embellish the icehouse bathroom. We started out gently easing the edges, but several iterations later we’ve settled on a full roundover. (Source: Garapa Roundover: Easing the Edge)
Months into this painstaking re-manufacturing process, several others had helped Tony from time to time, but there was no illusion. Tony had taken ownership of the garapa upcycling quest!
I joke with Tony that he’s investing lots of love into transforming this material. From debris to centerpiece… he’s literally been working and reworking [this upcycled garapa] since last September or October. That’s a LOT of love! (Source: Garapa Roundover: Easing the Edge)
By late winter Tony had finished planing (down to 9/16”) and dimensioning (down to 4”) the garapa decking. At almost a thousand linear feet we paused and reevaluated the quantity to be certain we would have sufficient usable material for the entire interior of the icehouse bathroom (walls, niche, and mechanical room door).
We revisited options for joining the paneling. To be fastened horizontally to the studs with concealed fasteners, joining the boards would be an important way to stabilize and visually address the gaps between boards. We considered tight lap joints and nickel gap lap joints, eventually settling on a nickel gap T&G type joint. But how best to accomplish this?
Peter’s solution for the ash and elm flooring seemed like our best option for the garapa paneling. We would create garapa splines that would fit into grooves in the sides of the paneling boards. If expansion and contraction (think visible gaps, between boards, etc.) weren’t an issue it might have been viable to just but the boards up against each other. But it’s a bathroom, so fluctuating humidity levels definitely needed to be factored into the equation. The splined joint would be a perfect solution.
And finally there was the question of edging. I wanted to ease the edges just enough to accentuate horizontal shadow lines (which stylistically echo the T&G nickel gap in the rest of interior) while deemphasizing dimensional disparity between boards. So a router joined the production protocol as Tony uniformly finished the visible edges of the paneling.
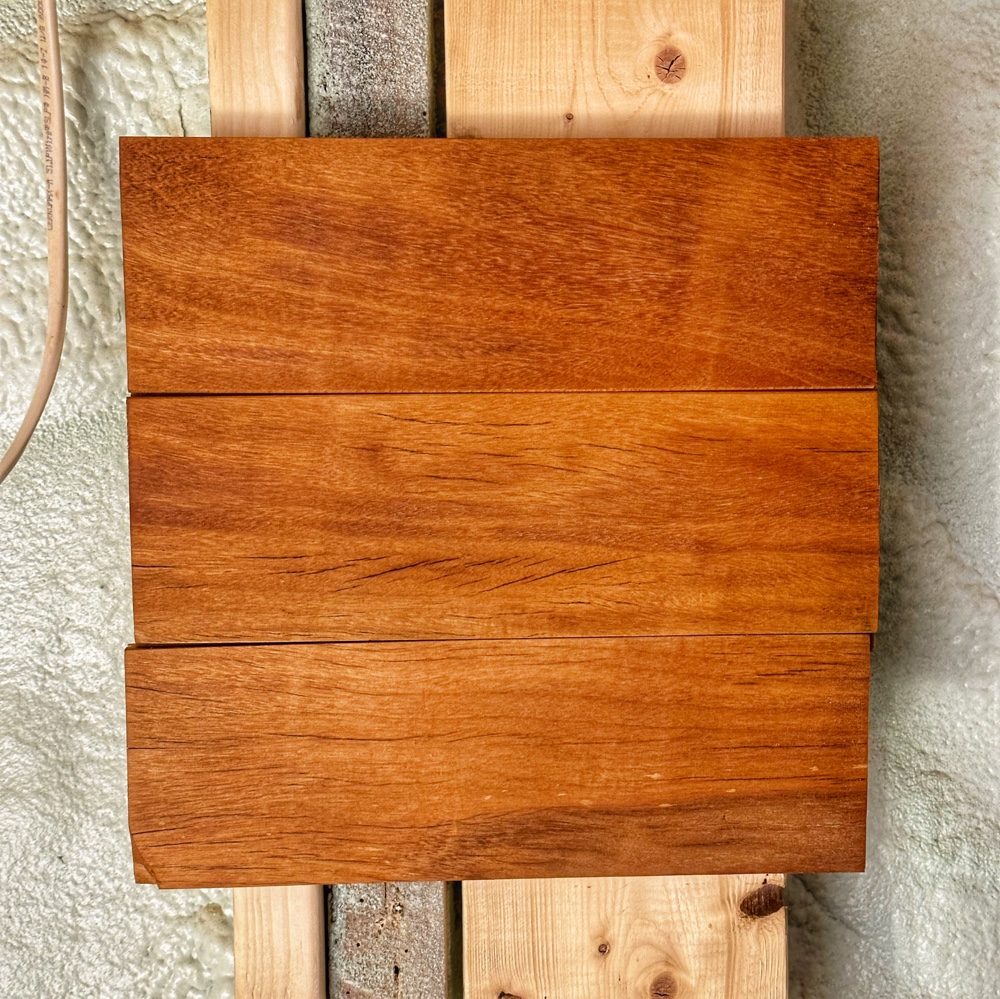
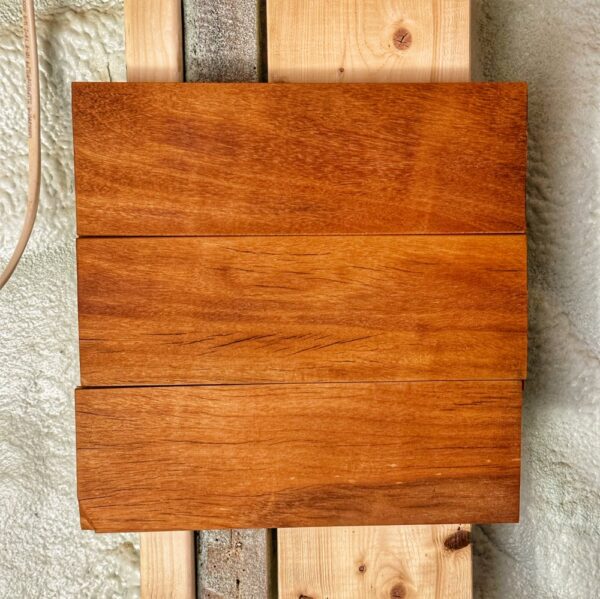
Garapa Edge Profiles v2.0 (Photo: Geo Davis)
And then there was the final step, oiling the garapa. As often, we turned to Bioshield Hard Oil for a hand rubbed, ecologically responsible finish. Eric’s team tackled the oiling, and the photo above gives you a preview of the garapa, edged and oiled. This was the final sample that we greenlighted before installation began.
And, for just a little longer, I’ll keep you in suspense before I share photos of the now completed garapa installation. Remember, anticipation is half the pleasure!
Installation of Garapa Paneling
I’ve dividing this monumental update into two posts to fairly review and showcase a project that has taken the better part of a year from beginning to finish. Thanks for your patience. I promise you that the photos you’ll witness soon, the finished bathroom paneling, will be worth the wait.
It’s a little premature to start celebrating the soon-to-be-completed hardwood flooring in the icehouse. With only the first two rows installed (and a third in the works), a superstitious soul might delay an update in the interest of humility (or outwitting fate). But it’s been so many months in the planning and preparation that I’ve decided to offer you a flooring sneak peek. After all, it looks too spectacular to keep it a secret!
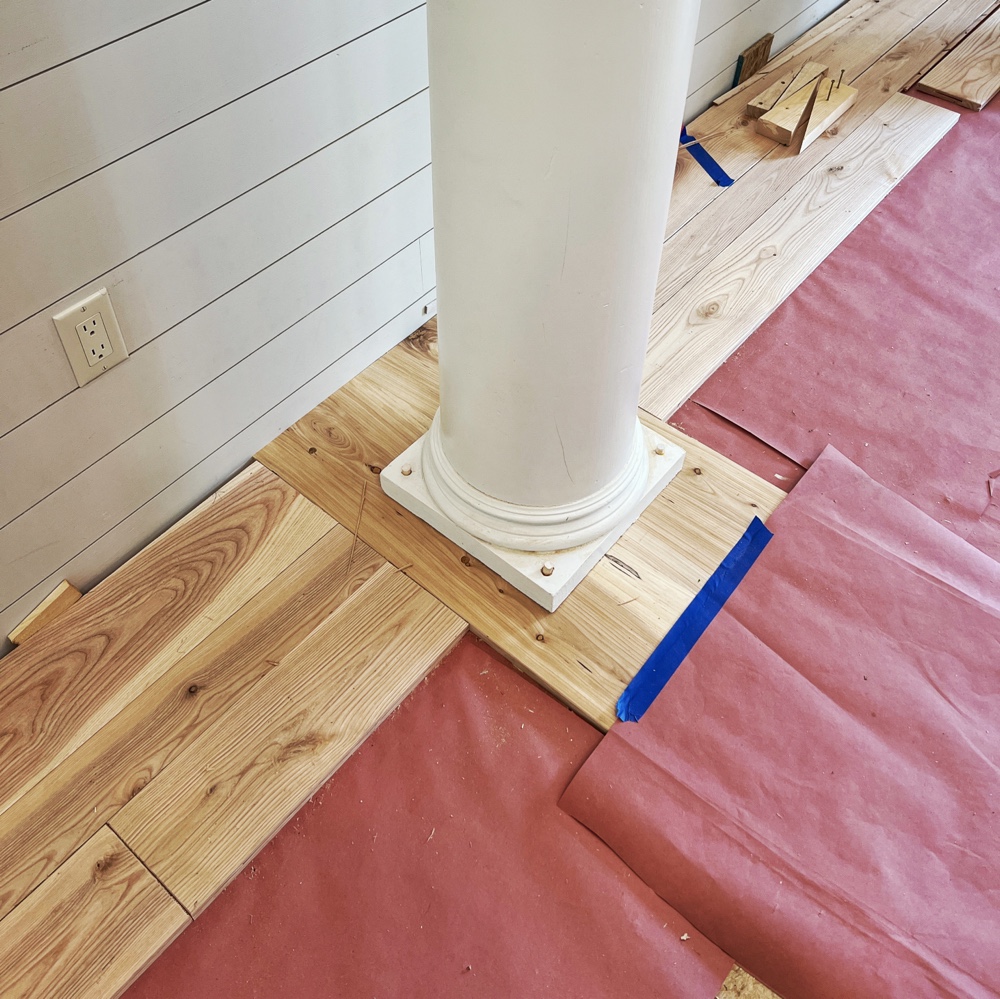
Flooring Sneak Peek (Photo: R.P. Murphy)
Do you remember my post about acclimating the ash and elm flooring in the icehouse loft? Well, with plenty of time for the homegrown flooring to acclimate and a rapidly diminishing timeline, Peter guided the transition to flooring as Eric put the finishing touches on the garapa paneling in the bathroom. (Glorious garapa bathroom update tomorrow.)
In the photograph above, you can see the dramatic intersection of new flooring with the bookmatched threshold (beneath the columns.) The flooring courses will be perfectly aligned in the vestibule and in the main room ensuring continuity with a dramatic interstitial transition at the ash “heart” abstraction formed from the mirrored grain (concealed with rosin paper in this photograph) of the bookmatched planks.
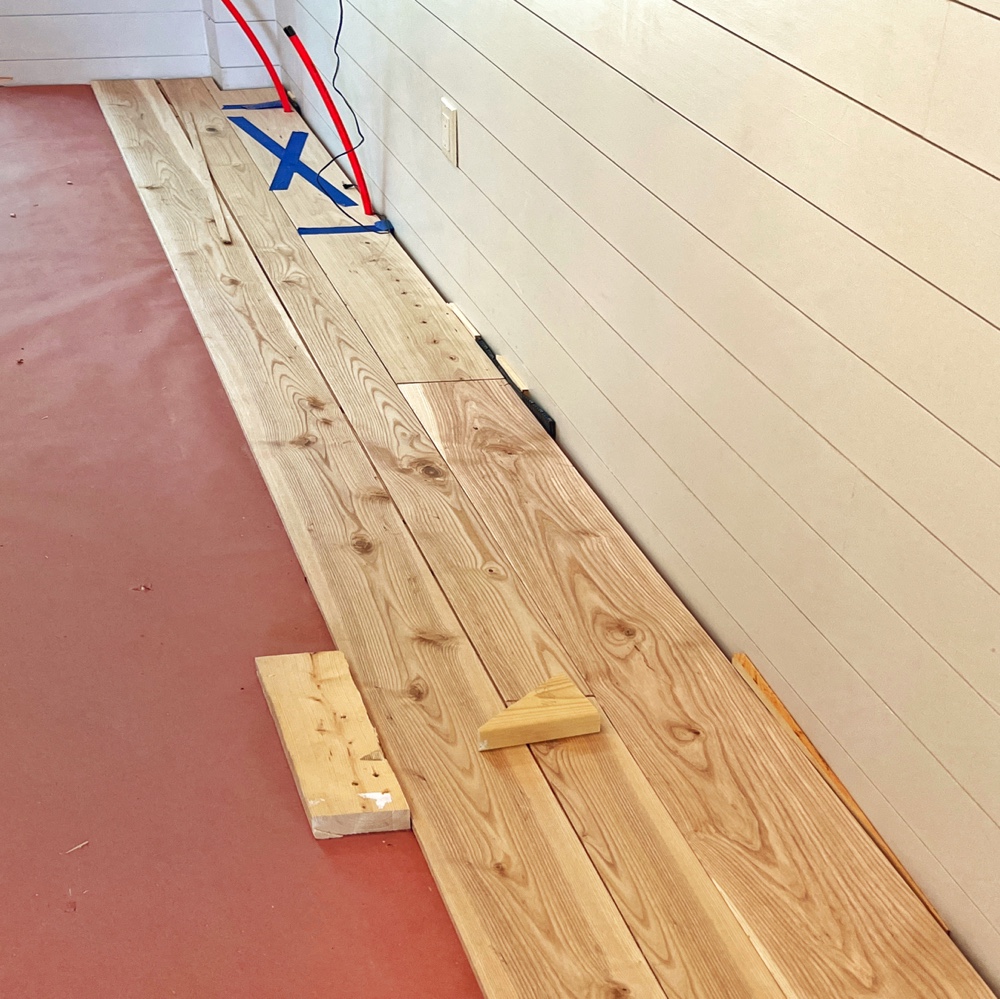
Variable Width Flooring (Photo: R.P. Murphy)
We opted for variable width flooring, and we’re intermingling ash and elm. All of this lumber was harvested, milled, seasoned, dimensioned, and finished on-site. In fact, some of this wood was felled almost 15 years ago, so this has been a slooow evolving rehab! So slow, in fact, that until about a year ago, we’d begrudgingly come to accept that the icehouse rehab might never happen. So, finally witnessing progress, even a few boards, is momentous and deeply rewarding.
I will follow up soonish with a more detailed look at how we’re joining the floorboards and a few other details that will make more sense once we’re a little bit deeper into this project. But, suffice to say, we haven’t taken the easy (or quick) way out! But I’m confident that the rewards are around the corner.
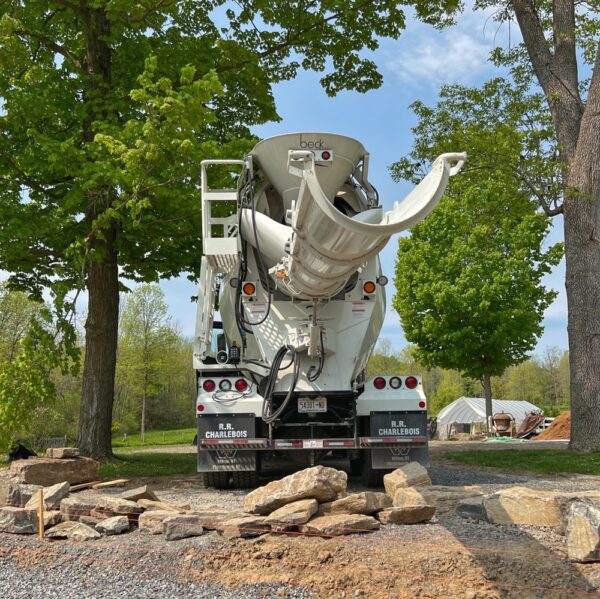
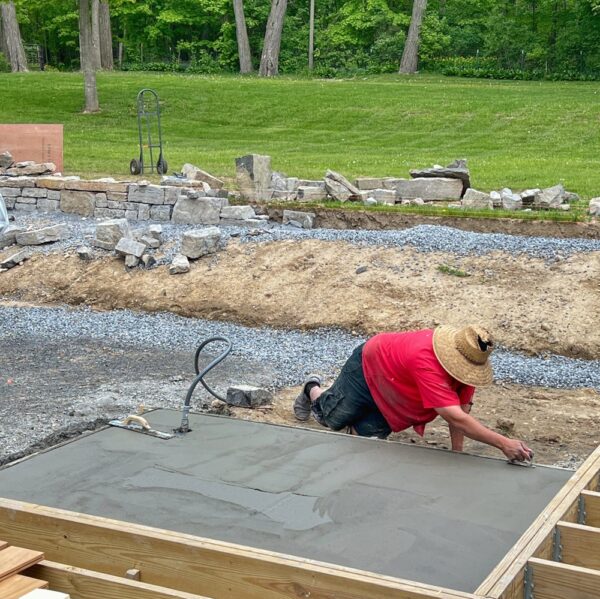
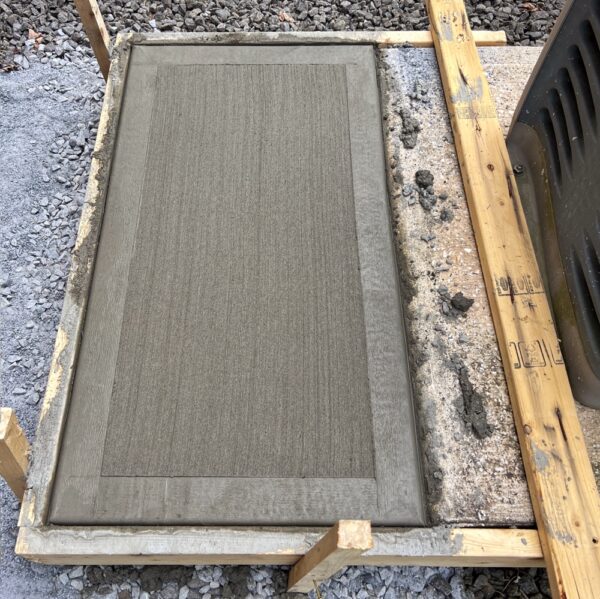
We’ve bookended our concrete work for the icehouse rehab with last autumn’s foundation and slab and concluding with a concrete slab finale for the hot tub and the mini split. And I am going to let the photos. Tell the story since today’s post is best narrated with a photo essay. But first we celebrate the remarkable ability and agility of this team. I am repeatedly impressed with the breadth of skills, the depth of energy, and the capacity to adapt to perennially evolving circumstances.
Despite the end, timely hospitalization of Peter, the lead on this project, just as these two slabs floated to the top of our calendar, Supi, Calvin, Tony, and Pam took the baton and ran with it. With no time to lose, and a concrete truck on the way they adapted and delivered perfection. As so often, I am proud, proud, proud!
Hot Tub Concrete Slab
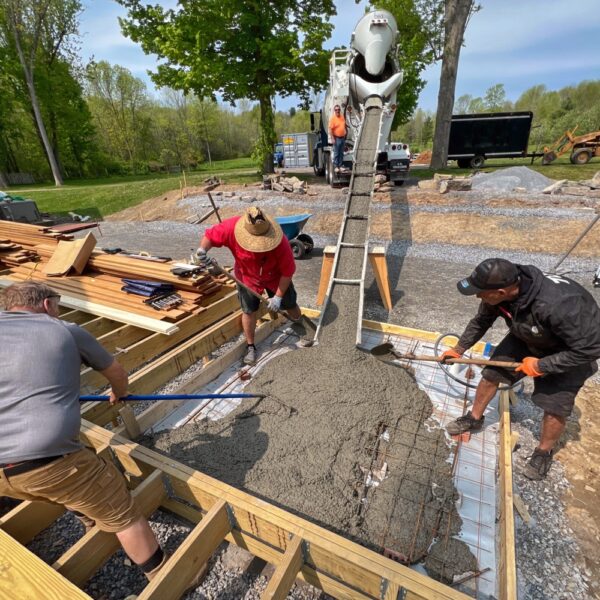
For the sake of streamlining this post, I am going to divide today’s work into two separate photo essays. This first will showcase the more ambitious of the two slabs, which is integrated into the icehouse deck, and will support the hot tub.
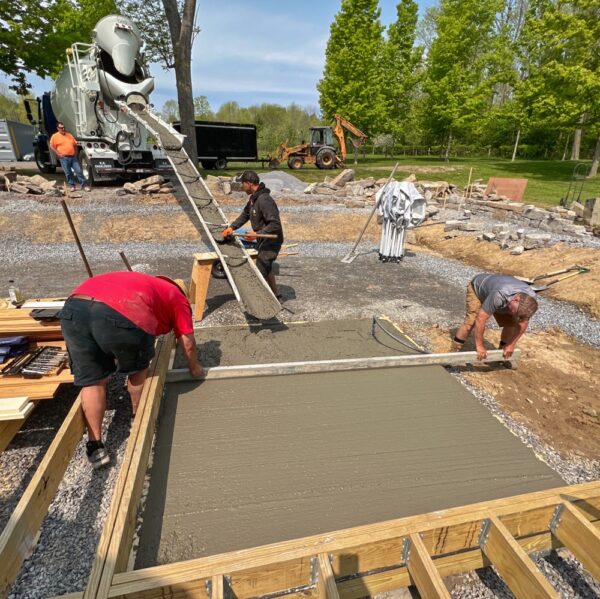
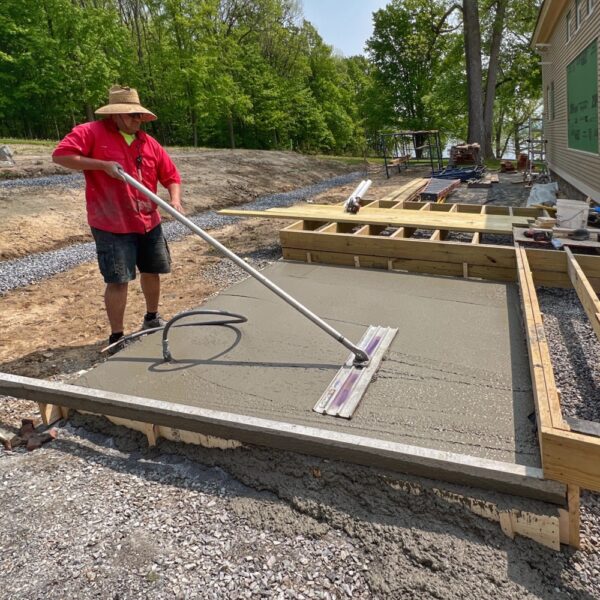
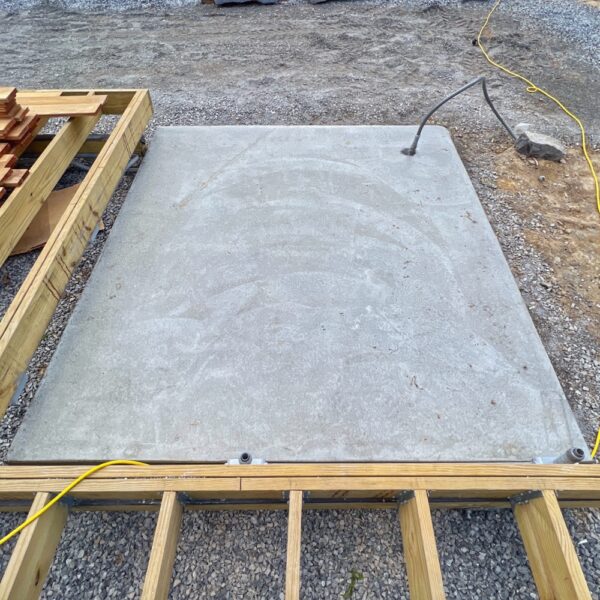
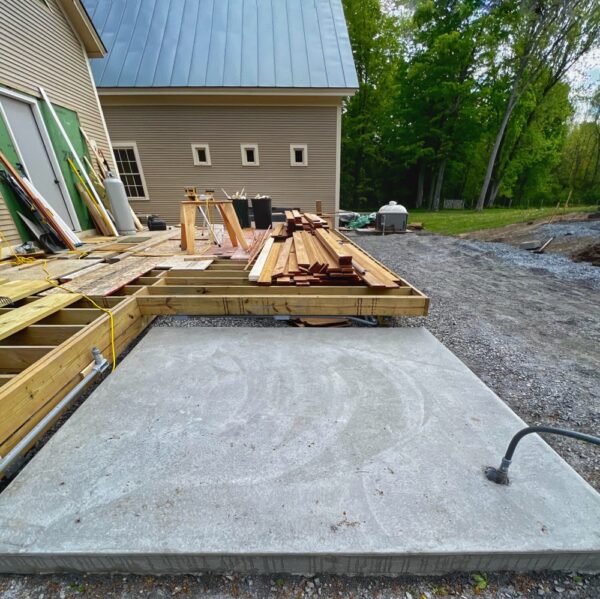
Concrete Truck Arrives (Photo: R.P. Murphy)Supi and Calvin Pull Concrete for Hot Tub Slab (Photo: R.P. Murphy)Supi, Calvin, and Tony Pull Concrete for Hot Tub Slab (Photo: R.P. Murphy)Supi and Calvin Level Hot Tub Slab as Tony Pulls Concrete (Photo: R.P. Murphy)Supi Screeds Hot Tub Slab (Photo: R.P. Murphy)Supi Floating and Edging Hot Tub Slab (Photo: R.P. Murphy)Hot tub Slab Slab Cured and Stripped (Photo: R.P. Murphy)Hot tub Slab Slab Cured and Stripped (Photo: R.P. Murphy)
That slab is ready for a hot tub. Thank you also to Brandon who installed the electrical prior to the concrete pour. Almost time to launch!
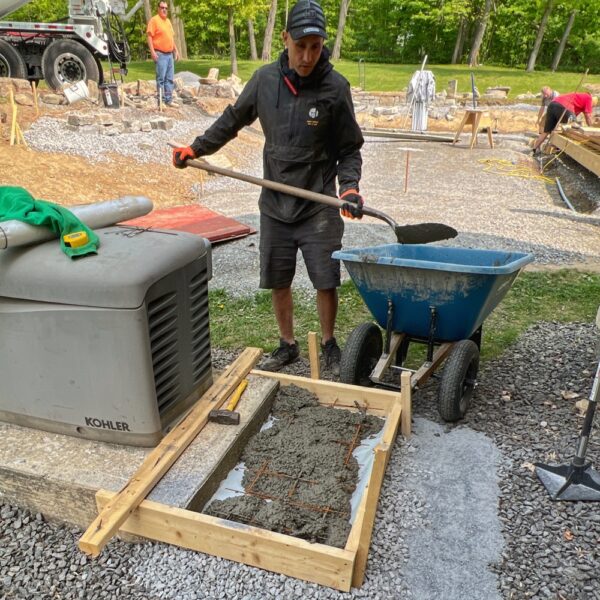
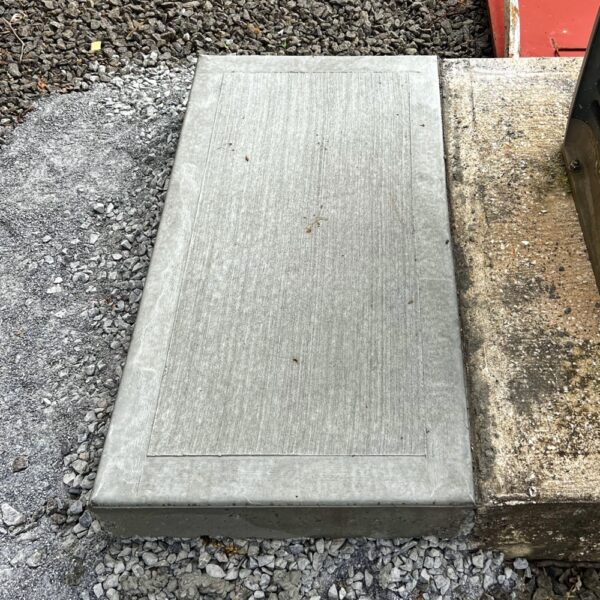
Mini Split Concrete Slab
The smaller, but no less essential slab is actually an extension of the one already supporting our generator. It will be the home of a condenser/compressor for the new mini split in the icehouse.
Tony Fills Concrete Form for Mini Split Slab (Photo: R.P. Murphy)Leveling Concrete for Mini Split Slab (Photo: R.P. Murphy)Pam Leveling Concrete for Mini Split Slab (Photo: Tony Foster)Mini Split Slab Swept and Edged (Photo: R.P. Murphy)Mini Split Slab Cured and Stripped (Photo: R.P. Murphy)
Thank you, Pam, Tony, Supi, and Calvin. You all surprise and impress us again and again. Congratulations and thank you.
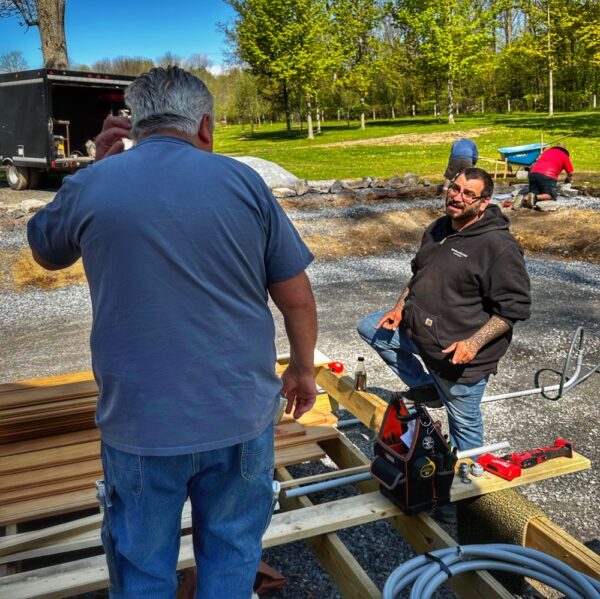
Many new and exciting thresholds crossed today. Supi, Calvin, and Tony started the stone hardscape project. Peter and Justin installed the columns and book matched ash transition upon which they rest. We finalized the shower glass order, and we *almost* finalized the coffee bar countertop stone. Eric arrived at the halfway point in the bathroom garapa paneling. And Brandon started installing the wiring for the hot tub. What a day!
Brandon Wiring the Hot Tub (Photo: Geo Davis)
It’s pretty exciting yo be one step closer to our first soak in Rosslyn’s icehouse spa! Brandon and his assistant will be back first thing tomorrow to wrap up the preliminary wiring so that the slab can be poured later this week. Hot tub, wiring, concrete slab, and then… we’ll be one giant step closer to soaking our bones and celebrating.
Brandon has been for a couple of years as the electrician for the boathouse gangway / waterfront rehabilitation, the deck rebuild, and the icehouse adaptive reuse. He’s been a tremendous asset, problem solving mystery after mystery, and shoehorning his work into challenging intervals throughout all three projects.
We can’t wait to celebrate another finished project soon!
Rosslyn’s icehouse looks a little different this evening. The east entrance door was installed by Peter, subtly transforming the most visible elevation of the building and finally illuminating the entrance hallway with natural light after months in a “cloistered” work environment without any natural light.
East Door Installed (Photo: Geo Davis)
Although there remains some additional shimming and trimming (plus removing paint from the window panes), the public facade of the icehouse is finally coming into focus. However, another element will appear about a month from now, a familiar element for those already accustomed to this facade. I’m going to keep mum for now, but a fun surprise soon!
East Door Installed (Photo: Geo Davis)
The much anticipated exterior change is only half the news. The interior is transformed! Sure, the overpainting tempers the impact of this new door, but it’s already recasting the interior in natural light. And a welcome evolution this is. You might recall that all windows and doors were closed in with insulated paneling months ago to ensure a warm, weatherproof work environment during the winter. Well, it worked perfectly, but everyone on the team is longing for natural light. At last the entrance vestibule is illuminated from without. I’m looking forward to starting my day in the icehouse tomorrow morning to see that it looks with the sunrise bathing the interior…
I’m slightly obsessed with transitions and betweenness. Liminality and interstices. Metamorphosis, reawakening, and transformation inevitably weave themselves into my words about gardening and historic rehabilitation. In fact, in a not altogether exaggerated sense, Rosslyn Redux is a kind of carefree contemplation of thresholds, the art of thresholds, and the artifacts of crossing thresholds…
From carpentry fiasco (boathouse gangway) to carpentry triumph (house deck), from summer to autumn (bittersweet seasonality), from hale and hardy to COVID crash dummy, from perennially postponed icehouse rehab to 100% timely reboot, from Adirondacks to southwest,… We are awash in transitions! (Source: Transitions)
Supi and Peter Fabricate a Charactered Threshold (Photo: R.P. Murphy)
One of the most notable changes in the icehouse rehab is a considerable increase in apertures, transparency, and porosity. With an eye to more seamlessly integrating the interior and exterior experience while reducing the potentially confining ambience of such a small (approximately 18’ x 30’) structure, we have introduced lots of glass.
Windows and doors blur boundaries between the enclosed environment and the exterior views, landscape, hardscape, decks and courtyard. Within the interior we’ve also endeavored to maximize transparency and porosity by embracing an open plan.
Only the bathroom is fully enclosed. Other zones (entrance, coffee bar, main room, and loft study/studio/office) flow into one another permitting the small volume to feel more ample. Design continuity and viewshed integration enhance this sense of openness, favoring cohesion and harmony over spatial subdivision by function. And yet, subtle transitions (i.e. a doorway threshold, the staircase and banister to loft.) are present and necessary.
In these instances delineation and boundaries serve us. Sometimes the utility is practical. For example, the loft is enclosed with a banister that extends from the top of the staircase to the north and south knee walls. Although code compliance is the most obvious reason for this, the underpinning logic is that a railing enclosing the second-story loft ensures that we do not accidentally pitch off the edge. The porosity of railing and balusters affords transparency, but the sturdy boundary ensures safety, as much a visual cue (caution, stay back, etc.) as a functional restraint.
Flooring transitions and how they help differentiate space and use warrant careful consideration. This is true in the icehouse where the top stair riser meets the loft floor, representing a meeting of dissimilar materials (painted poplar staircase and sealed beech flooring) and a blurring of function (stair tread and flooring). It is also true in the elm and garapa threshold that I conceived and Peter created for the icehouse bathroom doorway.
The highly charactered elm — grown, harvested, aged, milled, and finished on Rosslyn’s property — will integrate with the ash and elm flooring in the main floor of the icehouse. (Source: Elm and Garapa Threshold)
Today’s update considers the passage from the east entrance and coffee bar area into the main room of the icehouse. In addition to a shift in function and feel, the 8’ flat ceiling in the entrance and coffee bar area opens up to a 2-story cathedral ceiling in the main room. Accentuating this transition with a pair of columns that flank the passageway adds a touch of drama and playfulness given the incongruity of the diminutive space and the dominant pillars.
The elm and ash flooring will run east-west, so a threshold of sorts, seamlessly conjoining while differentiating the two zones presented an opportunity. Thresholds — door treads, doorsills, etc. — signal the ending of one space and the beginning of another space. But they often function as weather barrier and/or doorstop as well, resulting in a profile raised above the floor plane. I did not desire this threshold to deviate from the floor. Subtler than a doorway threshold, I nevertheless wanted to offer a visual cue that a transition is being made between two zones, a perhaps subconscious delineation of usage.
I explained my vision, first to Hroth and subsequently to Peter, for a threshold running perpendicular to the flooring and wide enough to frame the column plinths equally around the outer perimeter. Fabricated out of the same ash or elm that we are using for the floor, I proposed a pair of book matched planks that would cause pause and invite interest. I asked them to think of this over-wide threshold, not as a throwaway intended simply to bridge otherwise similar areas of flooring, but instead as an integrated piece of art. A contiguous embellishment within the broader “tapestry” of the floor. Character-rich grain and coloration. Precise joinery, perhaps an inlaid bowtie if necessary and aesthetically pleasing. An interstitial experience/object as bold and intriguing as the columns that rest upon it.
Peter Conjoins Charactered Boards for Threshold (Photo: R.P. Murphy)
As you can see, Peter has begun to transform the vision into reality. A mesmerizing tableau to be tread upon. The art of thresholds.
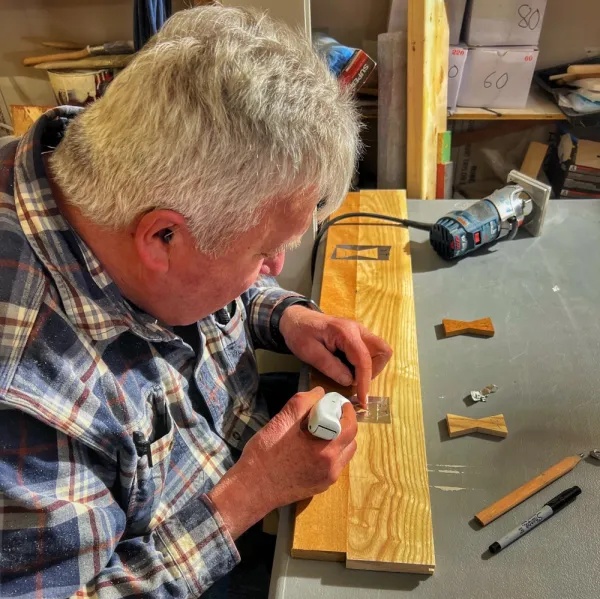
A Jeroboam of gratitude to Peter Vaiciulis for agreeing to fabricate a custom elm and garapa threshold for the icehouse bathroom doorway. Conjoining two two dissimilar hardwoods is challenging enough, but I added an extra detail (or two) that you just might be able to spot in the photo below.
Peter Vaiciulis Fabricating Elm/Garapa Threshold (Photo: R.P. Murphy)
The strip of garapa (closer to Peter in the photo above) will form the interior side of the threshold, integrating the slate floor and antique door with the upcycled garapa paneling. The highly charactered elm — grown, harvested, aged, milled, and finished on Rosslyn’s property — will integrate with the ash and elm flooring in the main floor of the icehouse.
If you look closely you’ll see two bowties, one elm and the other garapa, sitting on the table next to the threshold. Peter is preparing to router and chisel these bowtie joints (butterfly joint) into the new threshold, resulting in a visual testament, indeed a subtle celebration of two dissimilar hardwoods united into a single door sill.
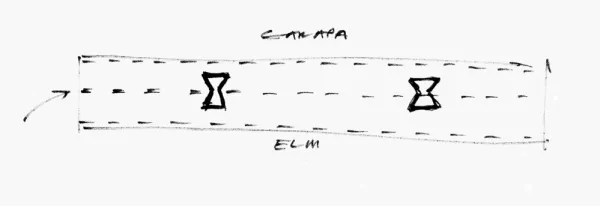
Sketch for Elm/Garapa Threshold (Photo: Geo Davis)
I gave Peter the quick sketch above several weeks ago with an explanation for what I envisioned. He instantly understood and accepted the challenge. His woodworking, joinery, and custom carpentry have proven indispensable not only in metamorphosing my ideas into reality, but in mentoring many members of the team.
Threshold & Bowties, Haiku
Crossing a threshold with the hammer and chisel, hardwood joinery.
— Geo Davis
Chiseling the Threshold
In the video snippet below a hammer and chisel begin to reveal the location for one of the soon-to-be embedded bowties.
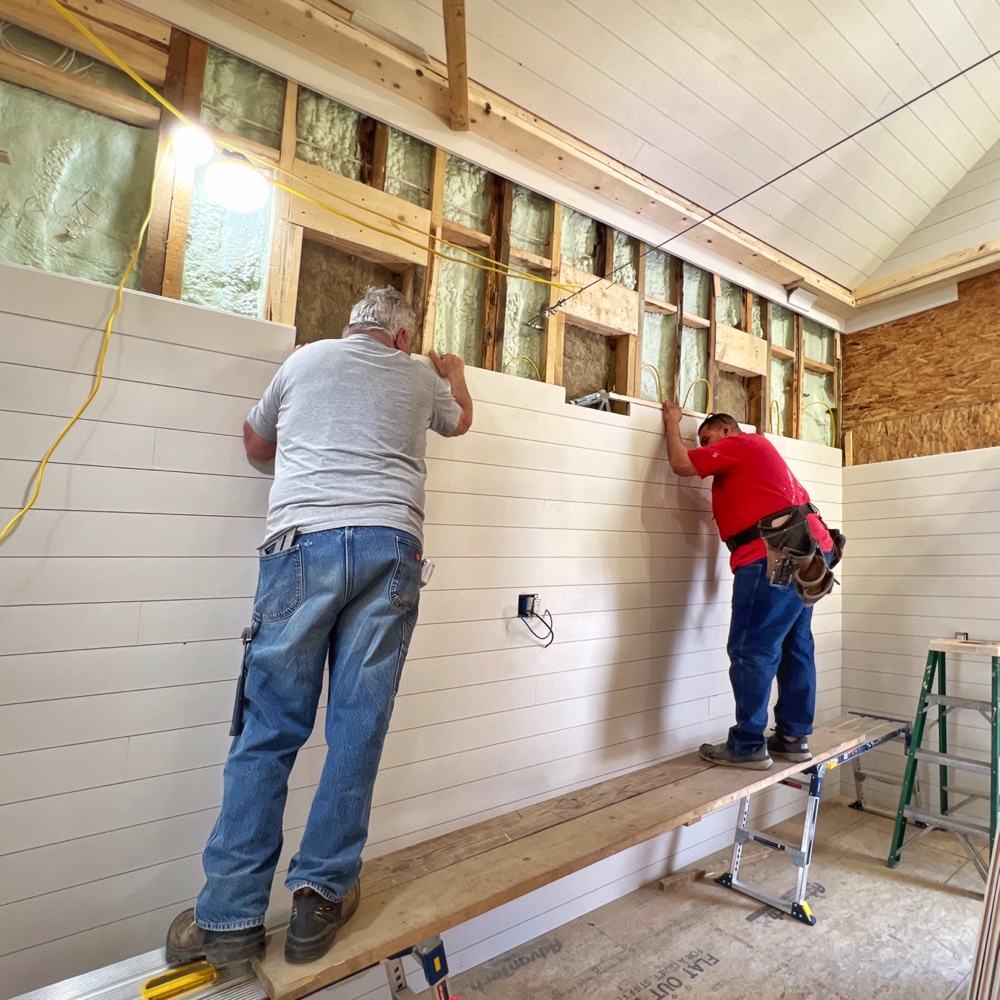
Almost one month ago, on March 19, I shared a T&G nickel gap progress report. Needless to say, I was bullish at the time. It had taken a while to make the transition to interior paneling, but once we started, I was optimistic that we’d make swift progress. That was then. It turns out that “nickel gapping” the walls and ceiling inside the icehouse would be intermittent and slower than anticipated.
Peter & Supi Nickel Gapping (Photo: R.P. Murphy)
Although most of the extended team has helped with nickel gapping the icehouse interior in one way or another, at one time or another, much of the recent progress has been made by Supi.
Nickel Gapping South Elevation (Photo: R.P. Murphy)
Almost exactly two years ago we were shiplapping the interior of ADK Oasis Lakeside. It’s a big house with lots and lots and lots of shiplap. And the persistent shiplap installation timeline weighed heavily on final month and a half. Having personally undertaken two sections of shiplap, I was a receptive to the proposal to change from shiplap to T&G nickel gap. Installation would be much quicker, I was assured. Much quicker? How much quicker? That turns out to have been an overly optimistic perspective. Nevertheless, we are entering the homestretch.
Nickel Gapping Entrance Area (Photo: R.P. Murphy)
With less than a month before the windows arrive, we really need to wrap up with nickel gapping so that we can start installing the variable width ash and elm flooring the team has been preparing for months. And the garapa paneling in the bathroom, another time consuming project is yet to be started. And there’s plenty more: stair risers, treads, and ;handrail; trimming and cabinetry (ie. coffee bar); decking east and west decks; hot tub and mini split slabs, hot tub installation, hardscaping (stone walls, steps, and pavers); brackets and tie rods to install; and… so… much… more!
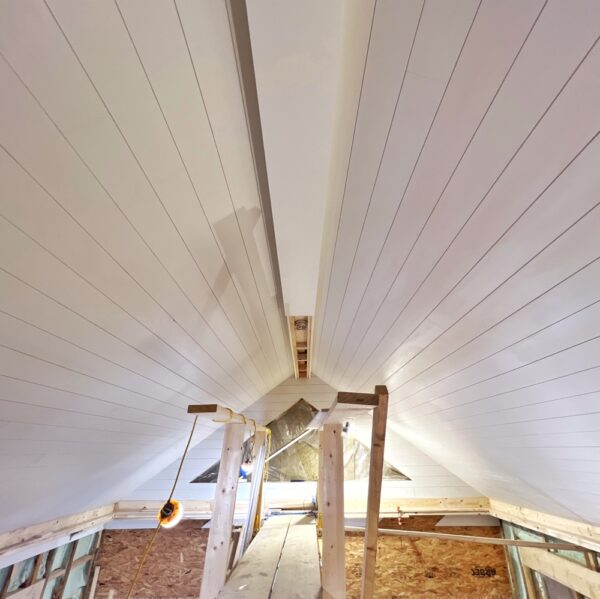
Icehouse Ceiling, Looking West (Photo: R.P. Murphy)
With deadlines looming and still heady punchlists, it’s easy to get angsty. But there’s a mountain of accomplishment in the rearview mirror to offset concern and foster guarded optimism.
For now we stay focused, sprint toward the finish line, and trust the process. Nickel gapping today, hardwood floor installation soon.
Icehouse Ceiling, Looking East (Photo: R.P. Murphy)
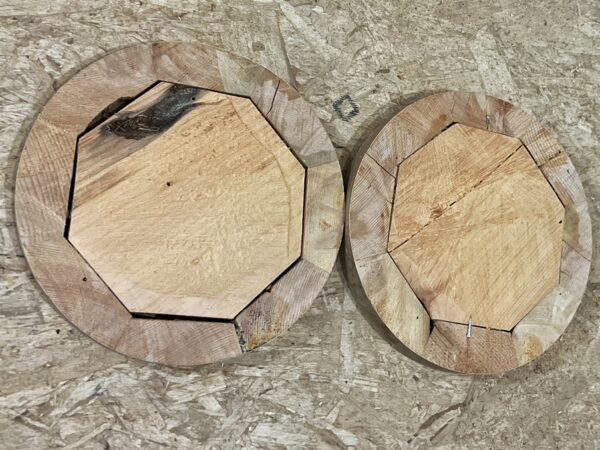
In the snapshot above, Peter is trimming the top off one of two Greek revival columns deconstructed and salvaged back in 2006 when we rehabilitated Rosslyn’s dining room. Although our vision was to repurpose these bold design elements, to upcycle them some way, somehow, it wasn’t until undertaking the icehouse rehab (after postponing it indefinitely 14 or 15 years ago) that this capricious concept presented itself: use them in the icehouse!
Why, you might well ask, would we need two imposing columns inside the diminutive icehouse? While the question is reasonable, perhaps *need* is not the most appropriate evaluation. After all, adaptive reuse of a utility building originally constructed to fulfill a highly specific (and outdated) function obviously doesn’t *need* handsome embellishments for structural support. And yet the opportunity to re-integrate these historic Rosslyn elements into an otherwise utilitarian barn has presented a whimsical challenge that at some level echoes the unlikely marriage of work space and recreation hub we’re imagining into existence with this newest rehab project.
And soon enough, you’ll be able to witness the capricious way in which this pair of columns (and an understated entablature) not only help support the loft where I’ll be composing these daily dispatches in coming months, but also define and frame a spatial transition from the more intimate entrance and coffee bar into the loftier main room of this small building.
Offcuts from Re-tuning Columns (Photo: R.P. Murphy)
Those geometric discs above are actually offcuts from Peter’s column re-tuning. while it’s easy enough for me to conjure these quirky concepts, and similarly viable for Tiho to translate my ideas into drawings, it is left to the alchemy of Peter and other finish carpenters to ultimately morph busily s and plans into reality. Thank you, Peter!
Tuning, Haikus
Re-tuning columns
salvaged from a dining room,
once deconstructed.
Sometimes a few fingers full of words best communicate a notion nebulous enough to wiggle free of prosaic paragraphs. And other times image, sound, motion speak sounder than words. So I conclude with two haikus, the more familiar variety above, and a quirky mashup below. Enjoy.
Time for a progress report on the garapa paneling that will soon embellish the icehouse bathroom. We started out gently easing the edges, but several iterations later we’ve settled on a full roundover. Here’s why…
Garapa Edge Profiles v1.0 (Photo: Geo Davis)
Roundover Rewind
Because the garapa upcycling backstory helps illuminate the decision to edge these boards with a diminutive roundover, let’s rewind the time machine. The garapa we’ll be installing in the icehouse bathroom as paneling began service at Rosslyn back in 2008 as decking, and it served admirably for almost a decade and a half, enduring summer feasts and foot stomping fêtes, winter snow and ice, and all manner of wear-and-tear. Last summer we deconstructed the deck, not because it was failing, but because the TimberSIL substructure was kaput.
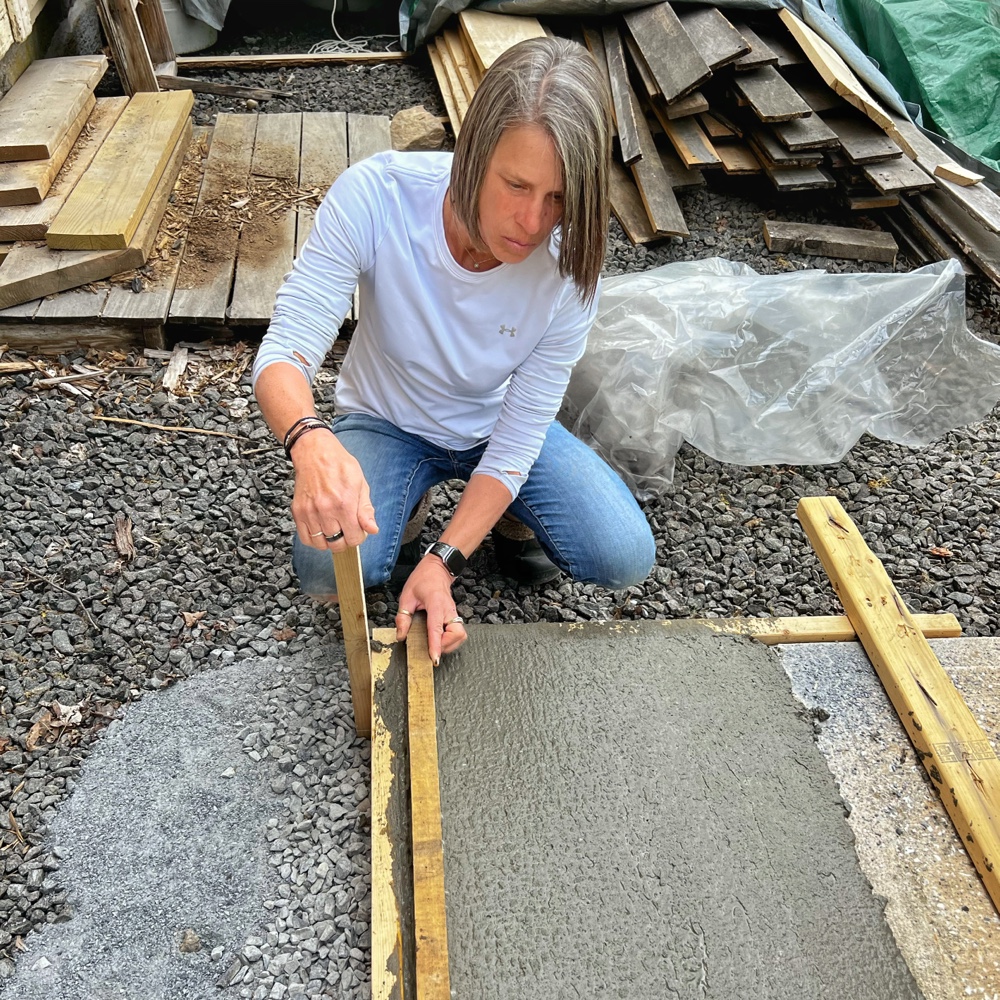
Grading Garapa for Upcycling (Photo: Tony Foster)
After dismantling the old deck we sorted out the best garapa decking boards for upcycling; “cherry picked” and inventoried the best-of-the-best material to ensure sufficient linear footage for adaptive reuse in the icehouse; and then began the painstaking process of trimming, re-dimensioning, planing, and grooving the edges that will be conjoined with garapa splines during installation.
A little over a month ago Peter experimented with several profiles. He started by just barely breaking/easing the edge two ways: sand paper and a single pass with a hand plane at 45°. Too subtle. He eased slightly more and then a little more. He also tried a subtle v-groove (two micro-chamfers), and we finally settled on a full roundover. Both the chamfer and round over details were achieved with a handheld trim router and a super small round over bit.
Garapa Edge Profiles v2.0 (Photo: Geo Davis)
Why Roundover?
Why did I make this decision? Because the garapa is repurposed, it is charactered and irregular. Preserving this patina is important to the finished look we’re endeavoring to achieve. A subtle wabi-sabi story is being told not only in the varied lustre and texture of these boards, but also the handworked (ergo slightly irregular) dimensions. When installed there will be some variability in the thickness of the boards. The roundover will create a shadow line while accommodating the slight inconsistency from board to board, and the quarter round profile will be less severe than the 45° chamfer would have been. I’m hoping that it will all come together with a a subtle horizontal linearity that creates cohesion for the well worn wood.
Tony Roundover Edging Garapa (Photo: R.P. Murphy)
Well Worn & Well Worked
It’s worth noting that the age and patina were showcasing with this upcycled lumber has only been made viable through the guidance of Hroth, Peter, and Pam and Tony’s devoted attention and immeasurable hard work over many months. I joke with Tony that he’s investing lots of love into transforming this material. From debris to centerpiece. In the photo above he’s roundover edging boards that he’s literally been working and reworking since last September or October. That’s a LOT of love!