I’m slightly obsessed with transitions and betweenness. Liminality and interstices. Metamorphosis, reawakening, and transformation inevitably weave themselves into my words about gardening and historic rehabilitation. In fact, in a not altogether exaggerated sense, Rosslyn Redux is a kind of carefree contemplation of thresholds, the art of thresholds, and the artifacts of crossing thresholds…
From carpentry fiasco (boathouse gangway) to carpentry triumph (house deck), from summer to autumn (bittersweet seasonality), from hale and hardy to COVID crash dummy, from perennially postponed icehouse rehab to 100% timely reboot, from Adirondacks to southwest,… We are awash in transitions! (Source: Transitions)
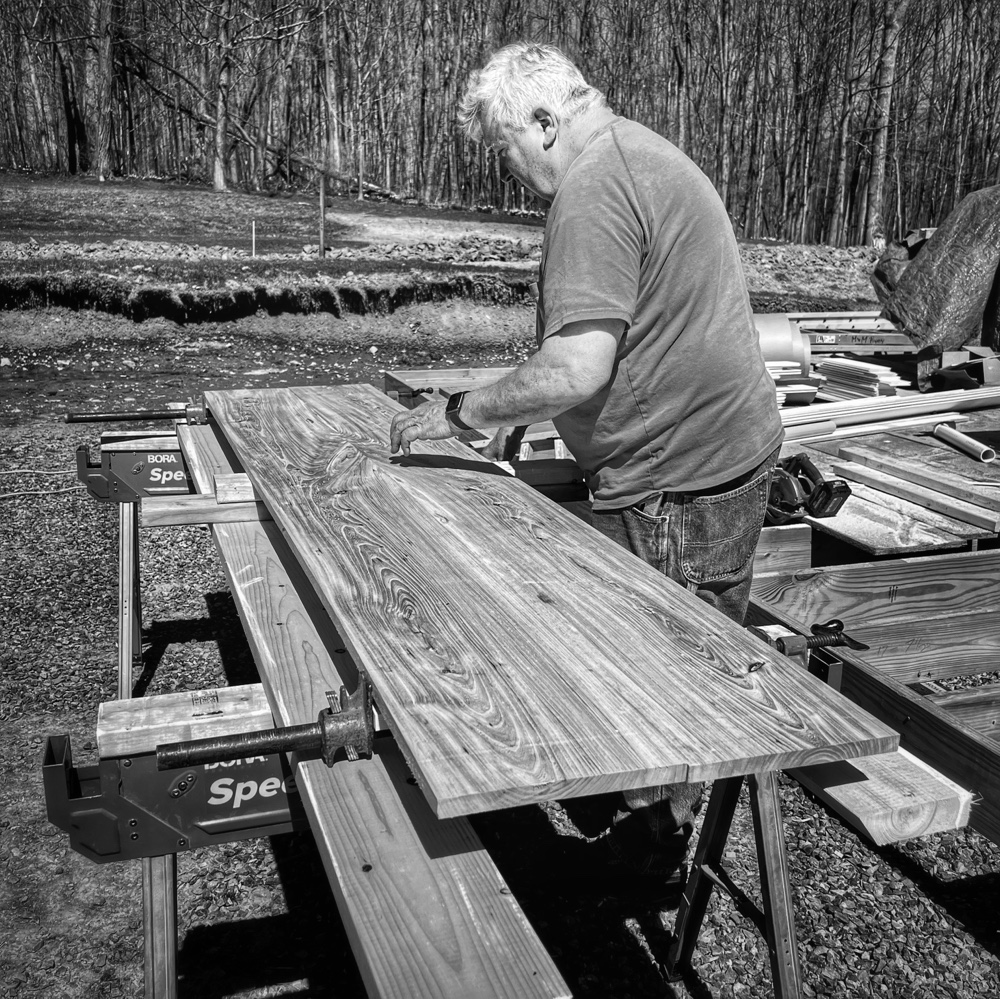
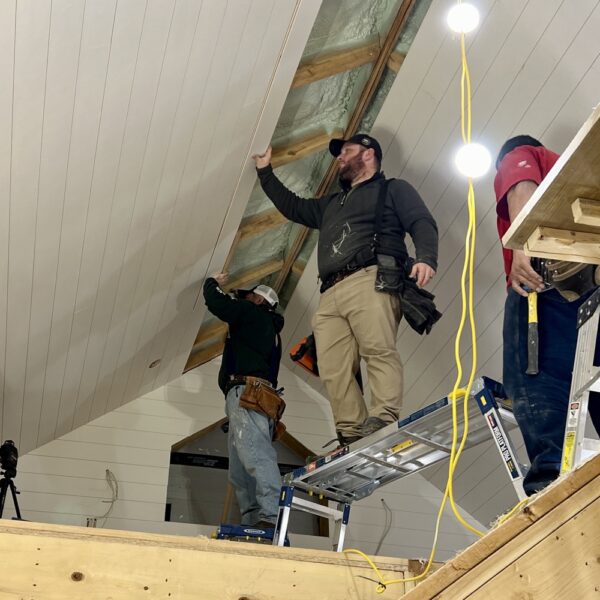
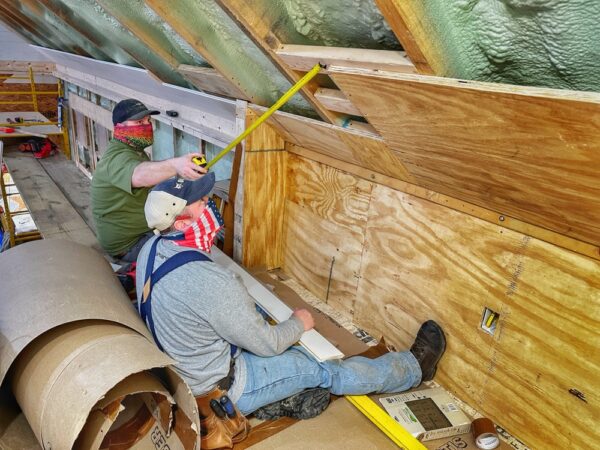
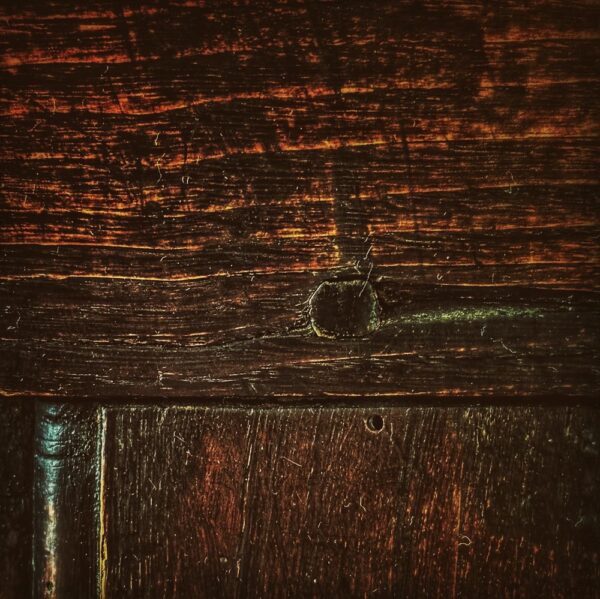
Supi and Peter Fabricate a Charactered Threshold (Photo: R.P. Murphy)
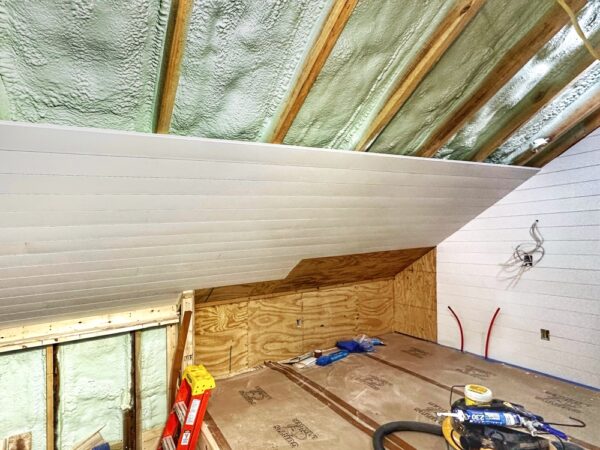
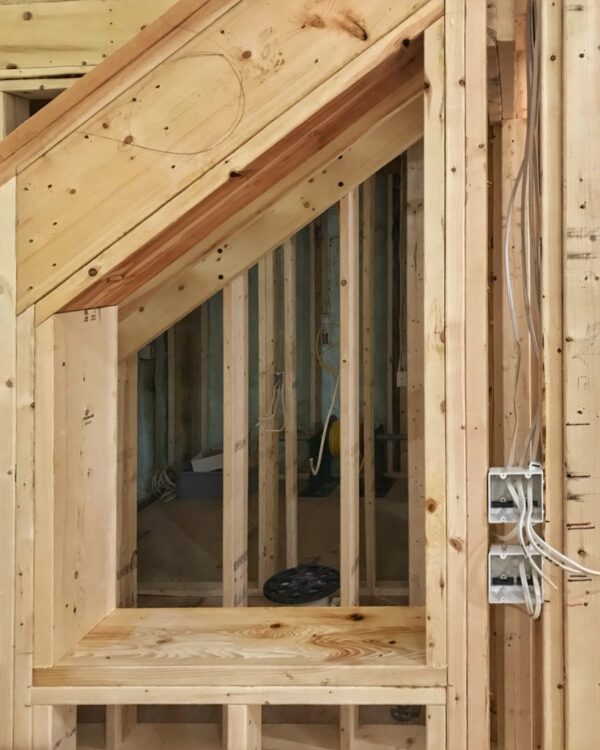
One of the most notable changes in the icehouse rehab is a considerable increase in apertures, transparency, and porosity. With an eye to more seamlessly integrating the interior and exterior experience while reducing the potentially confining ambience of such a small (approximately 18’ x 30’) structure, we have introduced lots of glass.
Windows and doors blur boundaries between the enclosed environment and the exterior views, landscape, hardscape, decks and courtyard. Within the interior we’ve also endeavored to maximize transparency and porosity by embracing an open plan.
Only the bathroom is fully enclosed. Other zones (entrance, coffee bar, main room, and loft study/studio/office) flow into one another permitting the small volume to feel more ample. Design continuity and viewshed integration enhance this sense of openness, favoring cohesion and harmony over spatial subdivision by function. And yet, subtle transitions (i.e. a doorway threshold, the staircase and banister to loft.) are present and necessary.
In these instances delineation and boundaries serve us. Sometimes the utility is practical. For example, the loft is enclosed with a banister that extends from the top of the staircase to the north and south knee walls. Although code compliance is the most obvious reason for this, the underpinning logic is that a railing enclosing the second-story loft ensures that we do not accidentally pitch off the edge. The porosity of railing and balusters affords transparency, but the sturdy boundary ensures safety, as much a visual cue (caution, stay back, etc.) as a functional restraint.
Flooring transitions and how they help differentiate space and use warrant careful consideration. This is true in the icehouse where the top stair riser meets the loft floor, representing a meeting of dissimilar materials (painted poplar staircase and sealed beech flooring) and a blurring of function (stair tread and flooring). It is also true in the elm and garapa threshold that I conceived and Peter created for the icehouse bathroom doorway.
The highly charactered elm — grown, harvested, aged, milled, and finished on Rosslyn’s property — will integrate with the ash and elm flooring in the main floor of the icehouse. (Source: Elm and Garapa Threshold)
Today’s update considers the passage from the east entrance and coffee bar area into the main room of the icehouse. In addition to a shift in function and feel, the 8’ flat ceiling in the entrance and coffee bar area opens up to a 2-story cathedral ceiling in the main room. Accentuating this transition with a pair of columns that flank the passageway adds a touch of drama and playfulness given the incongruity of the diminutive space and the dominant pillars.
The elm and ash flooring will run east-west, so a threshold of sorts, seamlessly conjoining while differentiating the two zones presented an opportunity. Thresholds — door treads, doorsills, etc. — signal the ending of one space and the beginning of another space. But they often function as weather barrier and/or doorstop as well, resulting in a profile raised above the floor plane. I did not desire this threshold to deviate from the floor. Subtler than a doorway threshold, I nevertheless wanted to offer a visual cue that a transition is being made between two zones, a perhaps subconscious delineation of usage.
I explained my vision, first to Hroth and subsequently to Peter, for a threshold running perpendicular to the flooring and wide enough to frame the column plinths equally around the outer perimeter. Fabricated out of the same ash or elm that we are using for the floor, I proposed a pair of book matched planks that would cause pause and invite interest. I asked them to think of this over-wide threshold, not as a throwaway intended simply to bridge otherwise similar areas of flooring, but instead as an integrated piece of art. A contiguous embellishment within the broader “tapestry” of the floor. Character-rich grain and coloration. Precise joinery, perhaps an inlaid bowtie if necessary and aesthetically pleasing. An interstitial experience/object as bold and intriguing as the columns that rest upon it.
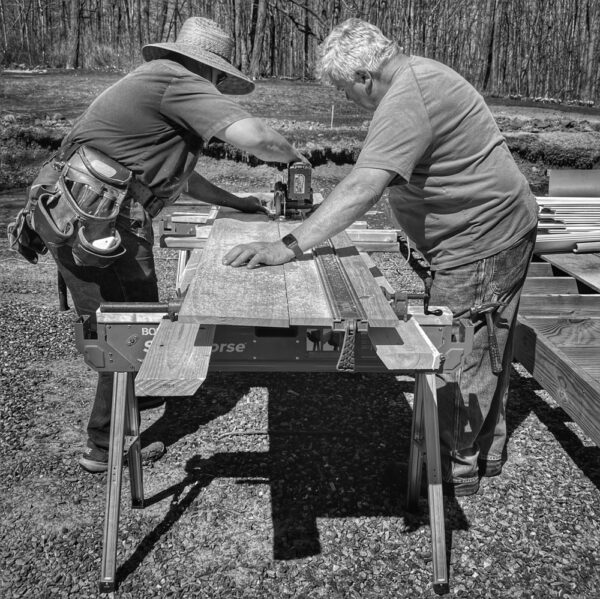
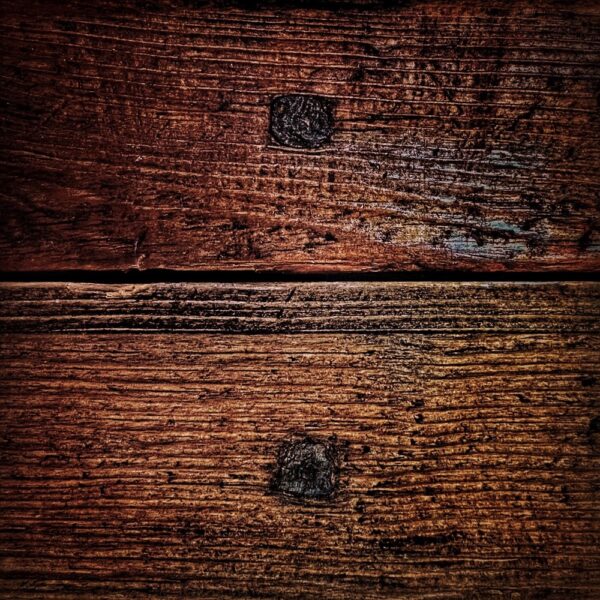
Peter Conjoins Charactered Boards for Threshold (Photo: R.P. Murphy)
As you can see, Peter has begun to transform the vision into reality. A mesmerizing tableau to be tread upon. The art of thresholds.
For the last couple of weeks my future study/studio/office in the icehouse has been serving as a lumber loft. Remember my excitement when we completed installation of the beech flooring (surplus materials remaining from reflooring Rosslyn’s living room, parlor, kitchen, and entrance hallway) a couple months ago? And my anticipation when Tony was about to start sanding and sealing the beech?
Well, “soon” slipped into later. Tony sanded and sealed and sanded and sealed… Gradually he built up a luxurious luster that I should have showcased long ago. But the orphaned dispatch was preempted by another and then another. Time whistled past. And I’m still intending to revisit that process and the comely consequences. Soon!
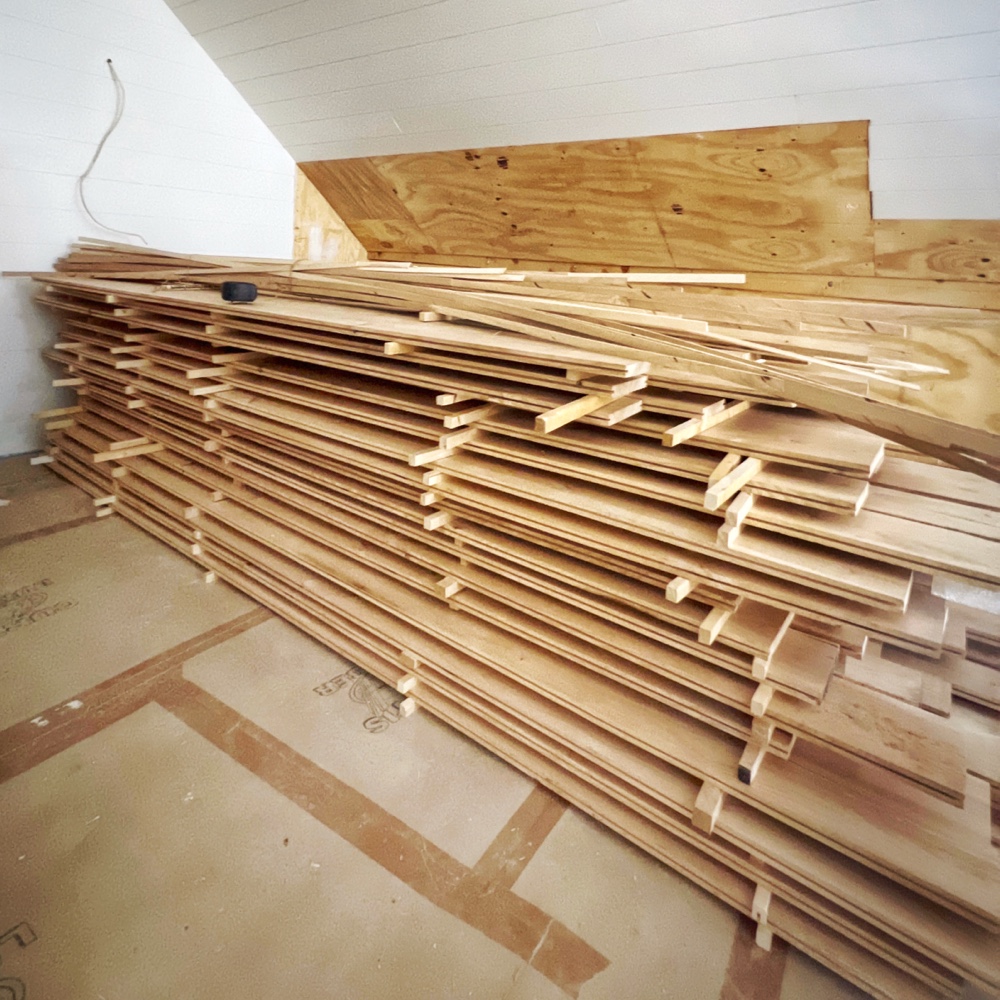
Acclimating Ash & Elm Flooring in the Lumber Loft (Photo: R.P. Murphy)
And part and parcel of my current confessions is owning up to yet another inadvertent omission. There’s a drafted-but-delayed dispatch I initiated last autumn, updated intermittently this winter, but that today still remains unfinished and unpublished. Temporarily titled, “Homegrown Lumber: From Stump to Floor”, I am backstory-ing the ash and elm timber-turned-flooring that will soon ground Rosslyn icehouse’s first floor. Literally years in the works, this homegrown flooring is has been one of the guiding elements in the icehouse rehabilitation.
So the chronicle will be told. Not now. But as soon as I can tell the story succinctly and comprehensively. Hope it’ll be worth the wait. Until then, today’s sneak peek inside of the icehouse is a look at the lumber loft.
Acclimating Ash & Elm Flooring in the Lumber Loft (Photo: R.P. Murphy)
Lumber Loft, Haiku
Desk and bookshelves soon;
now stickered stacks of homegrown
floorboards, splines, drying.
The congruity between the patience and painstaking toil invested in these former-trees-future-floorboards and the poems and prose I cultivate from seed to harvest intrigues me. Especially so given my writing loft temporarily serving as a lumber loft…
Flooring and Splines Acclimating (Photo: R.P. Murphy)
Acclimating Ash & Elm Flooring
I will forestall the tempting tale of how these character rich floorboards have come so close to installation within felling distance of the coordinates which marked their birth, their maturation, and their yield. I will postpone the how and why this timber is hyperlocal, having never once been transported off-property. And instead I will touch briefly on the merits of the lumber loft for acclimating the homegrown, milled, and seasoned ash and elm that will soon and forever grace the icehouse’s first floor.
Closeup of Splines Acclimating in Lumber Loft (Photo: R.P. Murphy)
In the photograph above bundles of splines milled from the same ash and elm as the flooring rest atop the boards they will conjoin. In the previous images (perhaps the first eat of all) you can discern the grooves cut into the floorboards’ edges that will receive the splines. Mimicking the function of tongue-and-groove, our splined floorboard joinery will ensure stability while accommodating the inevitable movement arriving from changes in humidity and temperature. If our installation is successful, this hardwood floor will last at least as long as the already impressive tenure of this historic building. And to ensure a successful installation it’s vital to properly acclimate the material before it is fastened into place.
The icehouse’s loft — elevated and open to the interior of the building — provide ideal conditions for acclimating: warmth and air circulation. Stickering the wood (stacking the lumber with identically dimensioned perpendicular spacers between each course) ensures consistent airflow and temperature. Why is this important? Although the rough cut lumber was seasoned (dried) and stored in the carriage barn for over a decade prior to finish milling it into flooring, fluctuations in humidity and temperature shrink and expand the wood. They can even twist, bow, and warp the lumber. So acclimating the material in the space where it will subsequently be installed enables us to improve the likelihood of a stable and aesthetically pleasing floor.
In short? The lumber loft has proven to itself to be invaluable for quality control!
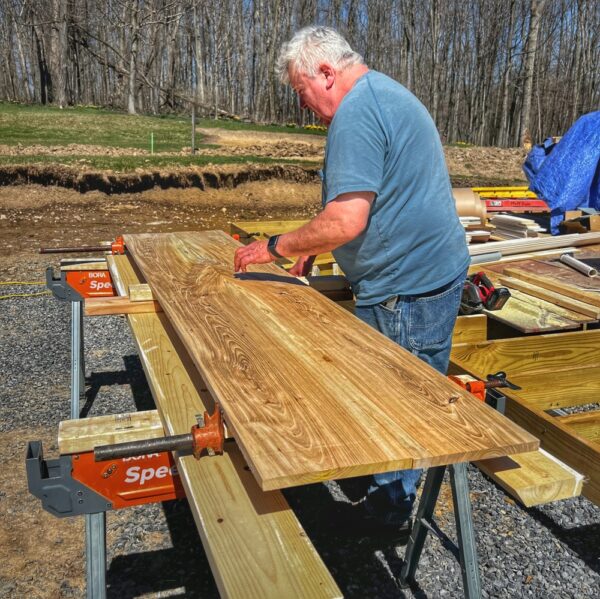
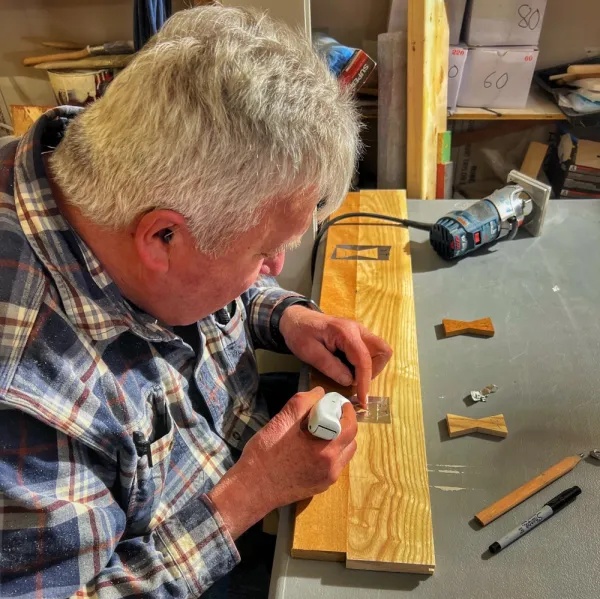
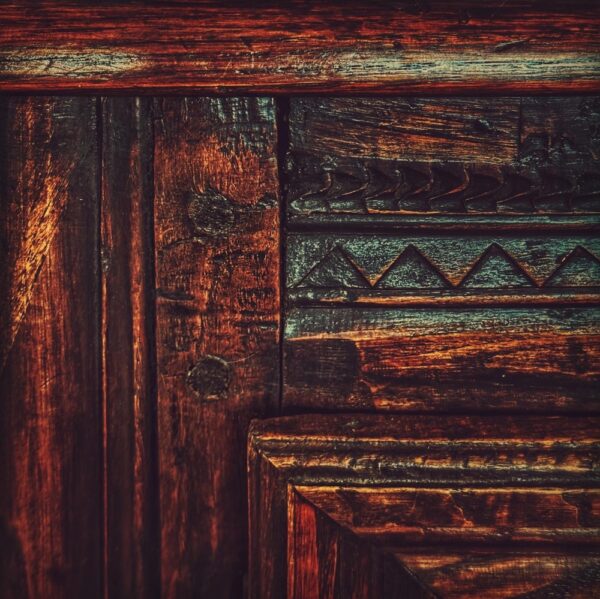
A Jeroboam of gratitude to Peter Vaiciulis for agreeing to fabricate a custom elm and garapa threshold for the icehouse bathroom doorway. Conjoining two two dissimilar hardwoods is challenging enough, but I added an extra detail (or two) that you just might be able to spot in the photo below.
Peter Vaiciulis Fabricating Elm/Garapa Threshold (Photo: R.P. Murphy)
The strip of garapa (closer to Peter in the photo above) will form the interior side of the threshold, integrating the slate floor and antique door with the upcycled garapa paneling. The highly charactered elm — grown, harvested, aged, milled, and finished on Rosslyn’s property — will integrate with the ash and elm flooring in the main floor of the icehouse.
If you look closely you’ll see two bowties, one elm and the other garapa, sitting on the table next to the threshold. Peter is preparing to router and chisel these bowtie joints (butterfly joint) into the new threshold, resulting in a visual testament, indeed a subtle celebration of two dissimilar hardwoods united into a single door sill.
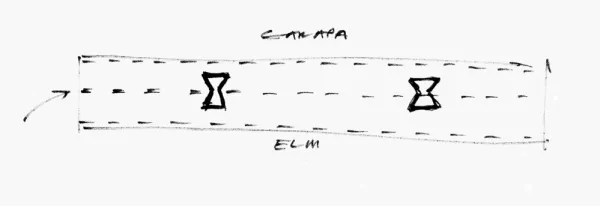
Sketch for Elm/Garapa Threshold (Photo: Geo Davis)
I gave Peter the quick sketch above several weeks ago with an explanation for what I envisioned. He instantly understood and accepted the challenge. His woodworking, joinery, and custom carpentry have proven indispensable not only in metamorphosing my ideas into reality, but in mentoring many members of the team.
Threshold & Bowties, Haiku
Crossing a threshold with the hammer and chisel, hardwood joinery.
— Geo Davis
Chiseling the Threshold
In the video snippet below a hammer and chisel begin to reveal the location for one of the soon-to-be embedded bowties.
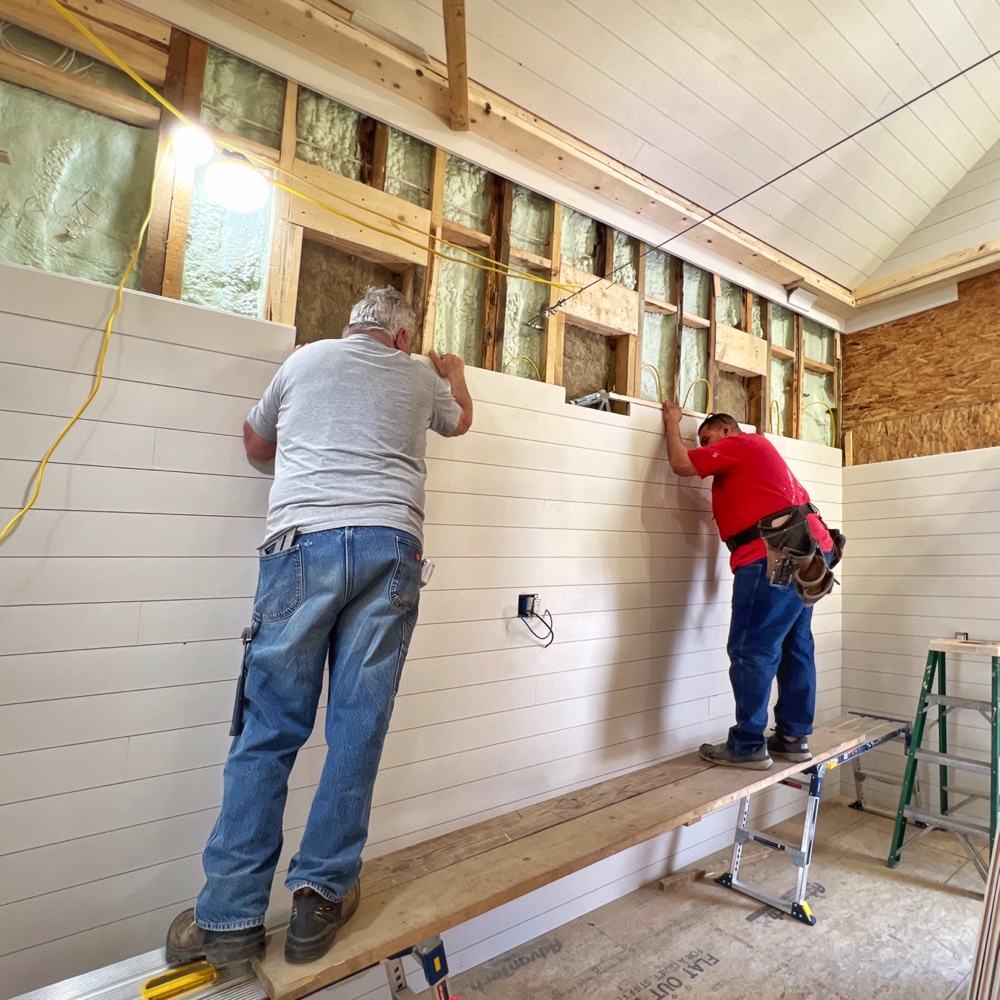
Almost one month ago, on March 19, I shared a T&G nickel gap progress report. Needless to say, I was bullish at the time. It had taken a while to make the transition to interior paneling, but once we started, I was optimistic that we’d make swift progress. That was then. It turns out that “nickel gapping” the walls and ceiling inside the icehouse would be intermittent and slower than anticipated.
Peter & Supi Nickel Gapping (Photo: R.P. Murphy)
Although most of the extended team has helped with nickel gapping the icehouse interior in one way or another, at one time or another, much of the recent progress has been made by Supi.
Nickel Gapping South Elevation (Photo: R.P. Murphy)
Almost exactly two years ago we were shiplapping the interior of ADK Oasis Lakeside. It’s a big house with lots and lots and lots of shiplap. And the persistent shiplap installation timeline weighed heavily on final month and a half. Having personally undertaken two sections of shiplap, I was a receptive to the proposal to change from shiplap to T&G nickel gap. Installation would be much quicker, I was assured. Much quicker? How much quicker? That turns out to have been an overly optimistic perspective. Nevertheless, we are entering the homestretch.
Nickel Gapping Entrance Area (Photo: R.P. Murphy)
With less than a month before the windows arrive, we really need to wrap up with nickel gapping so that we can start installing the variable width ash and elm flooring the team has been preparing for months. And the garapa paneling in the bathroom, another time consuming project is yet to be started. And there’s plenty more: stair risers, treads, and ;handrail; trimming and cabinetry (ie. coffee bar); decking east and west decks; hot tub and mini split slabs, hot tub installation, hardscaping (stone walls, steps, and pavers); brackets and tie rods to install; and… so… much… more!
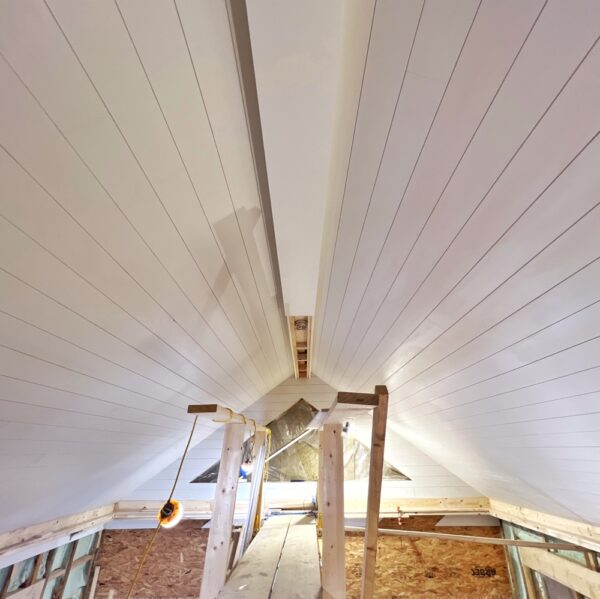
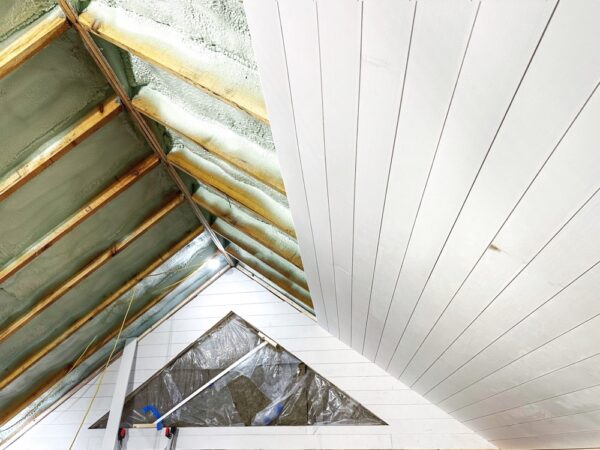
Icehouse Ceiling, Looking West (Photo: R.P. Murphy)
With deadlines looming and still heady punchlists, it’s easy to get angsty. But there’s a mountain of accomplishment in the rearview mirror to offset concern and foster guarded optimism.
For now we stay focused, sprint toward the finish line, and trust the process. Nickel gapping today, hardwood floor installation soon.
Icehouse Ceiling, Looking East (Photo: R.P. Murphy)
It’s been a good week, and it’s not even over yet. Much gratitude is due the entire team as we move into a Friday with many moving parts and a growing balance sheet of synchronous progress in the icehouse, outside the icehouse, and throughout Rosslyn’s still muddy but increasingly springlike grounds.
A photo essay (think more photos, less essay) will offer the best glimpse into the latest round of accomplishments. And behind all of these photos — if not literally behind the camera, in all cases behind the wrangling and tasking and managing and juggling and multitasking and quality control — is Pam Murphy. Our gratitude to everyone behind this week of synchronous progress, especially the woman who keeps it all together!
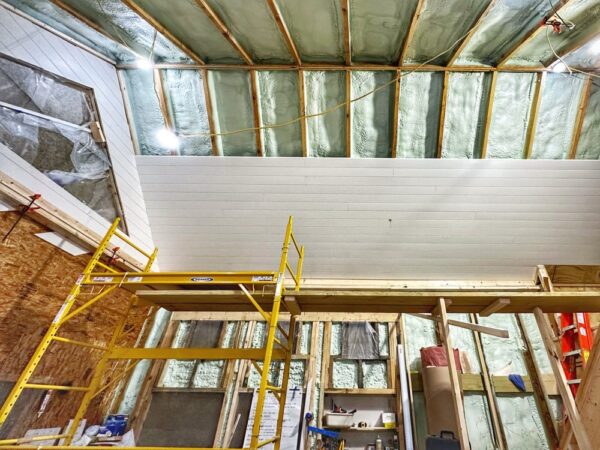
Finishing Up Icehouse Ceiling (Photo: R.P. Murphy)
In the photo above installation of the T&G nickel gap on Rosslyn’s icehouse ceiling is. Almost. Done. Rumor has it that tomorrow the ceiling will be finished. Fingers crossed!
March has marked plenty of plumbing progress in the icehouse rehab, most recently installation of the admittedly unattractive but practical mini split that will keep this oasis cool in the steaming days of summer.
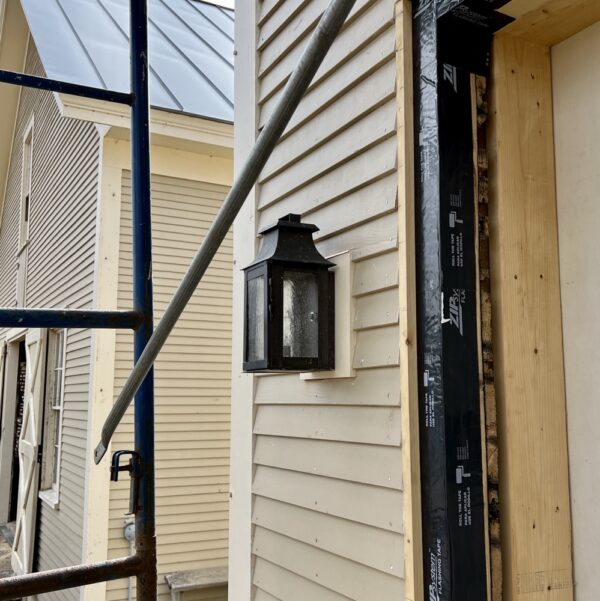
East Icehouse Lamp Reinstalled (Photo: R.P. Murphy)
Electrical headway includes reinstallation of the lamp next to the entrance door. Removed during installation of the insulated panels and clapboard siding, the patinated exterior sconce is now back in place.
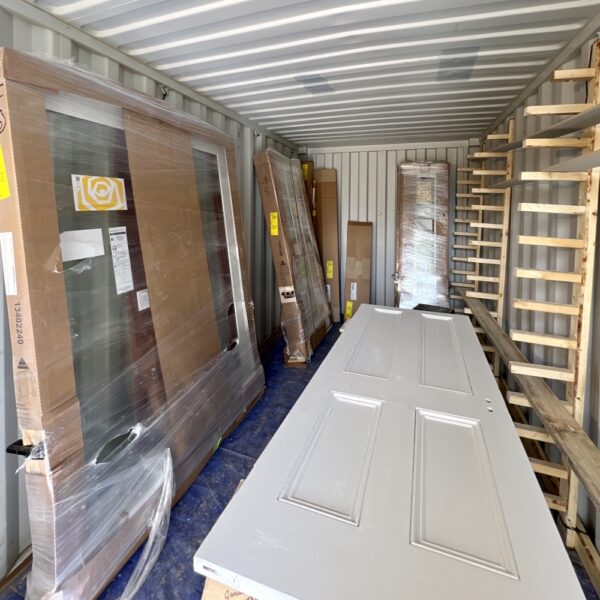
New Marvin Doors and Architectural Salvaged Door in Temporary “Paint Shop” (Photo: R.P. Murphy)
The first of the Marvin Doors have been received from Windows & Doors by Brownell. We started the process back in August, and the still have a little over a month to wait for all of the windows. So for now we’ll get to work painting the doors and installing them. On the right of the photo is an old door that Peter has rebuilt and that is now repainted in satin White Dove by Benjamin Moore to match the rest of the icehouse interior trim.
High Tunnel Almost Ready for Planting (Photo: Tony Foster)
In other exciting spring news, Tony has done a remarkable job of preparing the high tunnel for early season planting. And check out that solar gain on a freezing day!
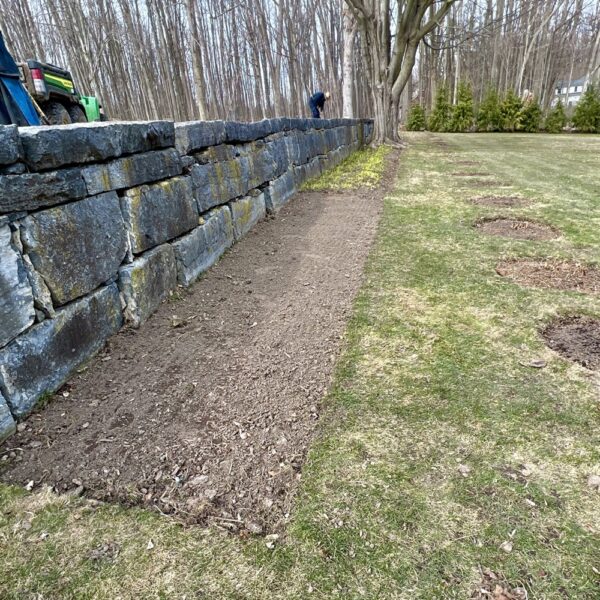
In addition to carpentry, plumbing, electrical, and gardening headway, some landscaping progress is also worth noting. In the photo above the lawn adjacent to the icehouse deck and terrace, has been crisply edged so that Bob Kaleita can fine-tune the site work and stone wall construction can begin.
A hat tip to our Amish neighbors who’ve accelerated the landscaping grounds work AND split up the massive ash tree that fell a couple of weeks ago. Plenty of firewood now curing, a geometrically impeccable extension to the daylily bed, and plenty of edging including the new hemlock hedge planted last summer by Patrick McAuliff.
Edging New Hemlock Hedge (Photo: R.P. Murphy)
Crisp edging ready for mulch along the hemlocks. In the photo above the perspective is looking east toward Lake Champlain, and in the photo below looking west toward the Adirondacks.
Edging New Hemlock Hedge (Photo: R.P. Murphy)
And that’s just *part* of a busy week. Thank you, team!
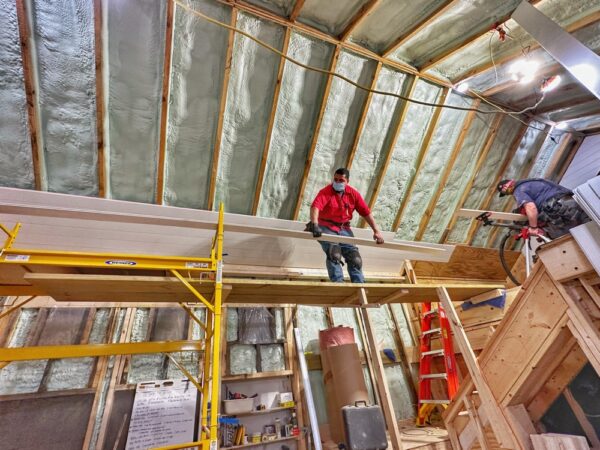
Matt and Jarrett Installing Nickel Gap on Icehouse Ceiling (Photo: Geo Davis)
Time for a nickel gap progress report. But first let’s backfill slightly. As you may recall, we decided to finish the icehouse interior in T&G nickel gap instead of shiplap. We estimated and re-estimated material, ordered it from of T&G from Haselton’s, waited a couple of weeks for milling and delivery, and then offsite material preparation began.
Supi and Matt Installing Nickel Gap on Icehouse Ceiling (Photo: Geo Davis)
We’ve been fortunate to have two offsite heated garage-workshops serving as paint shops for all of this material because we wanted to pre-finish the lumber and had no viable space on site. Our prep and finish has included 1) shellac-based primer or equivalent on all knots, etc., 2) two coats of rolled primer, and 3) two brushed coats of finish paint.
T&G Nickel Gap Progress on Icehouse Ceiling (Photo: Geo Davis)
T&G Installation
We started by coordinating our installation plan to ensure 100% consistency across weeks of installation with rotating team members. We’re using 16-gauge brad nailers with 2” nails through the tongues, into the 2” studs and rafters. On sloped and flat ceilings T&G is being doubled up and “scissor nailed” as follows:
maximizing the nailing angle of fasteners as close to 90° as possible to ensure maximum holding,
taking advantage of the full width of the 2” rafters,
driving the fasteners through the shoulder of the tongues into the framing at a 45° angle to improve retention against gravity, and
shimming if/as necessary to ensure full contact of T&G with rafters and to eliminate waviness.
Nickel Gap Progress on Icehouse Ceiling (Photo: Geo Davis)
When installation began, we transported material into the icehouse in sufficient amounts calibrated to speed of progress. We still need a little more trial-and-error to perfect our flow while trying balance multiple considerations:
enough material needs to be onsite for ongoing/continuous installation,
material flow should anticipate enough acclimatization time so that we don’t experience expansion or shrinkage after installation,
and, just to keep things challenging, we need to avoid having excess material in the icehouse at any given time because it gets in the way of other projects.
In short, three challenges baked into one!
Nickel Gap Progress on Icehouse Ceiling (Photo: Geo Davis)
Nickel Gap Progress
As you can see, we started out with the two gable end walls per Peter’s prudent recommendation. Now we’ve moved onto the north ceiling, with close to 2/3 complete including the challenging integration where loft built is are being installed.
T&G Nickel Gap Progress in Icehouse (Photo: Geo Davis)
Matt, Jarrett, Supi, and Eric have been focusing on the T&G nickel gap installation, and the progress is really starting to add up. The coming promised to be another visual leap forward as the ceiling gets closed up. I promise to post photos as soon as significant headway has been made!
Nickel Gap Progress Video
Let’s wrap up with a little moving picture to show you what’s happened so far…
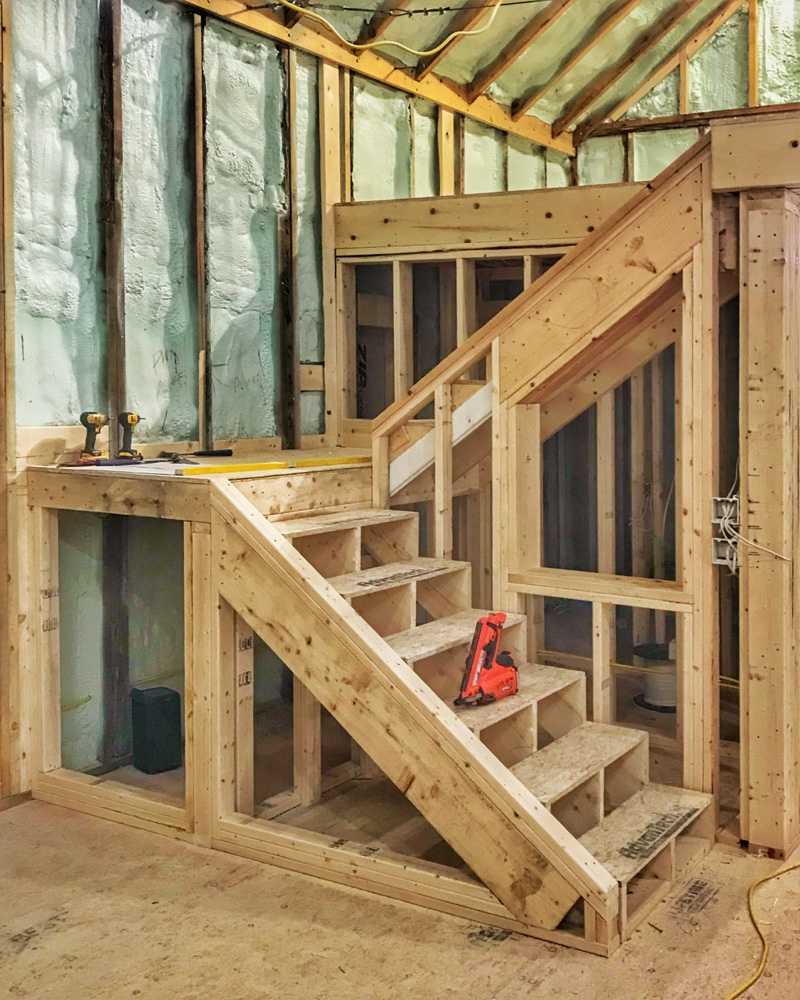
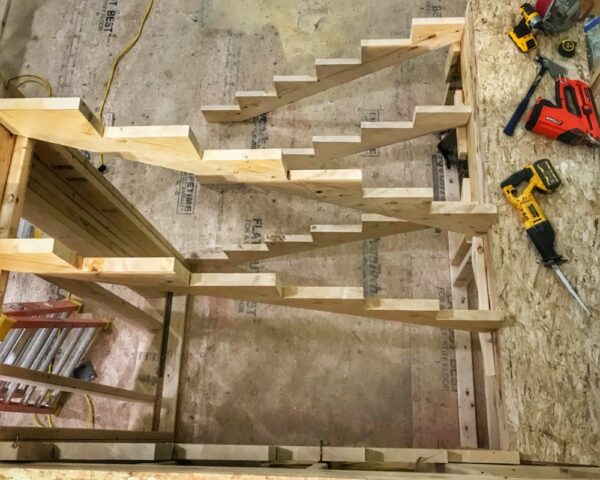
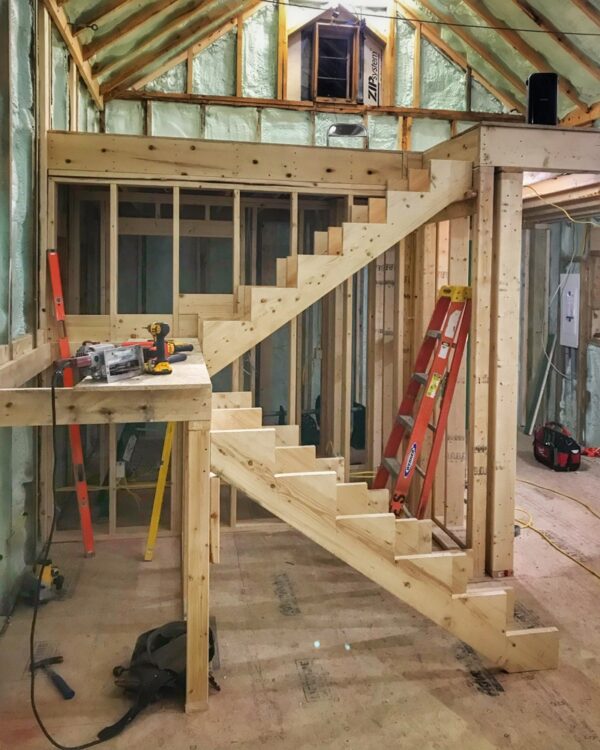
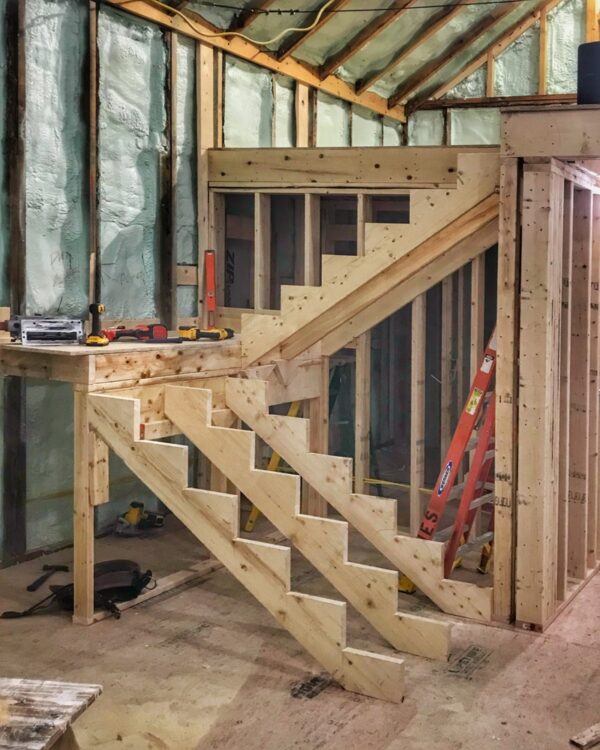
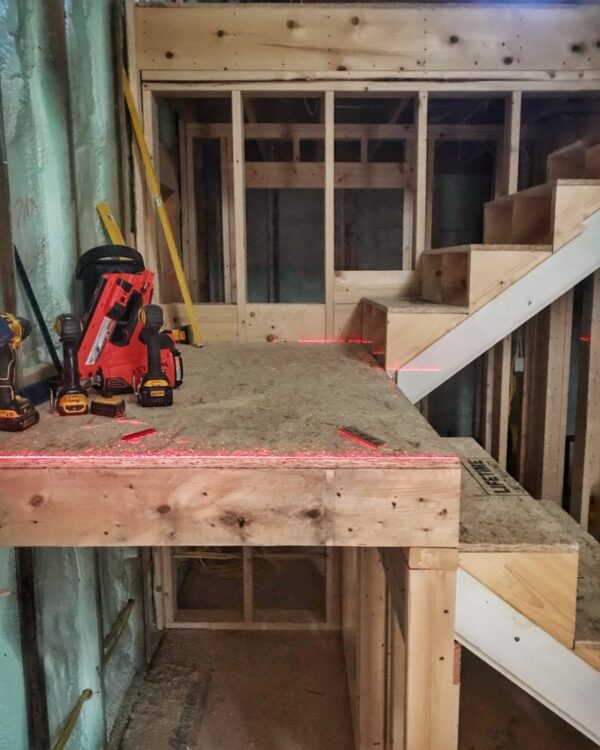
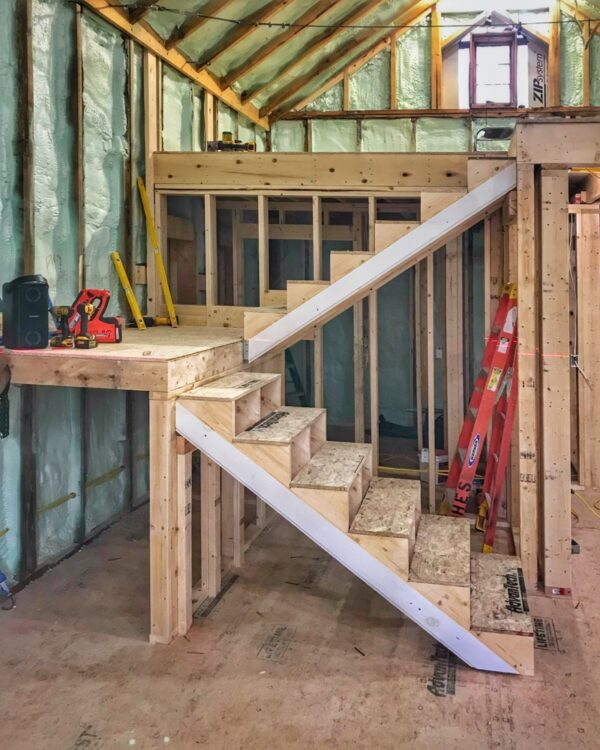
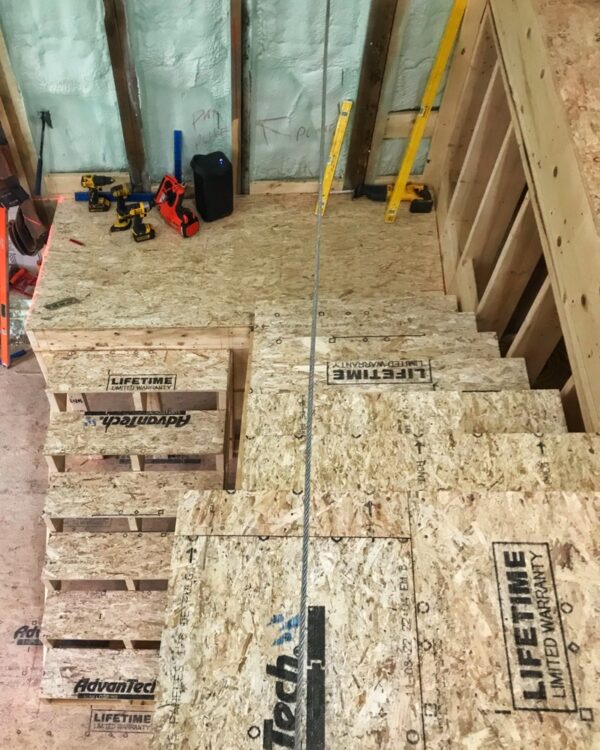
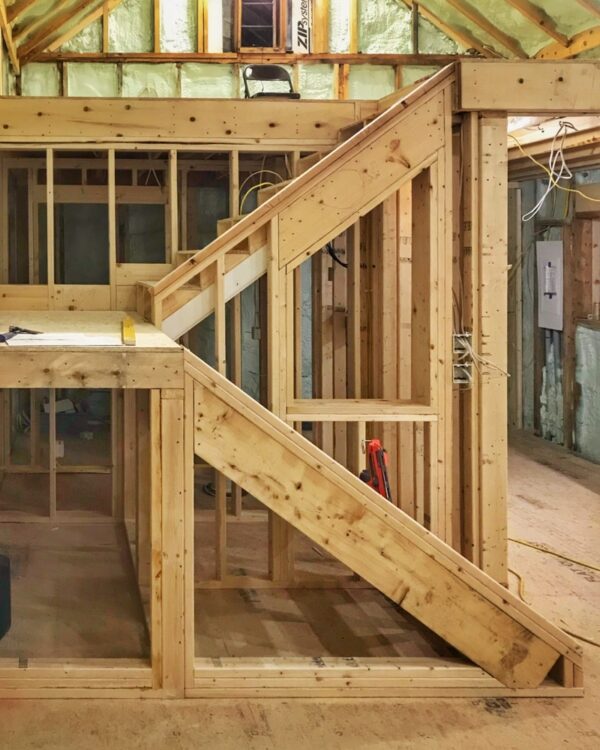
Stair framing to the loft is complete! (Photo: Hroth Ottosen)
First phase of interior framing (walls for bathroom, mechanical room, coffee bar, and loft floor) was an invigorating milestone in Rosslyn’s icehouse rehabilitation project. And then, installing the loft subfloor helped complete the transformation, visually defining the new spaces. But the most notable triumph during the interior framing phase is the stairway which has dramatically transformed—both visually and functionally—the construction site into a prototypical preview of Rosslyn’s icehouse reinvention.
Stringers level for stair framing to the icehouse loft. (Photo: Hroth Ottosen)
An avalanche of accolades on Hroth and Matt for successfully completing the stair framing to the icehouse loft. Bravo!
Stringers level for stair framing to the icehouse loft. (Photo: Hroth Ottosen)
Of course, skilled carpentry is the foundational ingredient for framing a staircase, but there’s a fair bit of mathematics and geometry as well. And then there’s the question of codes compliance. Lots of precise and inflexible dimensions enduring the safety of stairs!
Stringers cut for stair framing to the icehouse loft. (Photo: Hroth Ottosen)
And all of these ingredients need to be carefully coordinated to ensure successful staircase framing.
Stringers cut for stair framing to the icehouse loft. (Photo: Hroth Ottosen)
In the days prior to framing the loft stairs, confirmations were ironed out with the inspector; three-way meetings between Hroth, Pam, and yours truly reviewed plans, verified field conditions against the plans, checked and double checked everything to ensure that we were all on the same page; and then Pam and I stepped aside to let the carpenters perform their alchemy.
Stringers cut for stair framing to the icehouse loft. (Photo: Hroth Ottosen)
I’ve juggled my photo sequence a bit in this post to keep things interesting, but it’s worth noting that the first photo at the top of the post actually shows the staircase. And then the next for photographs document the process of installing the stringers.
Mid-story landing 100% level for new stair framing. (Photo: Hroth Ottosen)
In addition to the stringers, Hroth reconfirmed that the landing is 100% level, eliminating problems down the road.
Stair Framing to the Loft (Photo: Hroth Ottosen)
Throughout stair framing verifying everything for level and plumb is critical so that micro adjustments can be made as needed.
Stair Framing to the Loft Complete! (Photo: Hroth Ottosen)
Once stringers are secured and sun-treads installed, stair framing is ready for for further structural integration.
Stair Framing to the Loft Complete! (Photo: Hroth Ottosen)
And then, Hroth moved on to framing the tops of the stringers where railing balusters will land. And he’s even begun framing in the built-in shelves.
New bookshelves integrated into stair framing. (Photo: Hroth Ottosen)
Consider that word parade fair warning for where I’m headed. From dovetails to team dynamics, in the twinkling of an eye. At least, that was my plan in revisiting a flood of field notes. Instead my errand evolved into a meandering meditation on admittedly abstract, fairly freestyle associations between durable joinery and team dynamics.
So, if you’re the A-to-Z git-r-done type, this is a good post for you to skip. Probably. Unless you’ve already burned a cord of calories and you’re surfing a dopamine-endorphin wave, in which case this might be just the departure from your daily that the doctor ordered. (The proverbial doctor, not the real doctor.)
But I’m getting ahead of myself. Let’s rewind a few weeks to my sudden and unanticipated decampment from Santa Fe to Essex.
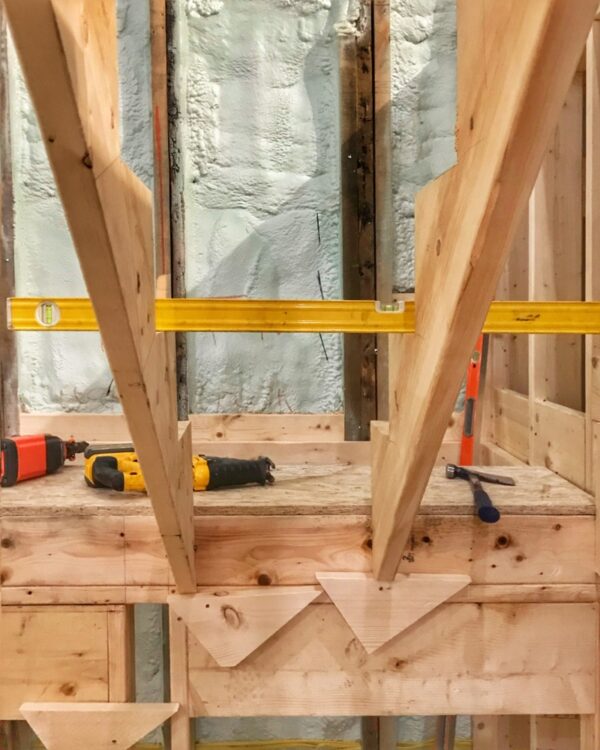
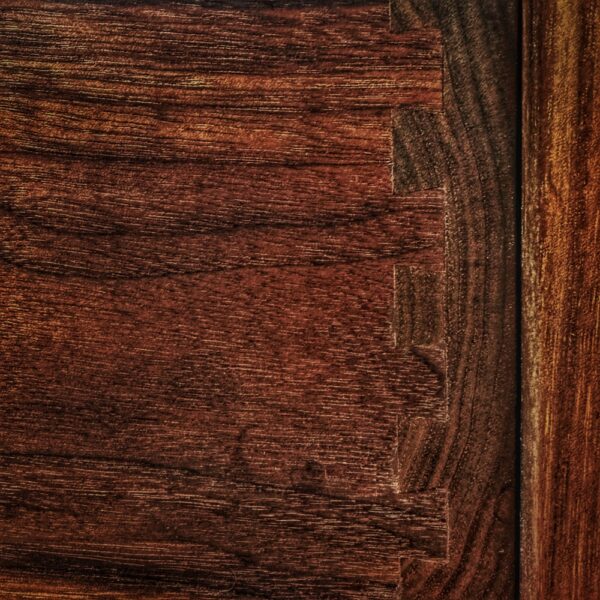
Durable Joinery (Photo: Geo Davis)
Icehouse Intermission
Mission interrupted, more to the point. Icehouse rehab back on ice for a week or two while we regrouped and remapped and, eventually, rebooted. Upon approaching Rosslyn by water — steely skies and surreal snowflakes fluttering occasionally (as if the special effects team had been downsized), an almost empty ferry, a mostly hibernating hamlet hunkering lakeside — mixed emotions roiled within me.
There was a wellspring of anticipation upon returning to inspect firsthand the team’s progress on the icehouse rehab, boathouse gangway, and some painting and tiling maintenance inside our home. There was also the poignant pique of a visit precipitated not by plan or passion but by infelicitous necessity. (Source: Snow Falling on Homecoming)
Three weeks ago this past Wednesday. The following days were invigorating. Encouraging.
By in large, this impromptu return to Rosslyn has been profoundly positive…
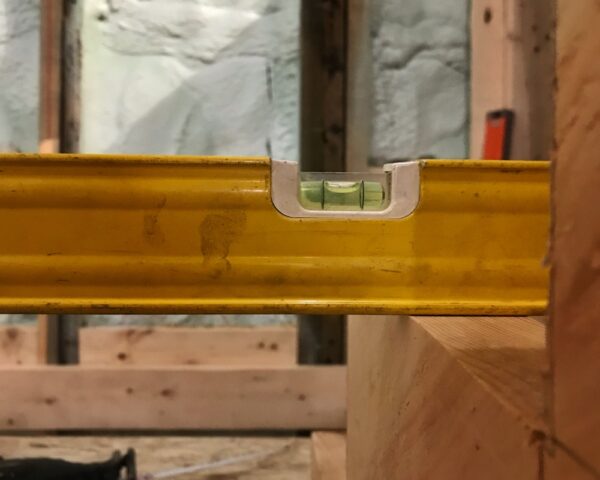
[“On the Level“, a poem drafted during my visit, reflects] the reassurance that I’m encountering, the confidence and conviction that are flowing back in after ebbing…
[…]
On the level, there’s plenty of optimism, despite inevitable setbacks. (Source: On the Level)
The progress was grounding, familiarizing myself physically with what I’d been living virtually, witnessing in person the dramatic transformation of this long-held vision into tangible, well built, inviting spaces and floors and walls and stairs and windows and doors. The volumes and the vessel that contains them, defines them, that had been gestating for almost two decades, was at last becoming believable due to the collaboration and teamwork of many.
Durable Joinery (Photo: Geo Davis)
A furtive foray into the curious coalescence of still tender fractures and ruptures that drew me back to Rosslyn (and that continue to disclose themselves each day of my stay, reminders of quaking in recent weeks) but also the durable bonds and the abiding beauty that hold it all together. (Source: Bowtie & Broken Memento)
While it is indeed Rosslyn’s abiding beauty that beckoned us to this property in the first place and her abiding beauty that has buoyed us through years of historic rehabilitation (and personal rehab!), there are times when the border between broken and unbroken blurs and faultiness become fractures. In such cases it is the durable bonds that prevail, that steady the proverbial ship, that hold it all together.
Rarely, I find, does the journey tidily delineate between clear victories and clear setbacks. Ours is a nonbinary and highly subjective adventure, and this midwinter, mid-project hiatus is no exception. Disheartening and challenging, yes, but also an opportunity to acknowledge and to celebrate accomplishment, a notable benchmark on the quest to reinvent a 19th century utility building as a 21st century lifestyle hub on a par with Rosslyn’s gracious home, waterfront, and generous grounds.
In short, there was — and there is — far more to fête than to lament at this juncture.
Durable Joinery (Photo: Geo Davis)
Back to Work & Field Notes
In what’s become a familiar pattern, today’s post was an orphaned draft, initiated as field notes during my recent Essex sojourn, and then adapted into a readout for the team to catalyze our onsite meetings into an actionable scope of work. That part happened. Practical. Necessary. Timely. Now, with the benefit of sufficient remove (for tempering tone and shifting perspective) I’m revisiting those field notes from a more meditative perspective. And yes, my reflection has been fueled in no small part by an obsession with joinery.
Before I go there, guiding you into the mesmerizing maze of my imagination (bread crumbs advised), let’s ground this soon-to-be-ungrounded stream of conscious in the days we spent together as a team. Here are a few excerpts recapping my extended site visit.
We met as a big group and as multiple smaller groups over more than a week. Much was rehashed, brainstormed, problematized, and decided during these encounters, so I’d like to follow up with a readout from our main meeting as well as some of the items that came out independently in my one-on-one followups. Please understand that some of what I’m including may feel like micromanaging or second-guessing skills, expertise, experience, etc. Please accept my apologies in advance, and understand that neither are among my objectives. However the last month has illustrated the downside to having direction and decision-making silo’ed up. By “flattening” the team, I am hoping to shift the focus toward a more collegial, more ensemble oriented approach. We have ample resources in our team (an almost embarrassing abundance of skill, passion, and work ethic!), and I want to make sure that everyone has an opportunity to contribute, to catch problems before they materialize, to learn from one another, and to avoid the bottlenecks and logjams that we can’t afford at this halfway point.
We will continue to rely on Pam, Peter, and Eric as the three leads or “co-captains” with the objective of streamlining on-site decision-making and progress. But I strongly encourage everyone to study the plans, to ask questions, to make suggestions, and to contribute to the collaborative success of the icehouse rehabilitation as we cartwheel toward the finish line.
Although we covered an expansive scope of work during our meetings, I gathered the gist into a detailed outline for everyone to review, edit, and augment prior to our team meeting the following week. In addition to onboarding everyone as a contributing and valuable member of the team while reaffirming a commitment to transparency as we move forward, I also hope to encourage the sort of cross pollination that has consistently defined the high point of this and previous projects.
Our follow-up team meeting fleshed out the scope of work and cemented the near term benchmarks and timeline. We will be able to revisit weekly with an eye to efficient project management, clear expectations, and an emphasis on incubating the sort of collaborative environment that yields the best results and ensures the most enthusiastic comradely. Goals set. Updates as we advance upon these goals.
So that sets the stage in a dry, rearview mirror sort of way.
What it overlooks is the morale, outlook ,and commitment of everyone with whom I met. Shuffling the team and shifting responsibilities midstream is unsettling and disruptive at best. The way this team came together, processed the change, stepped up to new responsibilities, and immediately, resolutely refocused on the new map and timelines was astounding. Confident and optimistic, proud of their accomplishments heretofore, eager to restore forward motion, and laser focused on the tight timeline, elevated expectation, and bountiful challenges. Unwavering. And hopeful that the full team might be reconstituted in the home stretch to finish up strong together, and to collectively commemorate their accomplishments come June.
And this is part of what takes me to the woodworking, and specifically joinery, as a metaphor. Heck, it’s not even just the sorts of joining and conjunction that are foundational to joinery and even carpentry. It’s the millennia old art and artisanry committed to joining, conjoining, and even mending that fascinates me. I’ve waxed on aplenty about wab-sabi, so I’ll sidestep a tangential deep dive now (ditto for Kintsugi.) A tidy touchstone will suffice.
Wabi-sabi (侘寂) is a world view centered on the acceptance of transience and imperfection. The aesthetic is sometimes described as one of appreciating beauty that is “imperfect, impermanent, and incomplete” in nature. (Source: Wikipedia)
Joining, conjoining, and reconjoining. No false disguise, no pretense, no faux facade. Bringing together. Bringing back together. I’m clearly still ill equipped to wordsmith my ideas into articulate or persuasive prose. But I’m working on it. And I’m hurling this half-baked post into the world with the unrestrained wish that it will settle on fertile soil, that it will germinate, and that I will be able to observe and learn how to communicate what it is that I’m discovering, this groundswell of insight that I’m experiencing without yet fully comprehending what it is. Bear with me, and I’ll do my best to interpret the lessons as they are learned.
In the mean time, I will draw in two compelling perspectives that may well shed some light.
Durable Joinery (Photo: Geo Davis)
Joinery as Metaphor
Allow me a moment to weave in a consideration that deftly approaches the idea of woodworking as metaphor.
I am building a file cabinet for my office. It strikes me an apt metaphor for what we do as teachers in the classroom. I begin with a vision, followed by making a clearly developed plan. I gather the materials I will need – examining them for grain, quality, and fit. Each piece is cut just over the requisite length. I use a variety of joinery techniques to assemble the parts. The finished piece begins to take form. From the rough construction, wood is slowly and strategically removed, rounding edges and corners, sanding rough edges and surfaces, slowly revealing the finished shape. I stand back to see what continues to require attention. Final details are attended. Stain is gently rubbed in; varnish is brushed on – rubbed smooth between coats. I stand back and smile, satisfied with a pleasing, useful piece of furniture. — Bill Lindquist, January 3, 2012 (Source: The Purple Crayon)
Teaching. Yes. And team building. Team rebuilding.
Perhaps the following is only tangentially related, though it feels germane.
But I know full well that many woodworkers don’t want to hear about philosophy. What practical value can there possibly be in sitting around thinking about work? Isn’t it better just to roll up your sleeves and get to it?
I believe that this temptation to leave our brains at the door of the shop is rooted in a fundamental misunderstanding of human nature that separates our thinking from our doing…
We are whole beings, and although we have inner and outer aspects (mind/soul and body), we are essentially unities, not dualities… you cannot separate your mind from your body. You can’t put your thoughts and beliefs in one category and your practices in another.
So, why so much thinking and theory from a woodworking publication? Because, reader, you have a mind inextricably connected to those hands. And I am convinced that if we want our work to reflect the fullness of who we are, the why will be just as important as the how. — Joshua A. Klein, September 28, 2021 (Source: What’s With This Woodworking Philosophy Stuff? – Mortise & Tenon Magazine)
Absolutely. (And, as an aside, this reminds me that I’ve been ignoring another orphaned draft about Rosslyn’s 5w’s. Back on the punch list!)
Durable Joinery (Photo: Geo Davis)
At present I’m endeavoring to unweave our recent Rosslyn narrative just enough to re-braid the threads that anew, mending the challenges that have arisen, as if braiding a bridge over troubled water… (Or a bridge graft at the base of a partially girdled tree in Rosslyn’s orchard… Yikes! Mixed metaphors. And so long as I’m hoarding metaphors, what about kintsugi?)
Kintsugi is an ancient Japanese art in which broken pottery is mended with glue and gold honoring and highlighting the cracks rather than hiding them. The belief is the pottery is stronger and more valuable after the breakage and mending. Kintsugi is a powerful metaphor and physical art practice to explore layers of meaning of broken, to look at the pieces in new ways, and notice the ‘glue’ in our lives that assist us to mend, navigate challenging times and keep on going. — Kristin Pedemonti (Source: Mending What’s Broken | Steer Your Story)
The writhing winds are pulling my mind hither and yon, and I find myself too, too deep into this meandering meditation to abandon it. If I’ve lost you, I apologize. Know that we are lost together. But as fellow sojourners we are not idle, waiting for the illumination of morning. Perhaps we’ll stumble upon or quarry in the darkness.
In closing, and I promise you I am, allow me to apologize for this untethered and unedited runaway. More soon, I hope, on mortise and tenons and dovetails, joyful joinery, rejoinery and durable bonds. My imagination is conjuring an intricate scarf joint that conjoins by gathering, by honoring, by encouraging, a meticulously crafted union where stresses are distributed in all directions and resilient when forces challenge. My imagination is ringing with the melody of strengthen, even repairing a strained or failing joint. Join, conjoin, reconjoin…
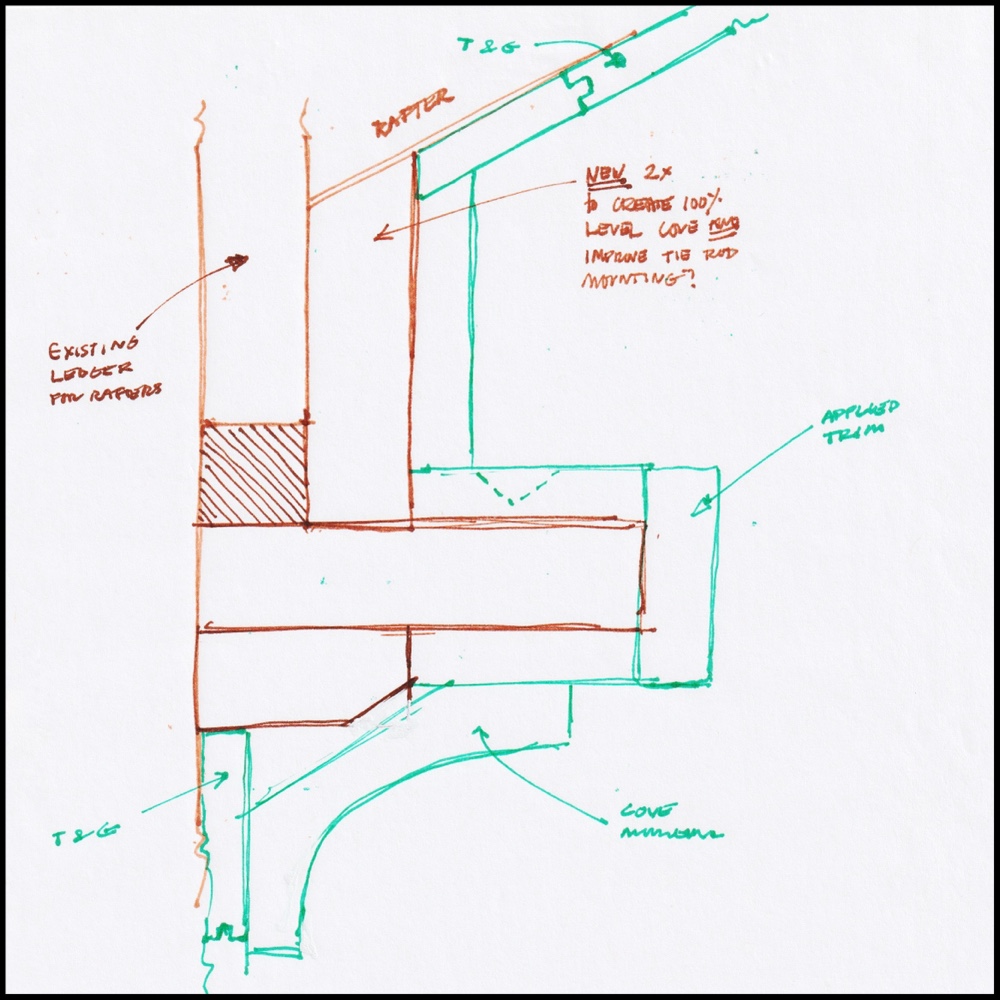
Let’s start with ciphering (before introducing my current coving challenge). I first heard the term “ciphering” used to describe job site problematizing, brainstorming, and generally massaging construction plans into completed carpentry in 2005 when we were renovating the Lapine House. From a linguistic perspective, the idea of describing the process of analyzing plans, troubleshooting an action plan, and navigating the inevitable impediments as “ciphering” fascinated me. Not deciphering. Not decrypting. This was one of the first times I perplexed our contractors with my inquisitiveness about terminology. Not the last.
Ciphering on Icehouse Coving. (Source: Geo Davis)
Okay, with that abbreviated “ciphering” backstory (thorough explanation for use of the term never really developed) introducing this post, let’s move on to the icehouse coving — actually a cove lighting/molding integration that’s still evolving — that needs to progress from planning to installation soon.
During my recent on-site meetings with the team I discussed a specific twist that needs resolving in order to move forward with coving construction (and tie-rod fabrication). There are ledgers along the north wall and south wall top plates that were installed in 2006 as part of our roof rebuild. All of the rafters land on these ledgers. The rebuilt roof is robust in part because of this interesting workaround, but it creates a 1-1/2” step near the top of the wall that introduces an impediment (or possibly a benefit) for coving construction. Basically, our construction plan (A402, detail 4) does not account for this plane discrepancy. I’m endeavoring to integrate the step structurally into the cove construction. Although this structural element creates an added challenge, I actually think that it might contribute to a pragmatic solution.
Ciphering on Icehouse Coving. (Source: Geo Davis)
I had created a hasty sketch when I met met with the team in order to illustrate what I was envisioning. A couple of days on site to refresh my memory on the field conditions has inevitably evolved my thinking. These new concepts offer further progress. I think I’m *almost* there.
I circulated these quick sketches to [hopefully] inspire a free flow of ideas so that we can zero in on an optimal plan. My idea doesn’t (yet) integrate electrical, focusing just on structural and finish integration. Stay tuned…
I left you wondering, patiently waiting for a couple of weeks after the “Deck Rebuild” update. I promised a post specifically focusing on the garapa decking, but days turned into weeks, and no garapa gallery. Sorry. Rest assured it was an act of omission, my friends, not an act of commission. (Maybe “fall” earned its name as an abbreviation for “falling behind”?)
Before 2022 re-decking… (Source: Geo Davis)
But you needn’t wait any longer. Patience is overrated, and the new deck “eye candy” is ready. Pictures aplenty coming your way shortly, but first a little backward glance to Rosslyn’s first garapa deck waaayyy back in 2008-2009. You see, this newly completed deck is a redo of the same deck and decking completed during our epic rehabilitation project a decade and a half ago.
So, without further ado, let’s look at the first iteration of Rosslyn’s garapa deck.
Garapa Decking v1.0
Let’s start by rewinding the timeline to 2008-9. Building the new deck and installing garapa decking was the proverbial caboose in a virtually endless train of construction that started in the summer of 2006. And with winter upon us, December days flurrying past, the year coming to an end, carpentry conditions deteriorating rapidly, and the risk of missing yet another deadline, we were pushing hard to get the deck complete before 2008 morphed into 2009. Fortunately most of our crew had been with us for years and they were really, really good sports about giving everything they had to finish the year with a completed deck.
Although the deck had been underway for many weeks at this point, let’s start with a couple of cold and drizzly December 10, 2008 snapshots.
Doug’s Decking Tent, December 10 2008 (Source: Geo Davis)
This makeshift weatherproofing was an attempt to endure the increasingly cold and wet conditions as autumn gave way to winter. Decking was closer, closer, sooo close,… but not yet done. And the damp child found its way into every every gap between clothing, up sleeves, down collars. Winter’s warning was everywhere as the team hustled toward the finish line.
Wondering about that smiling, blurry apparition at the left? That’s Doug Decker, hustling to keep warm. (And his colleague, partially concealed beneath the tarp, is Jonathan “Boulder” Schier.)
Here’s another glimpse of the challenging conditions the crew endured during the final stretch of the garapa decking project almost fourteen years ago. It’s not east to discern but Doug’s under the tarp tent working on the stairway.
Of course, the only way to make these drizzly early December conditions look pleasant is to leapfrog forward to December 22, 2008.
Installing Garapa Stairs on December 22, 2008 (Source: Geo Davis)
You might almost miss freezing rain once a couple feet of snow have blanketed the North Country. In the photo above, a dauntless carpenter (either Kevin Boyle or Warren Cross, I believe, though perspective and bundling make me uncertain) is scribing and installing garapa treads, the final step to completing the deck. And despite the snow, it’s sunny and he’s dressed for success. This is certainly one of the downsides of installing a deck so late in the season (and one of the upsides of having such an amazing team of carpenters, willing to do whatever it takes to get the job done right and on time!)
Garapa Deck, January 1, 2009 (Source: Geo Davis)
What a perfect way to start the new year! Garapa decking installation complete; access to and from vehicles, garbage and recycling shed, side yards, safe and convenient; and an absolutely breathtaking addition to the property, transitioning perfectly from interior to exterior space.
Garapa Deck, February 2, 2009 (Source: Geo Davis)
One month later Rosslyn’s garapa deck looks as if it’s always been there. Patinated perfection. Still unsealed, waiting for more forgiving conditions, but that too will happen in due time. (Although it’s an off-topic segue, I will revisit this period between garapa installation and sealing down the line. There was an unfortunate hiccup that required attention, but — spoiler alert — it wasn’t actually caused by the gap between install and oiling. Another gap was the culprit…)
Wayne Gryk Sealing Garapa Deck, September 19, 2009 (Source: Geo Davis)
Friend and jack-of-all-trades-master-of-many, Wayne Gryk tackled the challenge of sealing the garapa decking 9-10 months after installation. He’s an artist, a perfectionist, a productive and diligent finisher, and exactly the right person for the final step in Rosslyn’s [first] garapa deck.
Home stretch… One of the boobytraps of sealing a deck is maintaining house access. It’s easy to accidentally close off entrance and egress without forethought about how you’ll access the dwelling while patiently swaying the often lengthy cure time. Fortunately this isn’t the sort of drama Wayne delivers
Sealing Garapa Deck, September 19, 2009 (Source: Geo Davis)
Wayne proceeded strategically, leaving a small unsealed “pathway” on the deck for us to enter and exit until the newly sealed decking had dried sufficiently. Once we could switch to another doorway, Wayne finish up the last little bit. In the photo below he’s almost finished, but you can already see the glorious accomplishment.
Wayne Gryk Sealing Garapa Deck, September 19, 2009 (Source: Geo Davis)
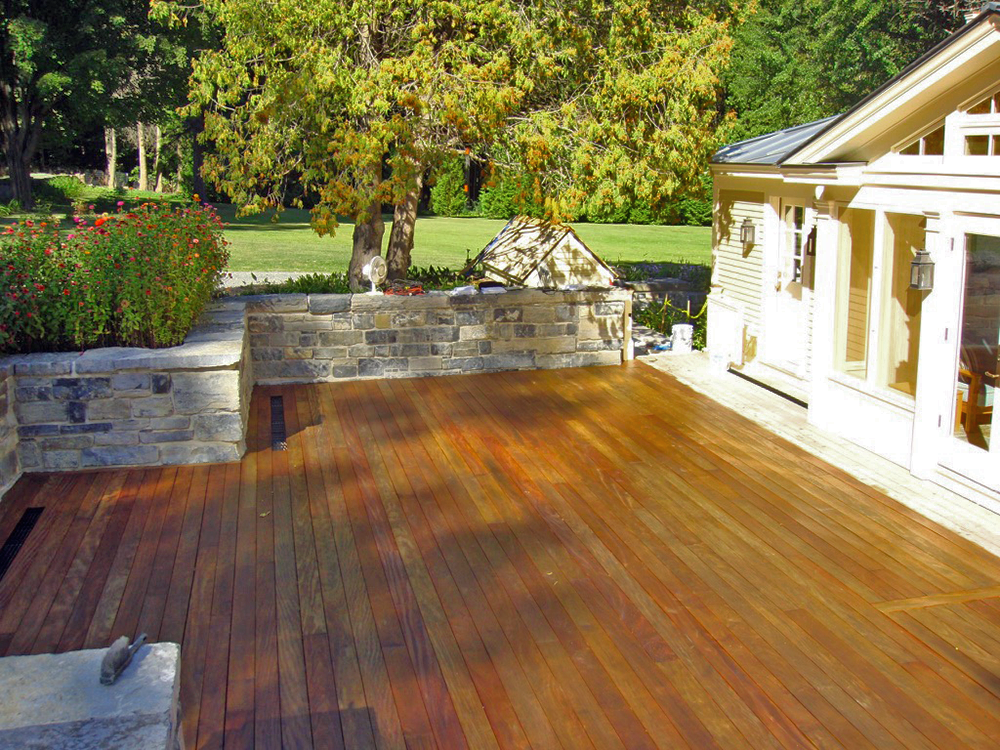
At this point it’d be reasonable to fast-track from 2009 to the present, 2022. With a newly rebuilt deck, brand new garapa decking installed, and a fresh coat of oil accentuating the unique color and grain of the garapa, it’s a site to behold.
But before showcasing the new decking, I’d like to make a quick pitstop on November 25, 2016 which is a handy example of the results of resealing our first garapa deck. Let’s start with a high sun, midday look across the deck shortly after oiling.
Resealing Garapa Deck, November 25, 2016 (Source: Geo Davis)
You’ll note the considerably darker decking in the photo above. This is not because we used a dark pigmented sealer (we have always used clear sealers). It’s the effect of graying as the deck ages. We generally allow a few years between resealing, in part because we actually really enjoy how the gray patinated decking looks next to the Essex quarried limestone (aka Chazy limestone) walls. But a sealed deck is better preserved against the snowy Adirondack winters, so we reseal in service to longevity. In this photo you can see how much depth and character the garapa exudes as it matures. Each season offers intriguing nuances to discover and appreciate.
Resealing Garapa Deck, November 25, 2016 (Source: Geo Davis)
The same deck, the same day, viewed from another angle highlights the honey and maple syrup range of Rosslyn’s garapa deck approximately eight years and several resealings after her debut.
In more recent years we allowed the decking to gray without resealing because we knew that the substructure was failing and deck replacement was iminent. In preparation for our summer 2022 deck rebuild we carefully salvaged all of this original garapa decking, and current experiments are underway to determine the most appealing adaptive reuse in the new icehouse project. (I’ll post an update on that soon!)
Next up? Installing garapa decking on the newly rebuilt deck!
Last Friday, I teased a recap of our recent deck rebuild — or more specifically an overview of installing garapa decking on the newly rebuilt deck — but then I proceeded to dive headlong into a 2008-9 decking-with-garapa flashback. Sometimes it’s helpful to discover the backstory before plunging into the present.
Here was my swaggering introduction (before getting lost down the rabbit hole…)
But you needn’t wait any longer. Patience is overrated, and the new deck “eye candy” is ready. Pictures aplenty coming your way shortly, but first a little backward glance to Rosslyn’s first garapa deck waaayyy back in 2008-2009. You see, this newly completed deck is a redo of the same deck and decking completed during our epic rehabilitation project a decade and a half ago.
So, without further ado, let’s look at the first iteration of Rosslyn’s garapa deck. (Source: Garapa Decking 2008-2009)
It was nostalgic to look backward at the original deck from inception through evolution through… failure. (Actually I didn’t include any of the documentation of the deck substructure’s gradual but premature decay. But I do have some unsettling photos squirreled away to review sometime. Maybe as a way to celebrate the longevity of the replacement deck.)
Today, instead of looking backward, it’s time to showcase this A+ rebuild, the handsome material we used, and the remarkable team that transformed a frustrating stutter-start (and a heady pipe dream) into a magnificent outdoor living space to make memories with family and friends.
Installing Garapa Decking… Again!
Before I plunge into the process (and handsome results!) of installing garapa decking on Rosslyn’s newly rebuilt deck during summer 2022, I’ll fill you in on the evolution of this project.
As you may already know, at the end of 2008 and beginning of 2009 Rosslyn’s deck looked picture perfect. In fact, it looked almost indistinguishable from the finished photos I’ll be sharing shortly in this post. That’s, of course, because the new deck is simply the old deck built again. Built better, because the substructure will not deteriorate prematurely like its TimberSIL predecessor.
The plan and timeline for Rosslyn’s replacement deck came into focus over a year ago.
During the summer of 2021 we allowed a carpenter to sweet talk us into entrusting him with… [three separate, historically sensitive, vitally important carpentry projects.] Although we initially informed him that our confidence was wavering given his subpar communication and organizational record during the planning and scheduling phase, we ignored our misgivings (and the warnings of many) and allowed him to persuade us that we had nothing to worry about. He planned to start by tackling the boathouse gangway and waterfront stairway in September/October, and then he’d move on to the house deck. We’d be so impressed, he assured us, that we’d then hire him to rehabilitate the icehouse. If only he built as well as he talked! (Source: Rosslyn Redux)
I’ve already covered in brief but painful details the calamitous unraveling of this 2021 plan, so I’ll sidestep the misery and fast-track to the good part. While our carpenter fiasco of the previous year might be summed up as a run-of-the-mill “crash and burn” story, this summer’s refreshing sequel was a quintessential “phoenix rising” story of mythic proportions.
And while there are so many “main characters” in this sequel that I can’t really credit one single protagonist — this was a truly inspiring group that coalesced into a collaborative, skilled, productive, respectful, creative, communicative team — it was Hroth Ottosen who served as the unmistakable catalyst. If I’m able, I’m hoping to eventually persuade Hroth to share his very personal decision to roadtrip east from Santa Fe, New Mexico to spearhead Rosslyn’s deck rebuild after the 2022 catastrophic wildfire season that ravaged the southwest. For now, I’ll say simply that Hroth reminds us that it is possible to emerge from calamitous circumstances braver, wiser, stronger, and freer than we were beforehand. I see an uncanny parallel between BOTH Rosslyn’s current rehab projects and the aforementioned 2021 fiasco AND Hroth’s decision to sojourn with us awhile on the Adirondack Coast. Like I’ve already suggested, a phoenix rising from the ashes!
Garapa v2.0 (aka Re-decking)
Time to dive in! I tried to post relatively current updates on the team’s progress during July, August, and September, so rather than getting in the way of the story, I’m embedding our Instagram posts that chronicle our step-by-step journey installing garapa decking (and sealing the boards to preserve and enhance their already breathtaking natural beauty.) I’ll add a few thoughts along the way, but for the most part a quick scroll through the images and videos will tell a purer and more visually satisfying story than my words.
The decision to deck with garapa back in 2008 rested on several considerations:
quality and endurance to outperform more conventional wood decking given the variable demands and extremes of our Adirondack Coast location, and
color and grain to complement late 18th, early 19th century architecture without appearing too contemporary and/or exotic.
We fell in love with garapa, and it handily ticked all three considerations.
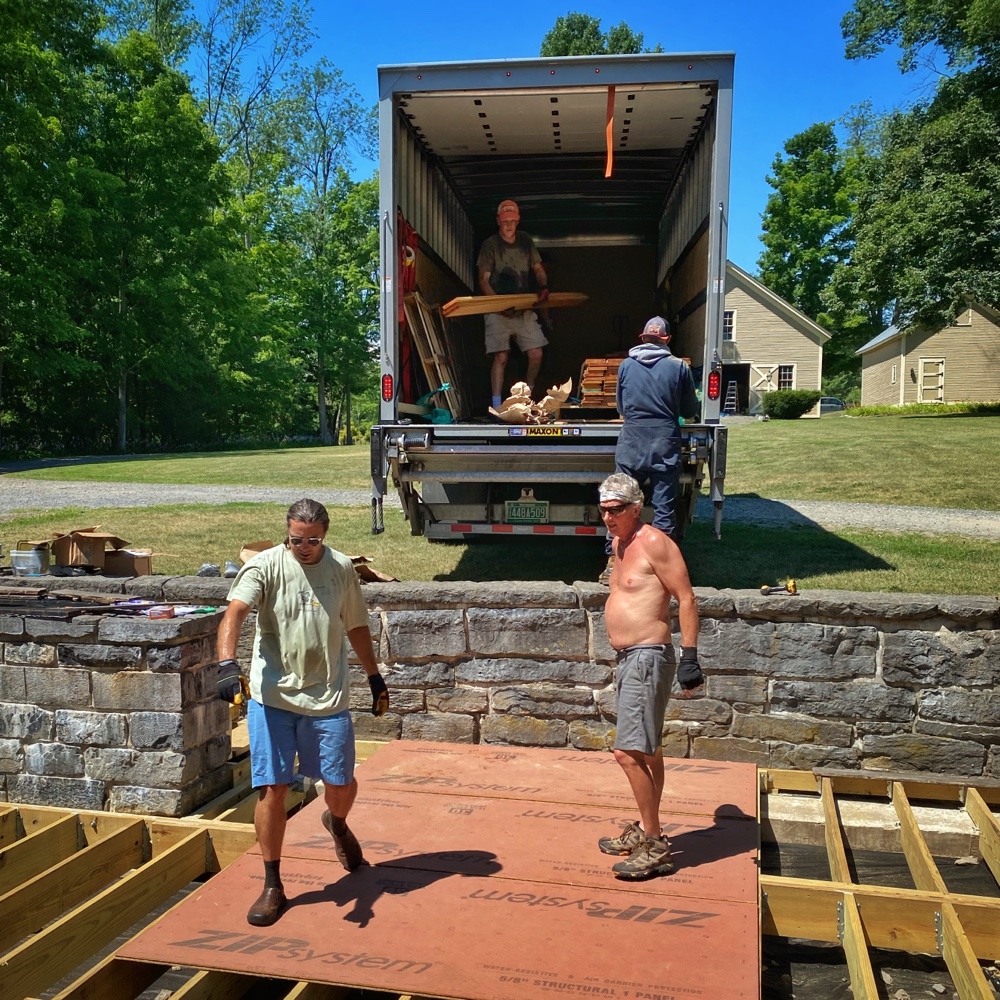
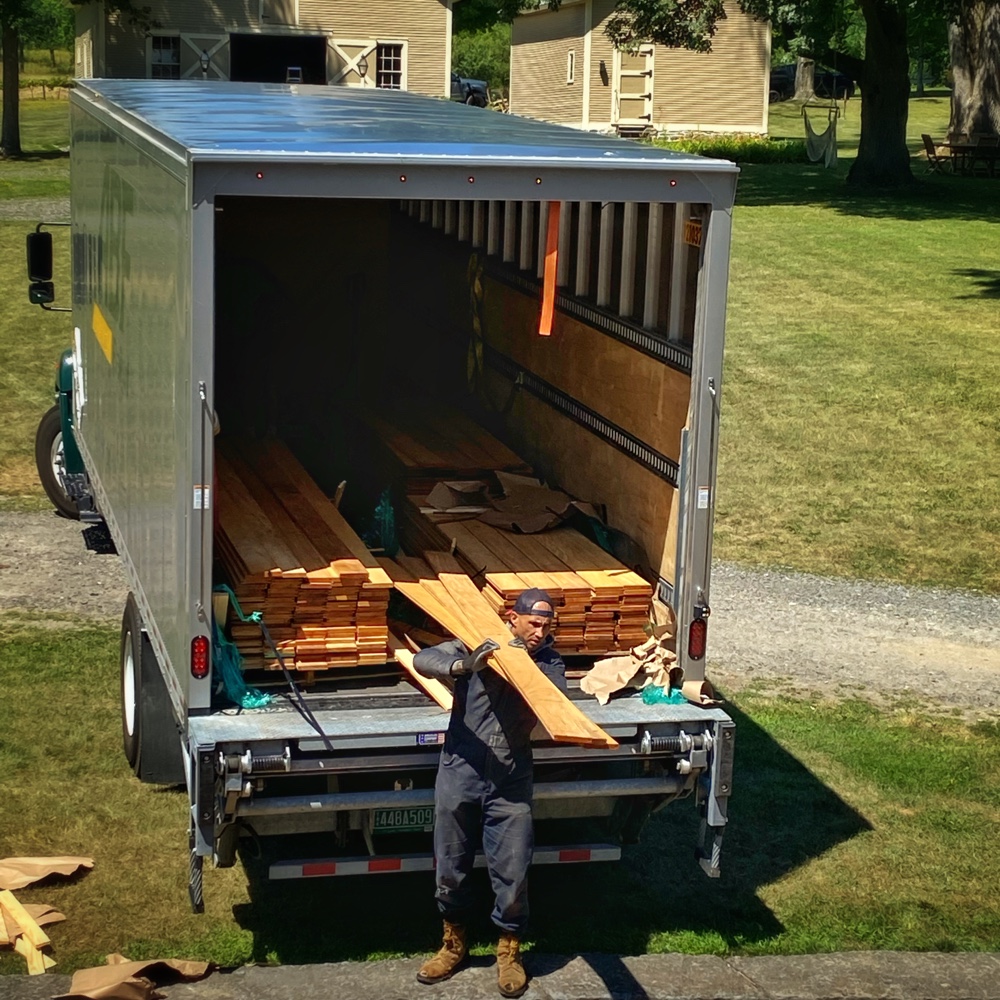
We sourced the milled-to-order garapa decking lumber from Advantage Lumber (@advantagelumber), and I was impressed with both their customer service and sales support. Unfortunately delivery of the lumber as less impressive. Advantage Lumber arranged shipment of the substantial order via ABF Freight (@abftoday) and — as with the majority of the logistical partners with whom we’ve worked in the last few years — they overpromised and underdelivered. Despite clearly articulating our tight timeline and receiving assurances that we’d received our garapa decking in time, the new decking material arrived late due to “logistics delays”. Sound familiar?
Unloading Garapa Decking, July 2022 (Source: Susan Bacot-Davis)
Unloading Garapa Decking, July 2022 (Source: Susan Bacot-Davis)
On July 28, just shy of high noon on a scorchingly hot and humid day, we received our order. Perfect conditions for unloading. David wisely volunteered to inventory the lumber inside the shady truck, Tony tackled the task of unloading lengths of garapa from the truck and passing it down to the deck where Hroth and I hauled, sorted, and stacked the precious cargo.
https://www.instagram.com/p/CgpAXM5uFCN/
Unloaded, sorted, inventoried, and ready to become Rosslyn’s new deck floor, this garapa looks absolutely sumptuous after a midsummer rain. We were all a little gobsmacked with the sheer beauty of this lumber. Even an aesthetically astute bat (or three) dropped in to celebrate the honey hued hardwood.
https://www.instagram.com/p/ChnfAqnvaju/
It took a couple of days for the team to find their groove, eager to balance forward motion with perfect execution to ensure that their workmanship matched the beauty of the material. Soon they were installing garapa decking from sunup to sundown, performing a mesmerizing choreography as efficient and beguiling as a ballet. (I better not let them read this or they may refuse to let me document their work ever again!)
https://www.instagram.com/reel/ChARdWSgBlX/
Although progress on this sort of deck is steady and incremental, my eagerness to complete the project sometimes overtook my patience. Why aren’t we further along yet?!?! But each day, reviewing the team’s accomplishments since morning afforded us all a daily opportunity to romance the stunningly beautiful deck taking shape. End-of-day reflection (revitalized with frosty libations) frequently ran to artistic and poetic reverie more than carpentry tropes and jokes. I kid you not, but again, don’t let the guys know I said that.
https://www.instagram.com/reel/ChXGgegAGR-/
Although that post above specifically called out Eric Crowningshield, this project brought out the best in everyone. If my photo / video recording were as nimble as I’d have liked, I would have posted a similar tribute to every single member of the team. I’ve already mentioned Hroth Ottosen above. You’ll be hearing plenty more about him in the weeks and months ahead because he’s such a vital asset. And, Pam Murphy, our friend and property / project manager extraordinaire, not only keeps our diverse projects sorted and successful, she is the most capable “air traffic controller” ever, juggling everyone and everything without letting anything tumble out of orbit.
These are a few of the most visible stars on this allstar team, but there are so many other: Susan’s cousin, David McCabe; our friend, Ed Conlin; electrician Brandon Dumas; jack-of-all-trades, Tony Foster; and Eric’s ever-reliable and hardworking team (Matt, Justin, Andrew, Jarrett, and Jason) Not only is the end product from this collaboration an understated masterpiece fit for the handsome home, but every day cooperation with this team was a pleasure and a privilege. We are profoundly grateful. (In fact, this is precisely why they’ve all teamed up for the icehouse rehabilitation project!)
https://www.instagram.com/p/CiaG1LjOStE/
There are the predictable successes with a project like this, but there are also serendipitous triumphs. One among many is captured in that delicate image above.
https://www.instagram.com/p/CiprpA5uLug/
Once the last board is scribed and screw head is plugged, it’s time to oil the garapa decking. It’s at this point that everything comes together, and the results are far more glorious than the sum of the parts.
https://www.instagram.com/reel/CipsbUSgn9f/
As each garapa board is tenderly treated with oil, the drama and depth of the wood comes alive. Such beauty!
https://www.instagram.com/reel/Ci0XQr3A3Rn/
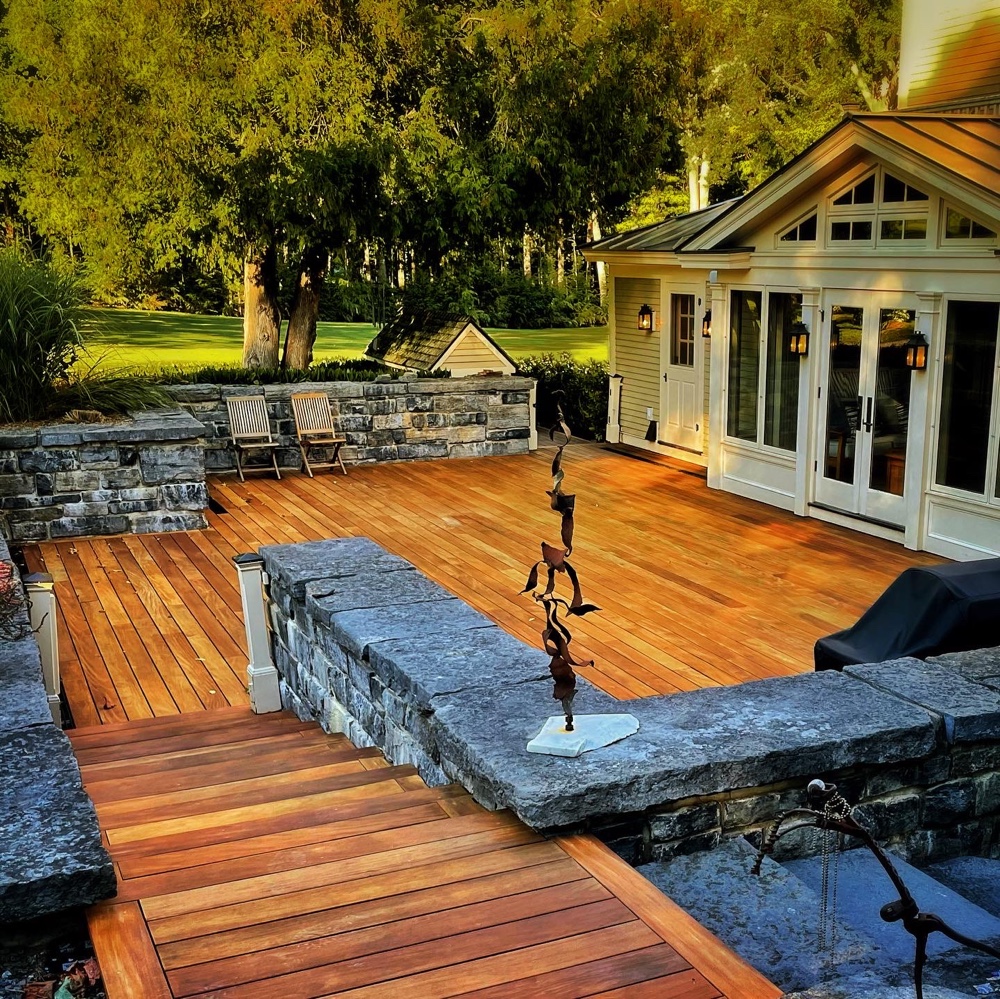
There remain a few last details to conclude the project — a bit of landscaping here, a few painted trim details there — but the results are breathtaking. And this is never more evident than in the later afternoon when that mesmerizingly lush sunlight bathes the wood in amber and gold.
https://www.instagram.com/p/CjOEWAAOjQ4/
And this, my friends, is the sun soaked conclusion of our summer (and autumn) 2022 Rosslyn re-decking adventure. Installing garapa decking isn’t an overnight victory lap, but the painstaking efforts will pamper us for years. Susan, Carley, and I extend our most sincere thanks to everyone who helped transform this dream into reality.
Eric Crowningshield Framing Icehouse Floor (Photo: R.P. Murphy)
What. A. Week. It’s a bit of a three ring circus at Rosslyn lately. So many projects happening concurrently. And so many invested, industrious, upbeat, solution-centric colleagues helping us repurpose Rosslyn’s circa 1889 icehouse rehabilitation into the ultimate 21st century flex-work-lifestyle hub. And as of today the first floor is framed!
Icehouse First Floor Framed (Photo: R.P. Murphy)
Vision + Ambition + Skills
With such a fortunate gathering of capable tradesmen (and woman) progress this week has reached a new level. A shared vision. An eagerness to advance the mission. An absence of ego. And a shared enthusiasm for the project. If only ever week can run this smoothly!
Although the collaboration of many ensured that the icehouse first floor was framed this week, especial thanks are due Pam, Hroth, Eric, Peter, Andrew, Ben, and Supi for your various contributions. You are truly inspirational. Thank you.
Video Mashup of Floor Framing
If you prefer a quick zip through, then this video mashup is for you.


")
")
")
")
")
")
")
")
")
")
")
")
")