Finishing, not finished. Yet. But soon. I hope! The icehouse main floor and staircase are slinking slowly toward completion. Sashaying? No. Sauntering. Slowly sauntering. But at last I can say that we’re finishing the floor and the staircase in Rosslyn’s icehouse.
Finishing Floor (Photo: Geo Davis)
We’ve been using Safecoat® Polyureseal BP to seal our hardwood floors for about twenty years. It’s an almost zero VOC alternative to conventional polyurethanes, and it performs really well. For the mixed species, ash and elm, variable with flooring we’re applying six coats with light, fine grit sanding in between coats. We’re not done yet, but the photo above captures the unique character of this homegrown, stump-to-floor hardwood, revealed and enhanced in no small part by the Polyureseal BP. Tony has been responsible for sealing all of the floors in the icehouse including the downstairs ash and elm, and the upstairs beach. Thanks, Tony. Almost done!
Near the top edge of the photograph above, you can catch a glimpse of the last section of the staircase to be completed. Let’s take a closer look.
Finishing Staircase (Photo: Geo Davis)
Supi has recently finished installing the T&G nickel gap paneling. Glen has been following with the paint brush. And Peter is working on the trims, cabinet doors (left), and the bookshelf (right). Home stretch! Well, except for the railings and balusters…Back on February 14, 2023 I was assured by a cabinetry carpenter named Bernie that tackling the banister (+/-2 weeks) and staircase railings would be “a piece of pie”. Unfortunately it’s proven to be a very slooow pie preparation. Hopefully we’ll see the cabinets and railing soon.
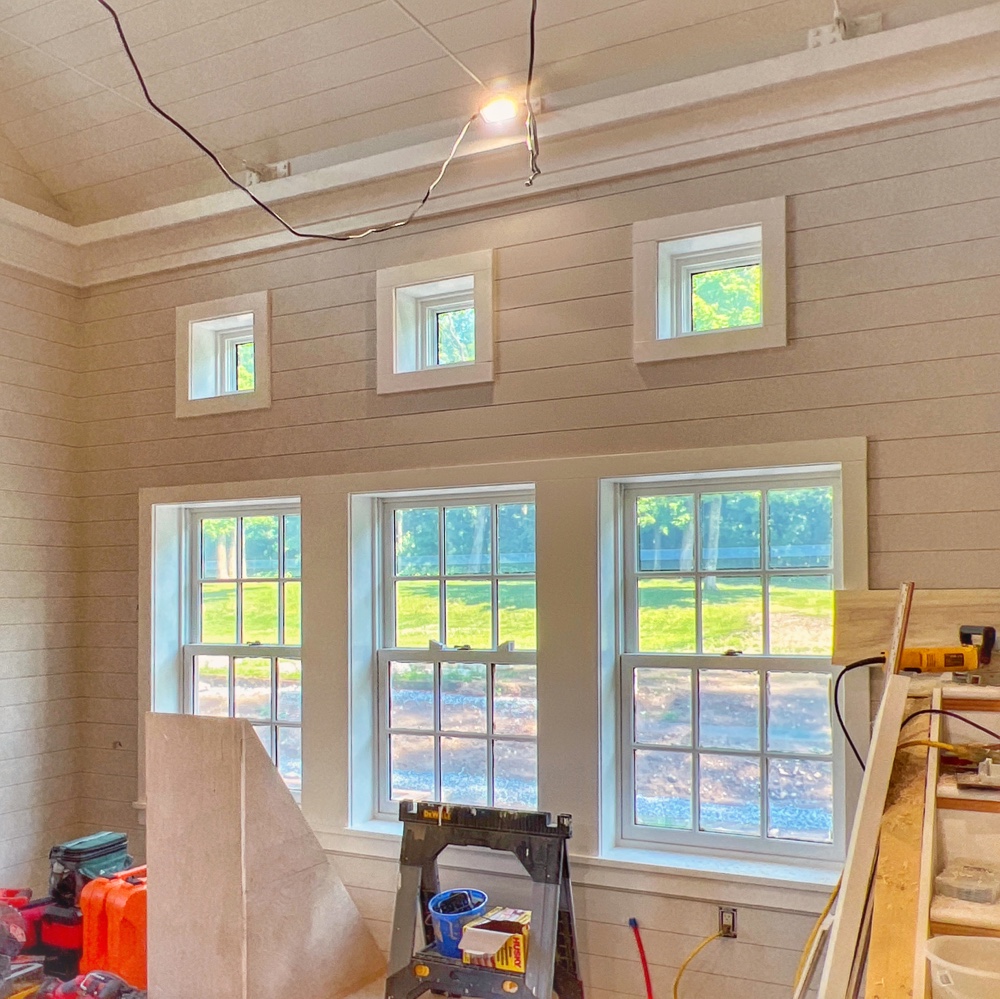
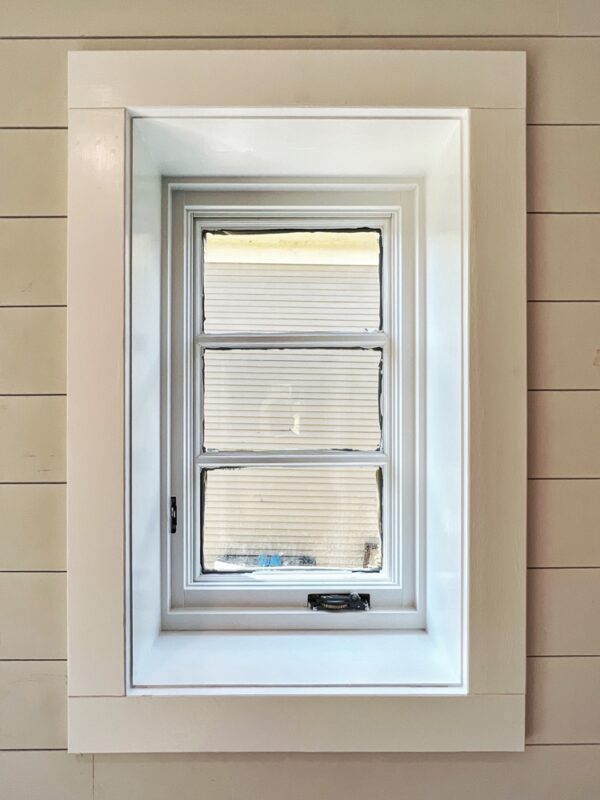
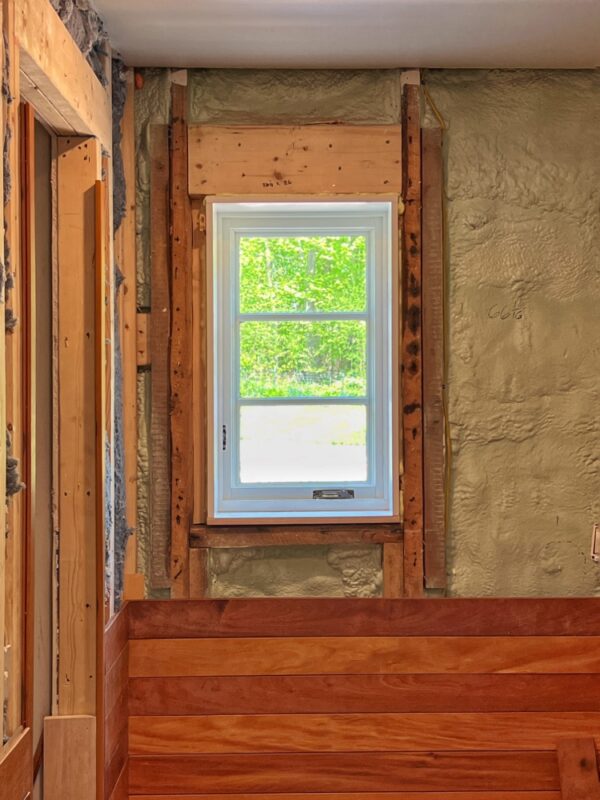
We’ve been finalizing a timely transition from porosity to fenestration in the icehouse rehab. Framed but temporarily concealed apertures have been cut out and transformed into doorways and windows. Jamb extensions, sills, and trims — carpentry confections that conjoin and integrate discrete elements into a cohesive architectural whole — are finally complete inside the icehouse. Exterior trims are still in the works.
When Apertures Become Windows (Photo: R.P. Murphy)
In the photograph above the north facing windows in the main room exemplify the coalescing of elements, framing a view of… gravel and dirt!
This view is evolving as I type. Stone walls and stone steps will define the levels and the transitions between them. In the near ground, a lawn will yield to a stone bordered area of plantings that will bridge the lower elevation outside the deck to the upper elevation where the volleyball and croquet court will once again be located.
When Apertures Become Windows (Photo: R.P. Murphy)
With the jamb extensions complete and the window trims installed the next step will be to scrape paint from the windows and install the hardware. Plenty of convergence and completion happening each day…
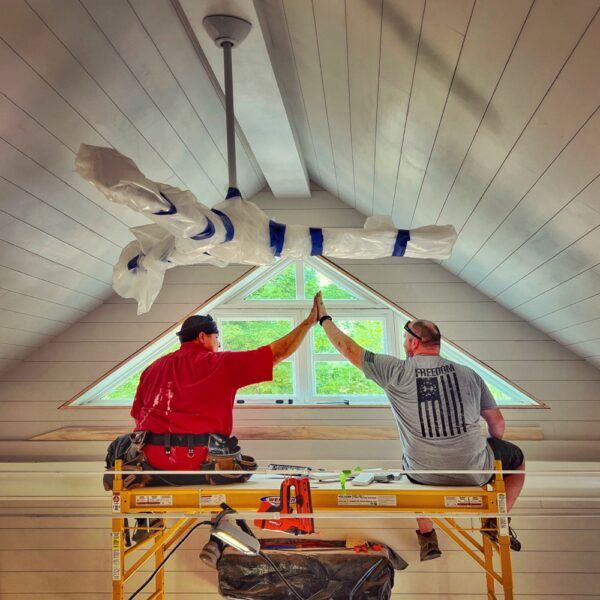
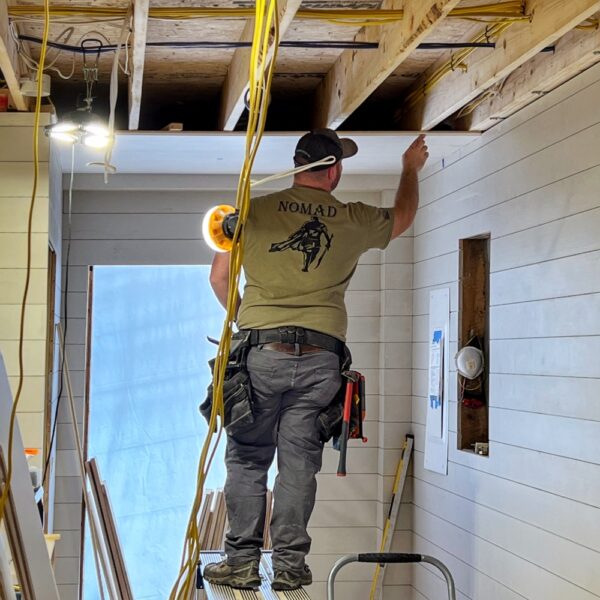
Two men on scaffold
carpentering, high-fiving,
enjoying the view.
Scaffold High
Much of the finish work in recent months has been high above terra firma (interior wall and ceiling paneling, exterior siding, window installation, etc.), so ladders and scaffolding have been omnipresent. Lots of climbing up and down, lifting up and down. Simple tasks become less simple, and complex tasks become more complex. Up, down, up, down,…
And yet the team has persevered. They’ve climbed, lifted, and maintained their upbeat demeanor. They’ve collaborated and they’ve celebrated. High five!
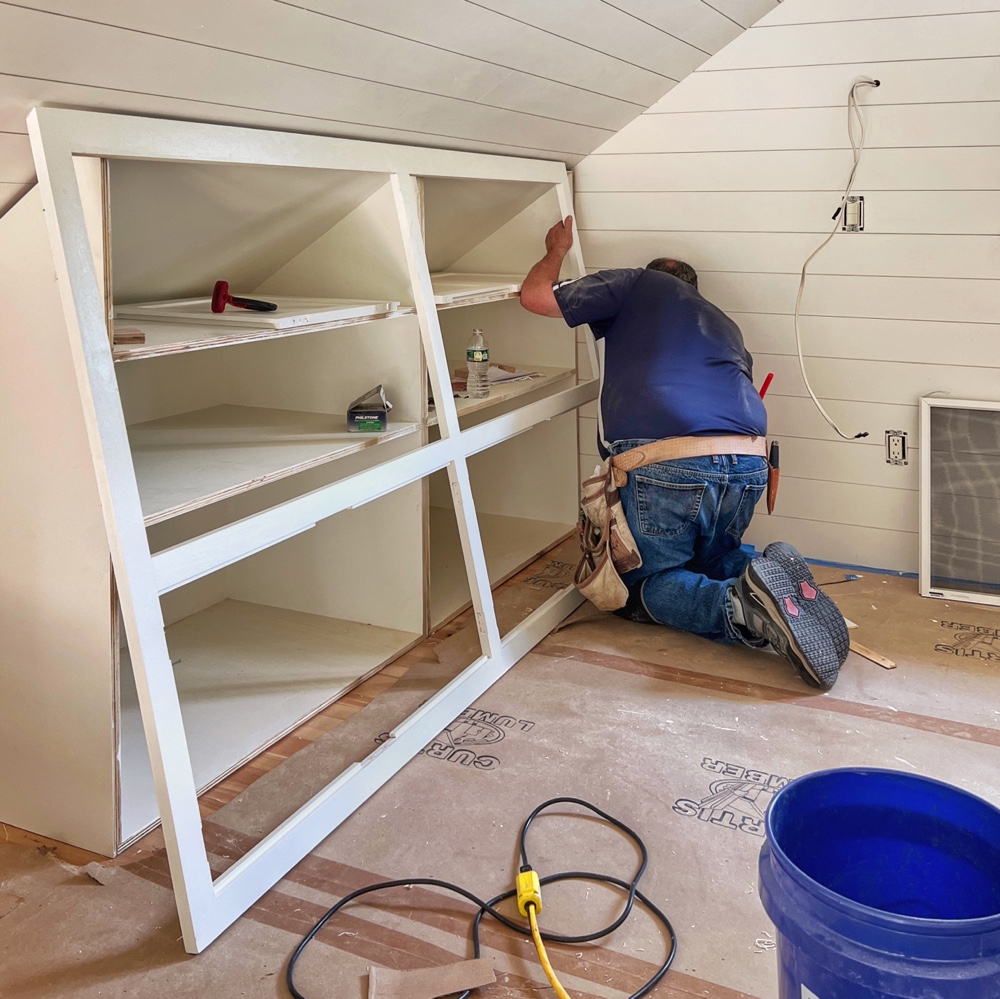
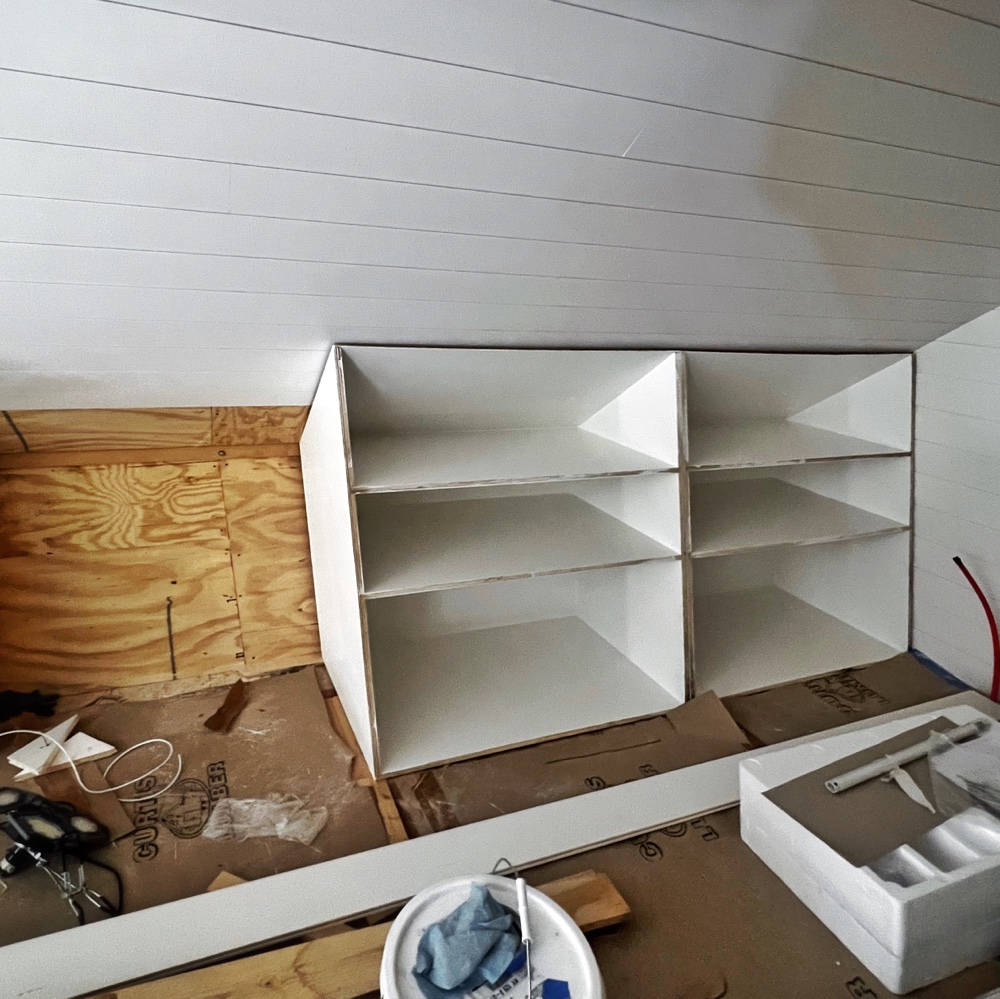
For such a nanoscopic space, it’s a little uncanny how much complex finish carpentry and how much cabinetry have been part of this final stretch in the icehouse rehab. Actually… it’s precisely *BECAUSE* of the nanoscopic proportions that we’ve emphasized builtins and detailed finish work. And degree-by-degree we’re measuring progress toward completion. Even the cabinetry in icehouse loft is beginning to take shape.
An endoskeleton for the soon-to-be loft shelving has begun to take shape. Shop-built carcasses fabricated by Bernie Liberty have been delivered and installation has begun. Lining the north and south knee walls, these reading repositories will soon be lined with bound words… (Source: Loft Shelving)
Cabinetry in Icehouse Loft (Photo: R.P. Murphy)
I accompanied my April 25, 2023 update with a haiku — a loft shelving haiku, of course, — brimming with bookish confidence. Bookshelf confidence, at least. I acknowledged my exuberance at the time.
A little forward leaning, I suppose. Aspirational. Projecting, courtesy of my imagination, a few weeks forward… (Source: Loft Shelving)
A few weeks forward?!?!
“Piece of pie,” the carpenter responded in January when we discussed the icehouse loft cabinetry. He estimated “a couple of weeks” to fabricate and install the cabinets. My optimistic update (referenced above) was posted three months later when some carcasses had been delivered, and the first units were installed. Hhhmmm… Almost two months after that the face frame is joining the ensemble. Hurrah!
Cabinetry in Icehouse Loft (Photo: R.P. Murphy)
I frequently remind Carley that anticipation is half the pleasure. She remains unconvinced, but lately I’ve been reminding myself that this isn’t just a patience mantra. There’s more than a kernel of truth in it. An aphoristic cousin to “distance makes the heart grow fonder”, perhaps?
However we account for it, I’m relieved and more than a little thrilled to see my loft cabinetry coming together. Since this space will be my study, the lofty locus of my productivity, I have a vested interest in the timely and reliable execution of this builtin storage. A tidy workspace is a productive workspace! Heck, I’m overflowing with aphorisms today. And even an autogamous poem…
Study & Studio Haiku
Lo lofty locus,
penning’s, typing’s, doodling’s
manufactory.
Speaking of anticipation, years of hope and expectation have fertilized the vision for my study-studio in the icehouse loft. A picture perfect panacea! And yet, I recognize the zealous overreach, understand that degrees of recalibration may be necessary. Soon.
Loft Cabinetry
With luck I’ll follow this post soon with a celebratory bookend to this project. Perhaps “a couple of weeks” will have extended into a couple of seasons, but I’ll be able to migrate my books and files and fountain pens and miscellaneous mementos into their new shelves and cabinets. I’ll be able to position my desk beneath the east side gable window and occupy the chair with a view for productive mornings in my loft. Ah, Elysium.
My mind meanders, doubling back on an exchange with Pam this past winter.
Geo: Builtins will combine open shelving (note dimension changes per our meeting) and cabinet doors (paint grade shaker style with flat panel and no panel molding) concealing deep cabinet storage. Please review plans and help me determine whether or not we can/should fabricate in-house or subcontract to a cabinetry shop. (Note: I’m hoping to evaluate whether or not our team is well suited to undertaking this mostly shop-work carpentry, and whether or not it is the most pragmatic use of our resources.
Pam: Builtins have been snapped out. I have a cabinet maker stopping in tomorrow to see the scope of work and discuss his availability.
Willing forward motion — cabinetry installation, final painting, hardware, and… migrating from the house to the icehouse — in the coming days.
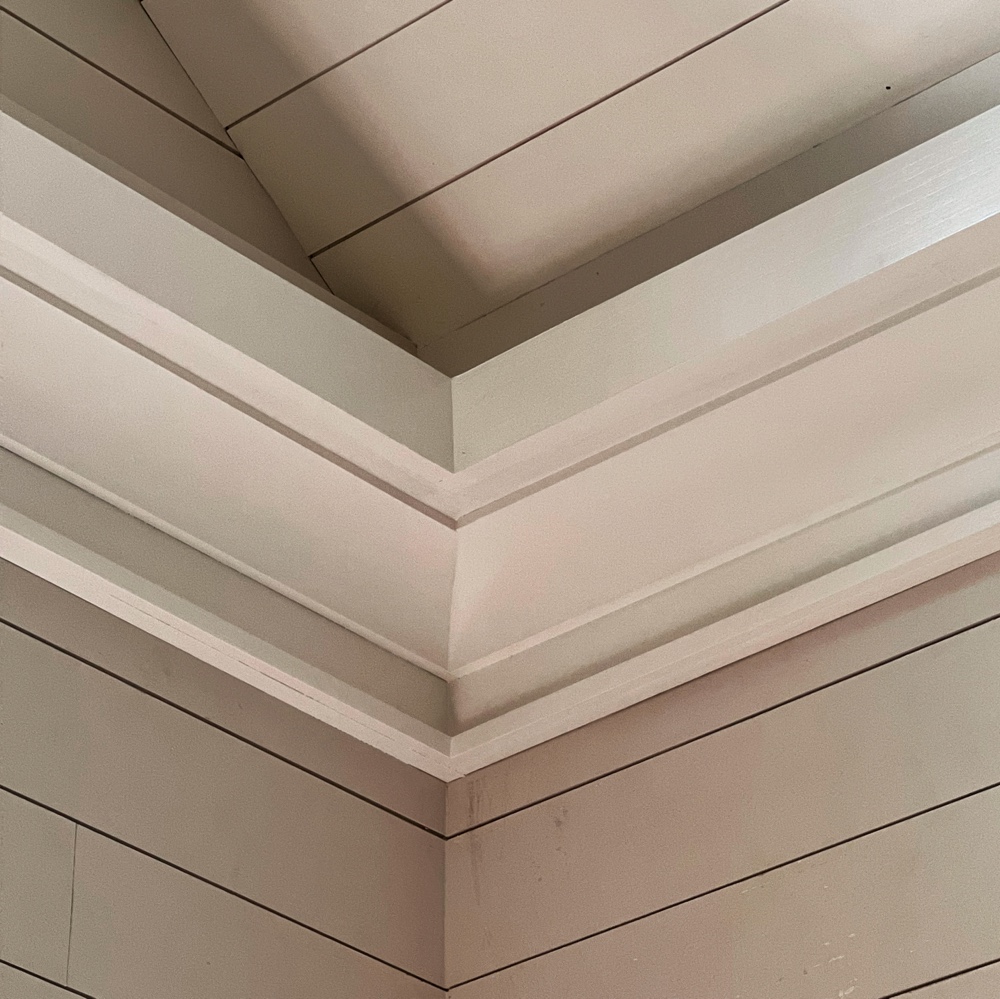
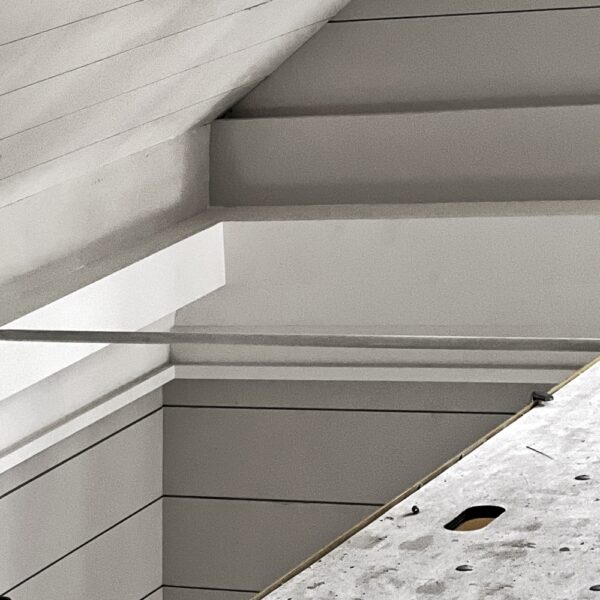
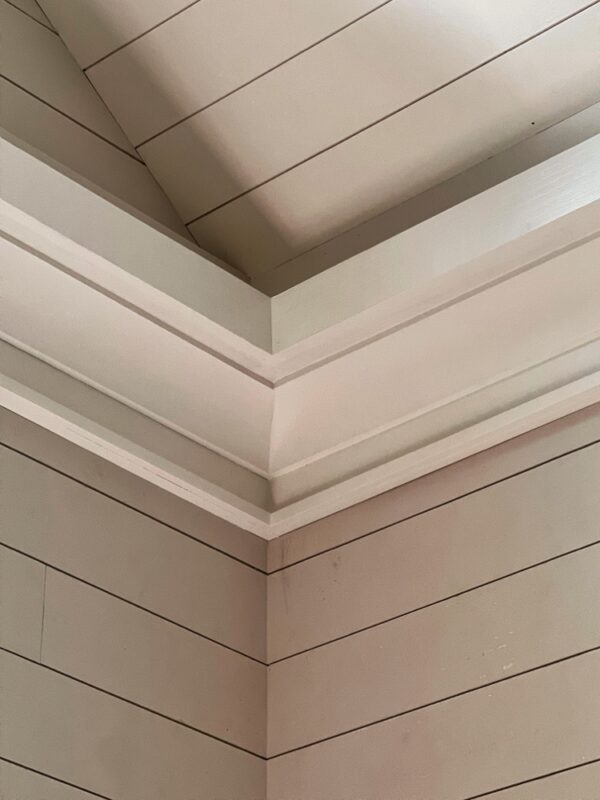
More good news this morning: the icehouse coving is complete!
It looks so seamless, so simple now that the woodwork is joined, the discrete elements have coalesced, and the paint has dried. Integration. Cohesion. Hurrah!
Coving Complete (Photo: R.P. Murphy)
Only a few months ago, this vision — more mirage than meaningful map forward — danced in my imagination. It was a problem to solve, actually a couple of problems, plus the possibility of an elegant if understated solution.
During my recent on-site meetings with the team I discussed a specific twist that needs resolving in order to move forward with coving construction (and tie-rod fabrication). There are ledgers along the north wall and south wall top plates that were installed in 2006 as part of our roof rebuild. All of the rafters land on these ledgers. The rebuilt roof is robust in part because of this interesting workaround, but it creates a 1-1/2” step near the top of the wall that introduces an impediment (or possibly a benefit) for coving construction. Basically, our construction plan (A402, detail 4) does not account for this plane discrepancy. I’m endeavoring to integrate the step structurally into the cove construction. Although this structural element creates an added challenge, I actually think that it might contribute to a pragmatic solution… [However, this] idea doesn’t (yet) integrate electrical, focusing just on structural and finish integration. (Source: Ciphering on Icehouse Coving)
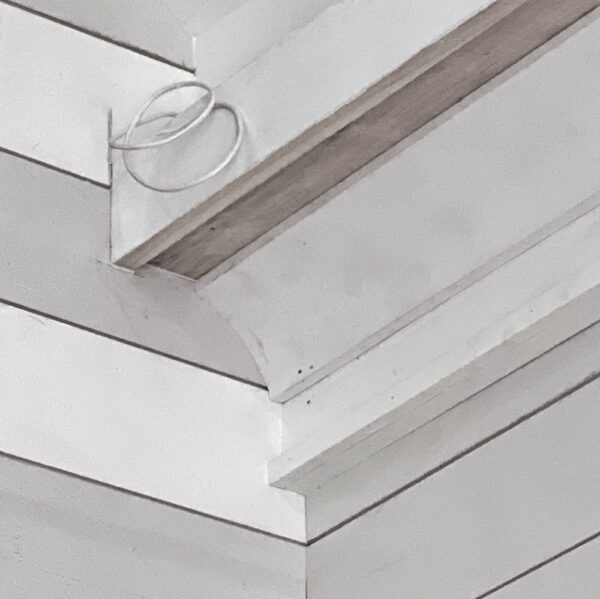
The electrical uncertainty pertained to low voltage lighting that is being concealed above the north and south side coving, gently illuminating the vaulted ceiling and allowing for a shadow line above the coving. (See the coiled wire in the image below?) That installation comes next. Here’s hoping that the results match up with my hopes…
Coving Nearing Completion (Photo: R.P. Murphy)
Pieces of the Puzzle
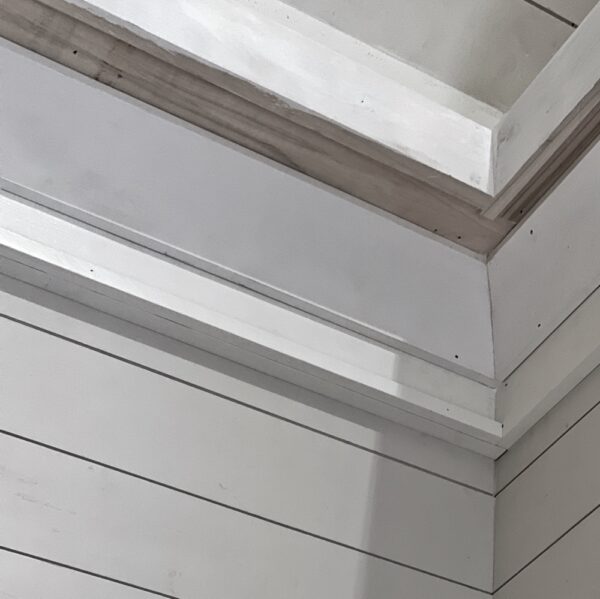
The snapshot directly above and the next one below, offer a glimpse into the carpentry process for fabricating the coving detail. Multiple constituent parts comprise this otherwise subtle, understated design element.
Like pieces of a three-dimensional puzzle finding their companions, the intricate borders, contours, and profiles fuse into a whole. With an ooold structure like this late 19th century icehouse, there’s another challenging. Few, if any, angles are true. Corners are infrequently 90°, walls bow and they’re rarely plumb. So scribing and fine-tuning are constant and critical. Measure, cut, fit, tune, refit, re-tune,…
Coving Nearing Completion (Photo: R.P. Murphy)
But, little by little, headway is made. And, as you can observe in the almost complete coving photo and the post-paint photo below, diverse puzzle pieces pull together and begin to merge. There’s a profoundly rewarding coalescence as heterogeneous components form a homogeneous ensemble. From pieces, emerge a whole.
Coving Nearing Completion (Photo: R.P. Murphy)
Doubling Back…
Wait what?!?! How did we get here? What did I miss?
If you’re perplexed with my quasi communion-esque enthusiasm for carpentry-conjoining bits and pieces of wood into architectural poetry, I understand. I offer you my sincere condolences. My peculiar propensity to understand (and communicate) creative processes — and I’m speaking in sweeping, inclusive, and trade androgynous terms from gardening and landscaping to construction and cabinetry, writing and theatre to dance and song — in analogous and overlapping ways. It’s not a bug, it’s a feature!
But let’s double back a beat or three in case the coving journey slipped past unexamined.
Structural integration for coving in the icehouse’s vaulted ceiling area is now complete… wrapping around the north, west, and south walls at the height where ceiling and the north/south walls meet… a new horizontal ledger has been installed and the “shelf” has been fastened underneath. (Source: Icehouse Coving Progress)
From unanticipated challenge to opportunity, from draftsman’s drawing to incongruous field conditions, a carpenter’s quiver need be equipped with *BOTH* skill and art. Fortunately our team is innovative and creative and persistent. Hurdles are chances to share ideas and collaborate on workarounds.
The next step will be to encase the 2x8s with trim (dimensional poplar) that will meet up with T&G nickel gap paneling on the ceiling and walls as shown above. Cove crown will be installed beneath the shelf, and an aluminum track will be installed in the corner of the shelf to secure LED strip lighting. (Source: Icehouse Coving Progress)
Now we’re ready for the strip lighting. Imagine the view below as it will appear once the cove on the right is gently backlit…
Coving Complete (Photo: R.P. Murphy)
With a flicker of fortune, I’ll be posting that update soon!
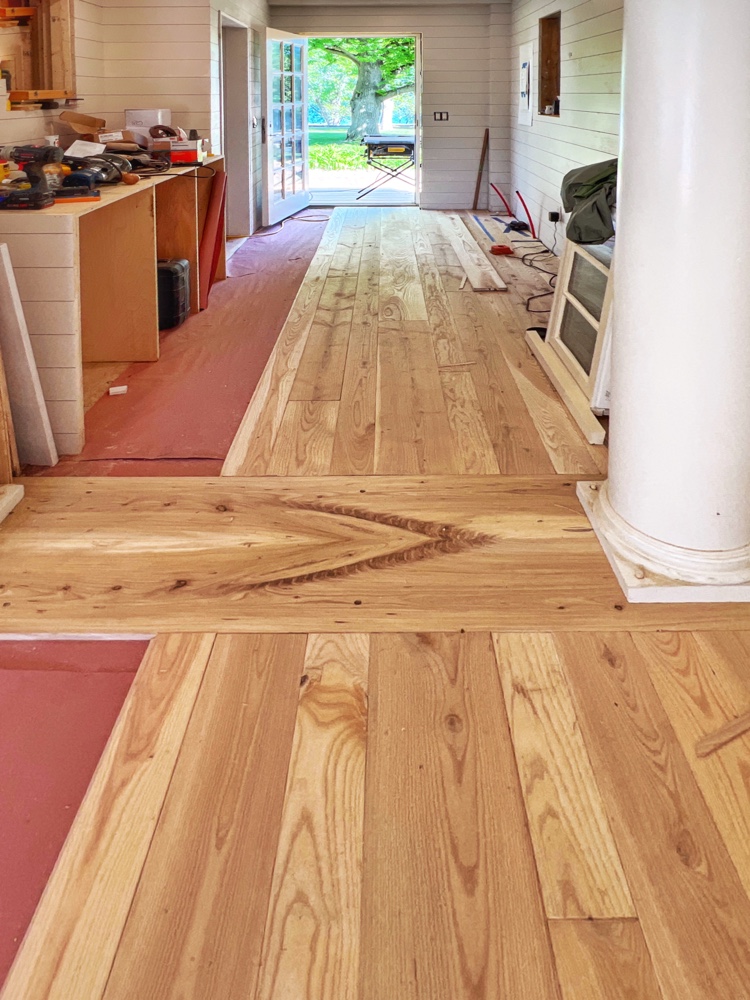
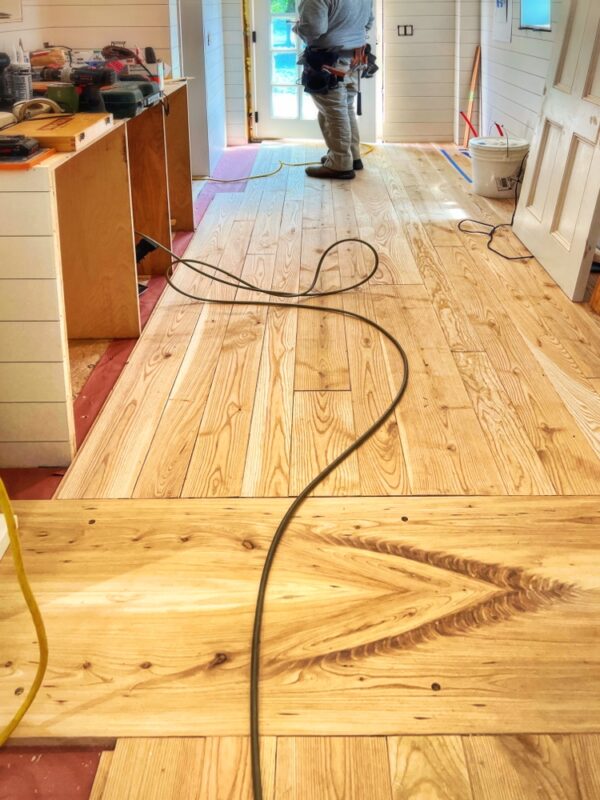
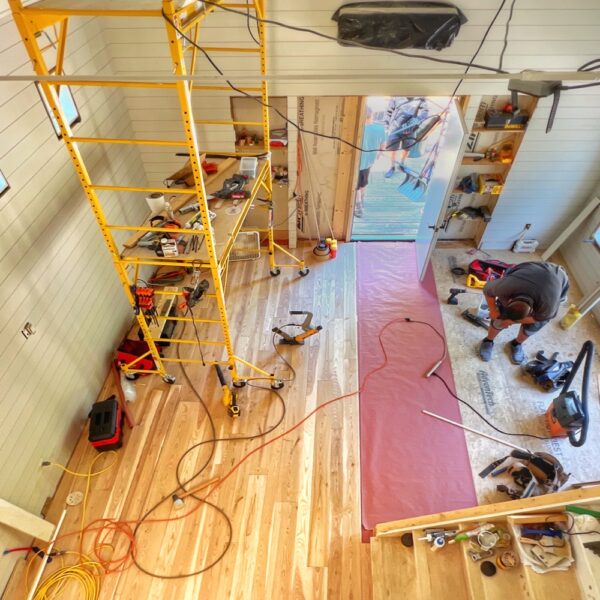
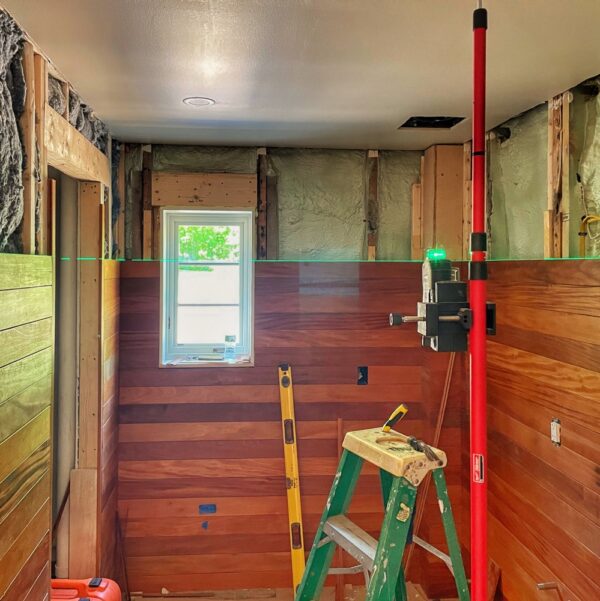
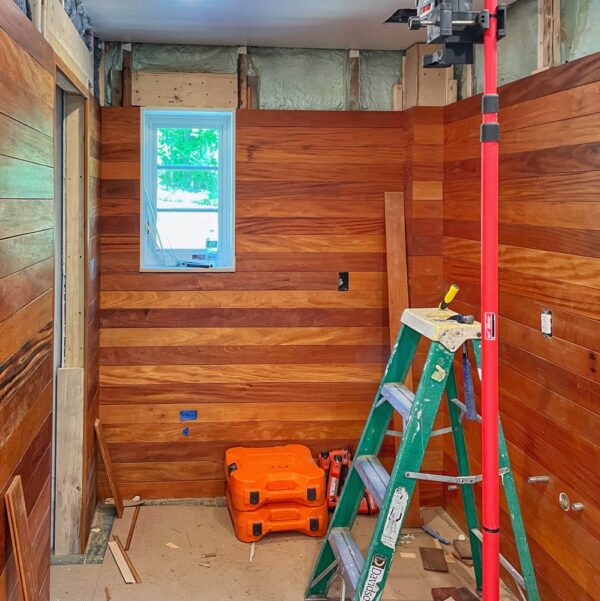
I shared a “Flooring Sneak Peek” a couple weeks ago when the first two rows of ash and elm flooring had been installed. Now that our homegrown hardwood installation is advancing I’d like to share a few progress photos and explain the choice of variable width floorboards.
Variable Width Ash and Elm Flooring Installation (Photo: R.P. Murphy)
Why Variable Width Flooring?
You may recall that we decided to mix ash and elm for the icehouse flooring, showcasing a decade and a half worth of lumber that we had harvested, milled, seasoned, dimensioned, and finished on-site. But I haven’t given much ink to the question of why we opted for variable width flooring instead of uniform sizing (as is the case with the beech flooring in the loft, the garapa paneling in the bathroom, and the T&G nickel gap cladding the rest of the interior walls.)
Installing Variable Width Flooring in Icehouse Vestibule (Photo: R.P. Murphy)
In the photo above the mixed species floorboards, randomly interspersed ash and elm, are clearly different widths. We decided on 4”, 6”, and 8” widths for several reasons. Mixing planks of different widths
contributes an authentic barn appearance (large planks more common in 1800s when icehouse was built)
suggests a more rustic atmosphere
varies visual pattern from the consistent geometry of paneled walls and loft floors
draws attention to the character-rich wood that is a focal point of our rehab story
permitted us to include luxuriously wide floorboards, maximize breadth of widths, and minimize waste
Although we incorporated a bookmatched threshold to visually delineate the vestibule from the main room, the flooring courses have been sized and aligned on both sides of the threshold, visually unifying the floor.
The east-west orientation of the flooring is both practical (perpendicular to the direction of the floor joists) and aesthetically appealing, contributing to the visual flow from entrance-to-entrance, emphasizing the visual axis, and inviting one’s focus toward exterior views beyond the largely glass west wall.
It’s worth noting that significant attention is being given to sequencing the variable width flooring to ensure a harmonious and attractive progression from board-to-board, allowing the color and character variations to enhance the cohesive integration across entire floor.
I can’t wait to see the floor completely installed, sanded, and sealed soon!
Just over a week ago I posted a prologue to today’s garapa paneled bathroom update. I apologize if it felt a little half baked.
For just a little longer, I’ll keep you in suspense before I share photos of the now completed garapa installation. Remember, anticipation is half the pleasure! (Source: Garapa Paneled Bathroom, Pt. 1)
I wasn’t teasing out the update for the sake of suspense. I promise. And today’s post will hopefully offer some recompense for your patience. But there was a lot — a LOT — to pack into a single post, so I felt it more reasonable to subdivide it into a couple of installments.
I’m dividing this… update into two posts to fairly review and showcase a project that has taken the better part of a year from beginning to finish… (Source: Garapa Paneled Bathroom, Pt. 1)
Besides, I was about to head into the Gila Wilderness when Eric Crowningshield gave me the good news, and I simply couldn’t squeeze it all in before going off-line adventuring for a week sans connectivity, computer, etc.
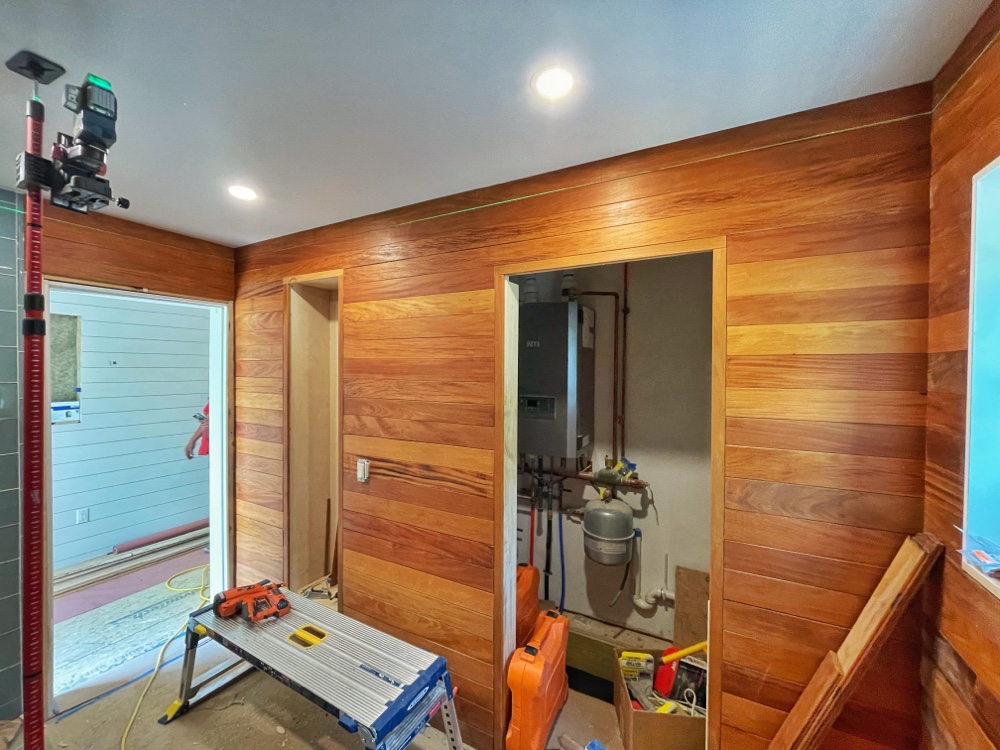
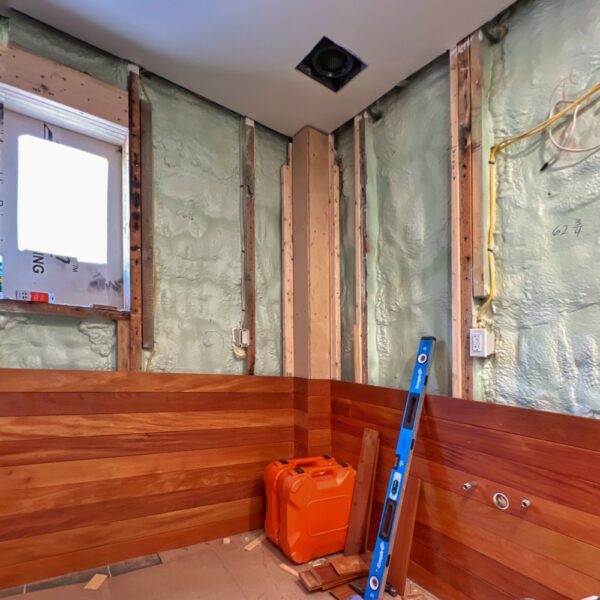
But now it’s time to celebrate completion of the icehouse bathroom’s garapa paneling, to showcase the photos, and to sing praises for the carpenter behind this monumental accomplishment.
Eric Crowningshield Installing Garapa Paneling in Icehouse Bathroom (Photo: R.P. Murphy)
Garapa Paneling the Bathroom
Upcycling Rosslyn’s deconstructed garapa decking into interior paneling has occupied many members of the icehouse rehab team for months. It’s been a challenge. Every. Single. Step. From demo’ing the old deck (while painstakingly deconstructing, selecting, and grading the most reusable and aesthetically pleasing garapa) to troubleshooting, iterating, and finally re-fabricating the decrepit, timeworn decking into elegant interior finish material, this upcycling endeavor has been an epic quest. And the exacting preparation demanded even more exacting installation.
Garapa Paneling Progress in Icehouse Bathroom (Photo: R.P. Murphy)
Today we celebrate Eric’s conscientious carpentry and dogged determination, shepherding the garapa paneling to its exquisite completion! (It’s worth noting that Matt Sayward assisted in the early stages of installation, but Eric soon took ownership of the project to ensure 100% consistency.)
Garapa Paneling Progress in Icehouse Bathroom (Photo: R.P. Murphy)
The following excerpts and photos offer an interesting perspective as Eric worked through installation of the garapa paneling.
Garapa Paneling Progress in Icehouse Bathroom (Photo: R.P. Murphy)
It should go a little quicker now with the breaks in the runs [and] not needing to lineup 4 miters in one location. Nothing about this is easy but my gosh probably one of the most rewarding project thus far… — Eric Crowningshield
Garapa Paneling Progress in Icehouse Bathroom (Photo: Eric Crowningshield)
On the left side of this door it is 3-1/8” from the inside of the door jam to the tile. Do we not put garapa and run a 3” trim around the jam leaving a 1/8” reveal? On the other side we only have about 2”, so I’m guessing it may look odd with wider trim on the left and top. — Eric Crowningshield
The best way to handle the garapa around the door is difficult to determine from afar. My suggestion is that you and Peter look at it together and come up with the best solution. We have some asymmetry to deal with. Tricky. — Geo Davis
I’m going to put horizontal pieces on the left side before trim because the trim on the other side is around 1 3/4” so I think it would look better keeping the same size around the door. — Eric Crowningshield
Garapa Paneling Progress in Icehouse Bathroom (Photo: R.P. Murphy)
I went down tonight for a few hours and ripped some [garapa] down to the same width so the last 4 rows will be the same. Otherwise we were going to end up with a 1” or so piece around the ceiling. I put another row of that up so only 3 rows left. — Eric Crowningshield
How much did you have to takeoff of each of the boards for the last four courses? Or, better question, how different will they be from the rest of the words? — Geo Davis
About 3/8 of an inch. The boards I put up throughout the whole wall ranged from 4” down to 3-5/8” and a few at 3-1/2”. I had 13” left so I was doing 3-1/4” for the last 4 rows. — Eric Crowningshield
Garapa Paneling Progress in Icehouse Bathroom (Photo: R.P. Murphy)
It is completed!!! I love saying that. — Eric Crowningshield
Superb! Congratulations, Erik. It really looks amazing. I hope you’re proud of the results. I know this has been an almost endless process from demoing the deck to installing the paneling, but a worthwhile adventure. Well done. Is everything wrapped up around the door as well? — Geo Davis
No, we are going to adjust the casing so it is the same size trim on each side. Yes, super excited about it and everything it means to you and the story behind it all! — Eric Crowningshield
Garapa Paneling Progress in Icehouse Bathroom (Photo: R.P. Murphy)
Bravo, Eric Crowningshield, for completing installation of the glorious garapa paneling in the icehouse bathroom. What a tour de force! It’s hard to believe that this is the same decking your team deconstructed from Rosslyn’s deck a year ago. Many months of brainstorming, experimenting, re-milling, oiling, and installing later this masterpiece is born. Hurrah! — Geo Davis
Garapa Paneled Bathroom (Photo: R.P. Murphy)
It was a task for sure, but the end result more than makes it worth the struggles. It is a must see in person although the pictures capture how amazing it looks, [though] it’s even more impressive in person! — Eric Crowningshield
Garapa Paneled Bathroom (Photo: Eric Crowningshield)
I forgot to tell you. I found one board with plugs still in it, so if you look close it is about midway up the wall between the utility and niche. A couple small ones in the niche as well. I thought that would be pretty cool to help tell the story about it being old decking. Wish I found more. — Eric Crowningshield
Garapa Paneled Bathroom (Photo: Eric Crowningshield)
Thanks for letting me know. I will hunt for them next time I’m back. Although you should’ve left it to see if I noticed! — Geo Davis
Garapa Paneled Bathroom (Photo: R.P. Murphy)
This subtle upcycling/repurposing souvenir isn’t quite discernible in the photo above, but it thrills me. Can’t wait to inspect in person!
Garapa Paneled Bathroom (Photo: R.P. Murphy)
I look forward to sharing more photographs of the icehouse bathroom as it approaches completion. It’s so close… Until then, I’d like to express my profound gratitude to Eric for transforming this vision into reality. What an extraordinary accomplishment!
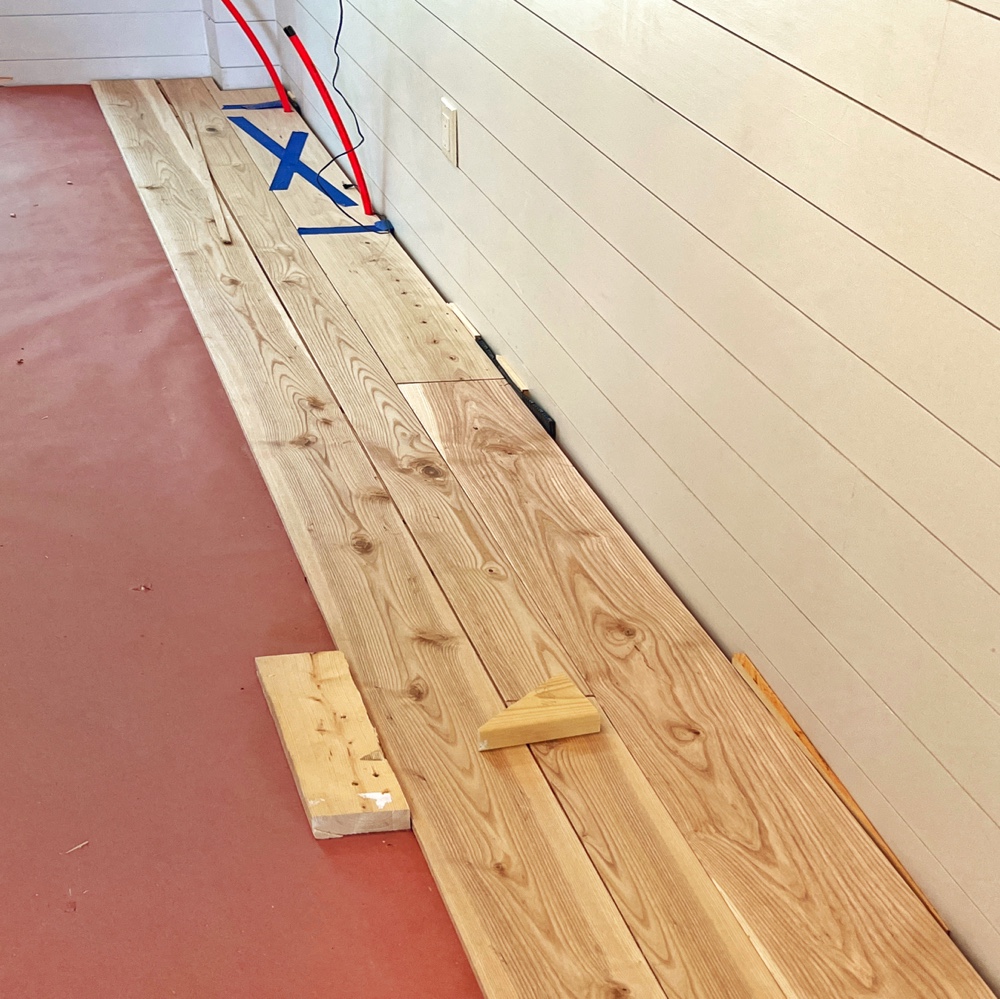
It’s a little premature to start celebrating the soon-to-be-completed hardwood flooring in the icehouse. With only the first two rows installed (and a third in the works), a superstitious soul might delay an update in the interest of humility (or outwitting fate). But it’s been so many months in the planning and preparation that I’ve decided to offer you a flooring sneak peek. After all, it looks too spectacular to keep it a secret!
Flooring Sneak Peek (Photo: R.P. Murphy)
Do you remember my post about acclimating the ash and elm flooring in the icehouse loft? Well, with plenty of time for the homegrown flooring to acclimate and a rapidly diminishing timeline, Peter guided the transition to flooring as Eric put the finishing touches on the garapa paneling in the bathroom. (Glorious garapa bathroom update tomorrow.)
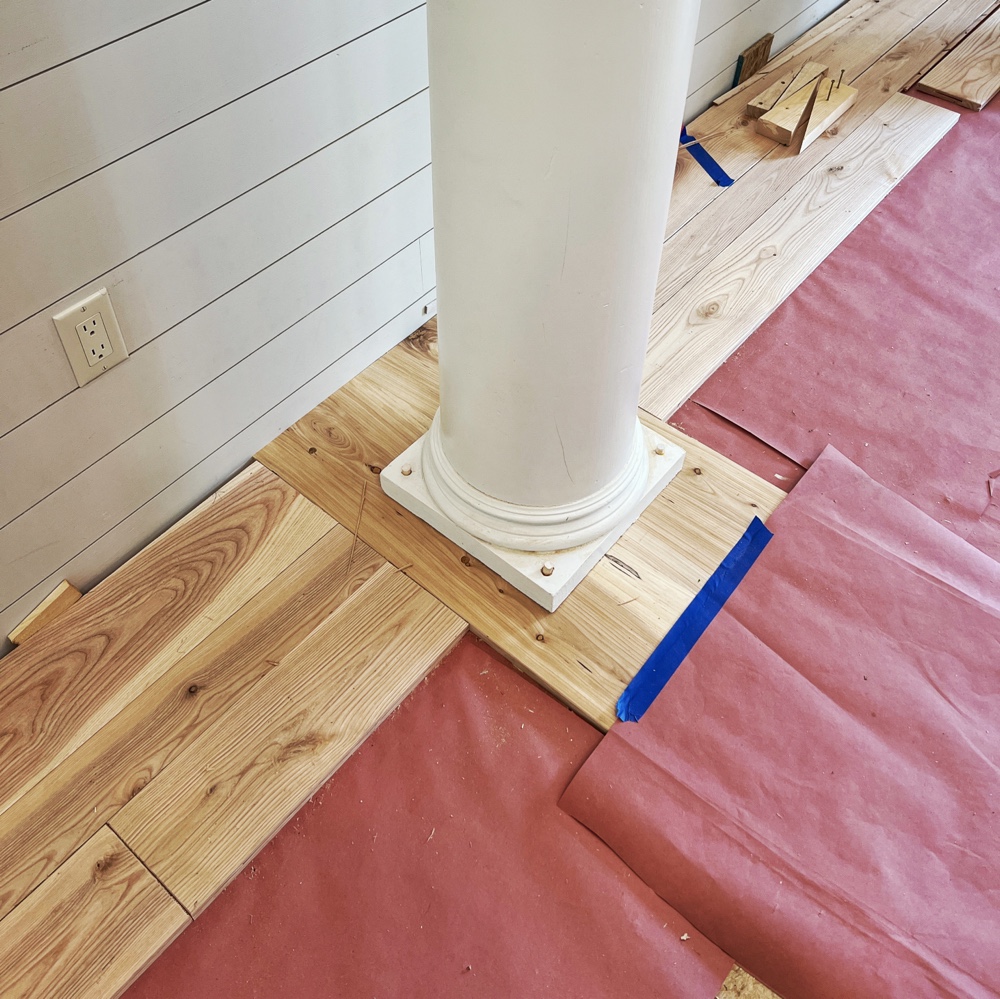
In the photograph above, you can see the dramatic intersection of new flooring with the bookmatched threshold (beneath the columns.) The flooring courses will be perfectly aligned in the vestibule and in the main room ensuring continuity with a dramatic interstitial transition at the ash “heart” abstraction formed from the mirrored grain (concealed with rosin paper in this photograph) of the bookmatched planks.
Variable Width Flooring (Photo: R.P. Murphy)
We opted for variable width flooring, and we’re intermingling ash and elm. All of this lumber was harvested, milled, seasoned, dimensioned, and finished on-site. In fact, some of this wood was felled almost 15 years ago, so this has been a slooow evolving rehab! So slow, in fact, that until about a year ago, we’d begrudgingly come to accept that the icehouse rehab might never happen. So, finally witnessing progress, even a few boards, is momentous and deeply rewarding.
I will follow up soonish with a more detailed look at how we’re joining the floorboards and a few other details that will make more sense once we’re a little bit deeper into this project. But, suffice to say, we haven’t taken the easy (or quick) way out! But I’m confident that the rewards are around the corner.
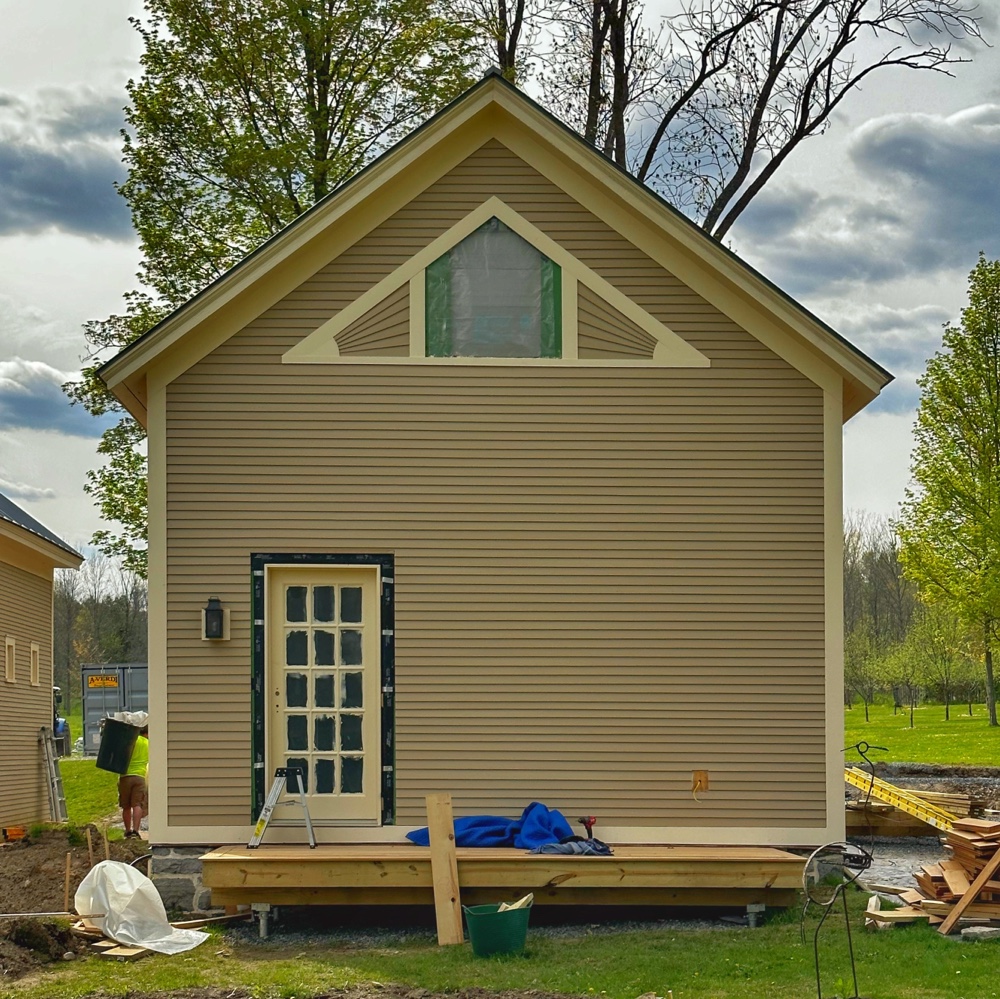
Rosslyn’s icehouse looks a little different this evening. The east entrance door was installed by Peter, subtly transforming the most visible elevation of the building and finally illuminating the entrance hallway with natural light after months in a “cloistered” work environment without any natural light.
East Door Installed (Photo: Geo Davis)
Although there remains some additional shimming and trimming (plus removing paint from the window panes), the public facade of the icehouse is finally coming into focus. However, another element will appear about a month from now, a familiar element for those already accustomed to this facade. I’m going to keep mum for now, but a fun surprise soon!
East Door Installed (Photo: Geo Davis)
The much anticipated exterior change is only half the news. The interior is transformed! Sure, the overpainting tempers the impact of this new door, but it’s already recasting the interior in natural light. And a welcome evolution this is. You might recall that all windows and doors were closed in with insulated paneling months ago to ensure a warm, weatherproof work environment during the winter. Well, it worked perfectly, but everyone on the team is longing for natural light. At last the entrance vestibule is illuminated from without. I’m looking forward to starting my day in the icehouse tomorrow morning to see that it looks with the sunrise bathing the interior…
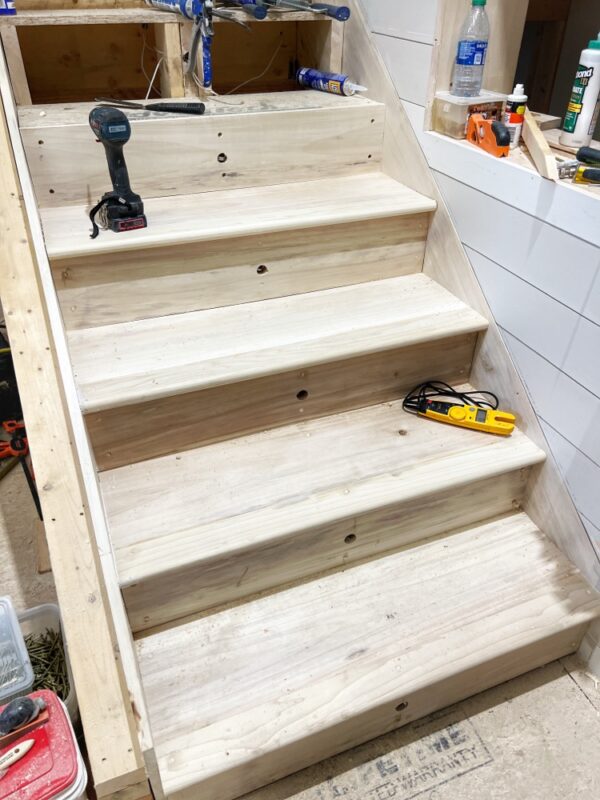
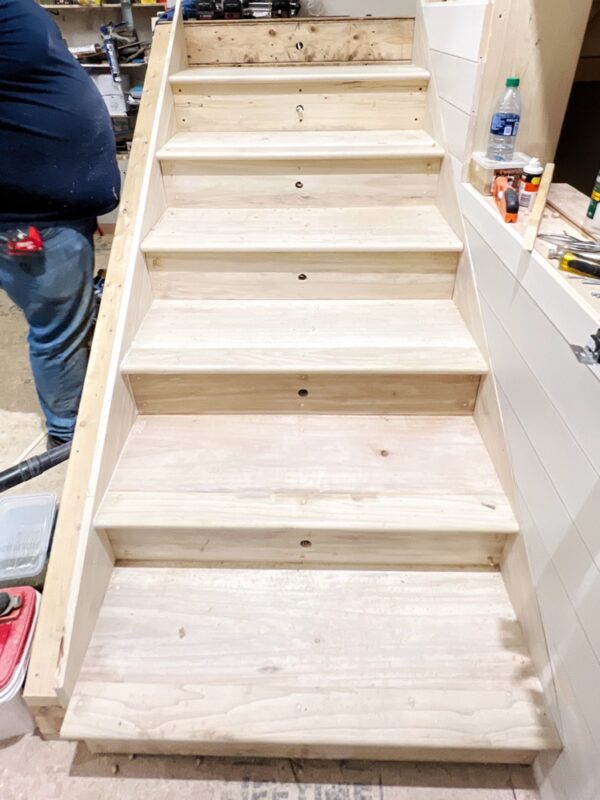
We turn our gaze upon stairs, a rudimentary machine known as an inclined plane. Yes, I am referring to the triumph of engineering that allows us to easily and almost effortlessly transition between stories. Today we look at stairway progress in the icehouse.
When ascending or descending a staircase, do you ever consider the structure and finish upon which you tread? The framing is stout and reliable, the dimensions precisely dictated by building regulations and aesthetics, the handrail and head clearance code compliant but also intuitive and comfortable, and the constituent parts so well integrated that they cease to be treads and risers and balusters and become a single element as familiar and user friendly as countless others you’ve trafficked over a lifetime.
Stairway Progress (Photo: R.P. Murphy)
Although the structural undergirding for the icehouse stairs has been in place for a few months, the finished staircase is just now beginning to pull the parts together. New stairway progress includes installation of stair treads and risers, and preparation for the riser lights that will subtly illuminate the treads after dark. With half of the staircase complete, attention turns to the treads and risers above the midway landing and installation of scotia molding at the junction of risers and treads.
Stairway Progress (Photo: R.P. Murphy)
Baserails, balusters, and handrails will complete the incremental assembly, completing the simple machine which likely go mostly unnoticed after completion. Despite its central location. Despite its vital utility. Its many parts will have become one. And it will be taken for granted. Perhaps. Perhaps not…
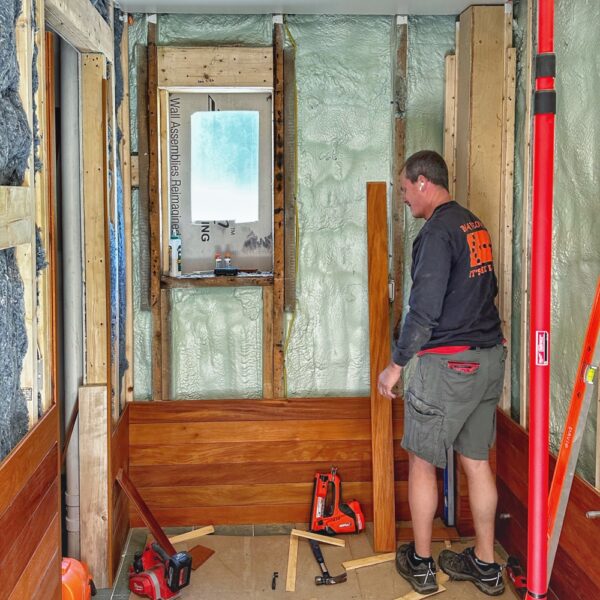
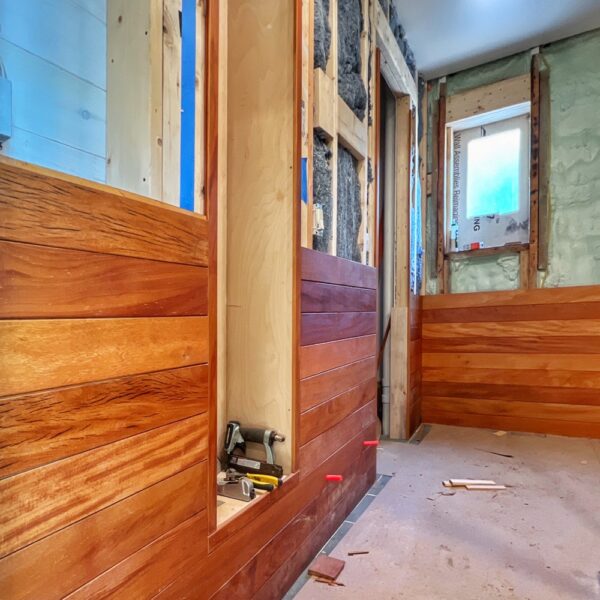
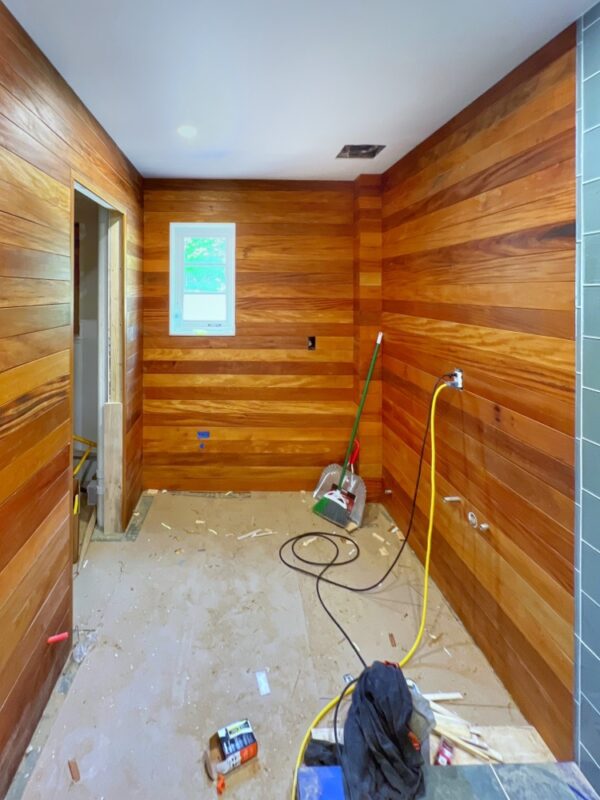
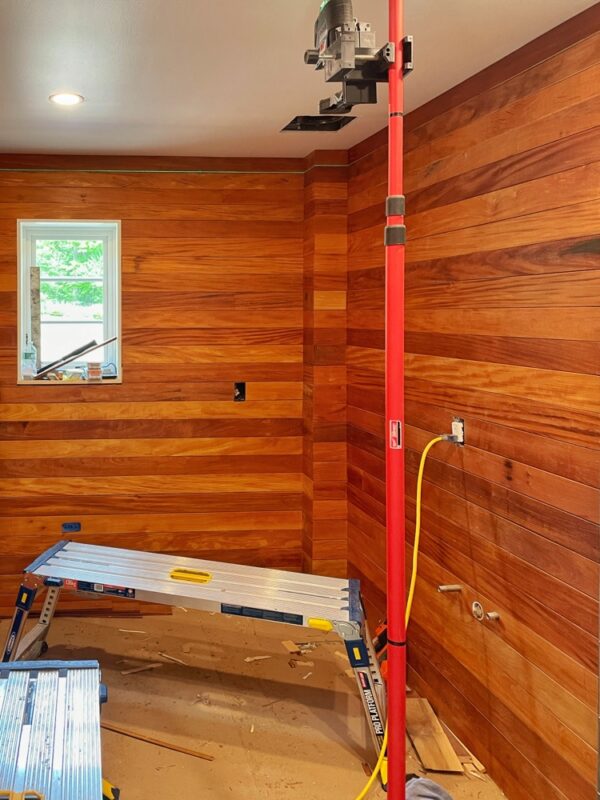
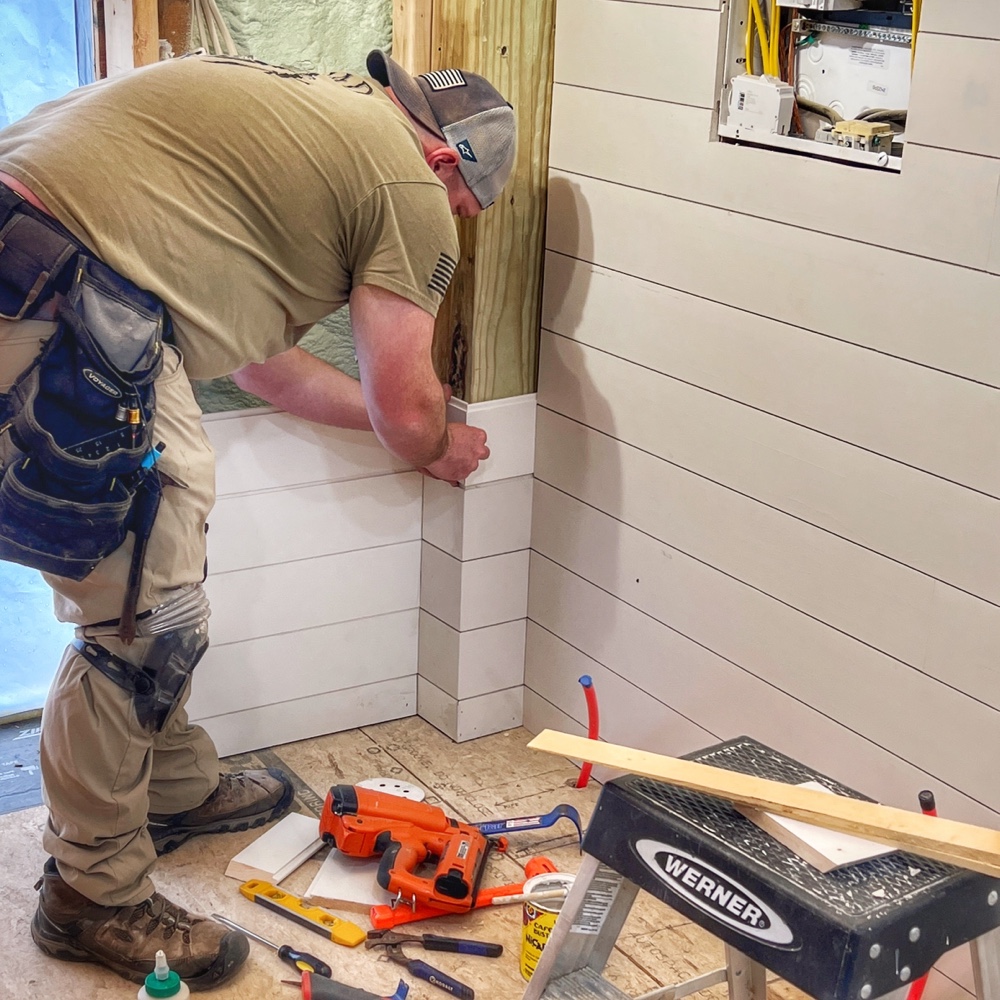
As Rosslyn’s icehouse rehab heads into the final few laps, were beginning to focus on finishes details. In the case of T&G nickel gap installation that means that the large planes (walls and ceilings) are almost complete, so the team’s focus on nickel gapping the remaining nooks and crannies.
Matt Nickel Gapping Corner (Photo: R.P. Murphy)
In the photograph above, Matt is mitering and fastening T&G around an inverted corner located at the southeast of the building. The engineer stipulated that two corners — this one as well as the northeast one, located in the bathroom — have load bearing structural columns helping to ensure structural integrity of the loft. Because we’re taking the time to miter (45° angle-cut) both our convex *and* concave corners these finicky little details take time. But details matter!
Matt Nickel Gapping Ceiling (Photo: R.P. Murphy)
By the time Matt moved on to the ceiling, he’d completed the corner as you can see above. Nickel gapping corners like this requires attention to detail and patience, painstakingly ensuring that the horizontal grooves line up perfectly and the mitered corners, especially the convert corner, close up 100%.
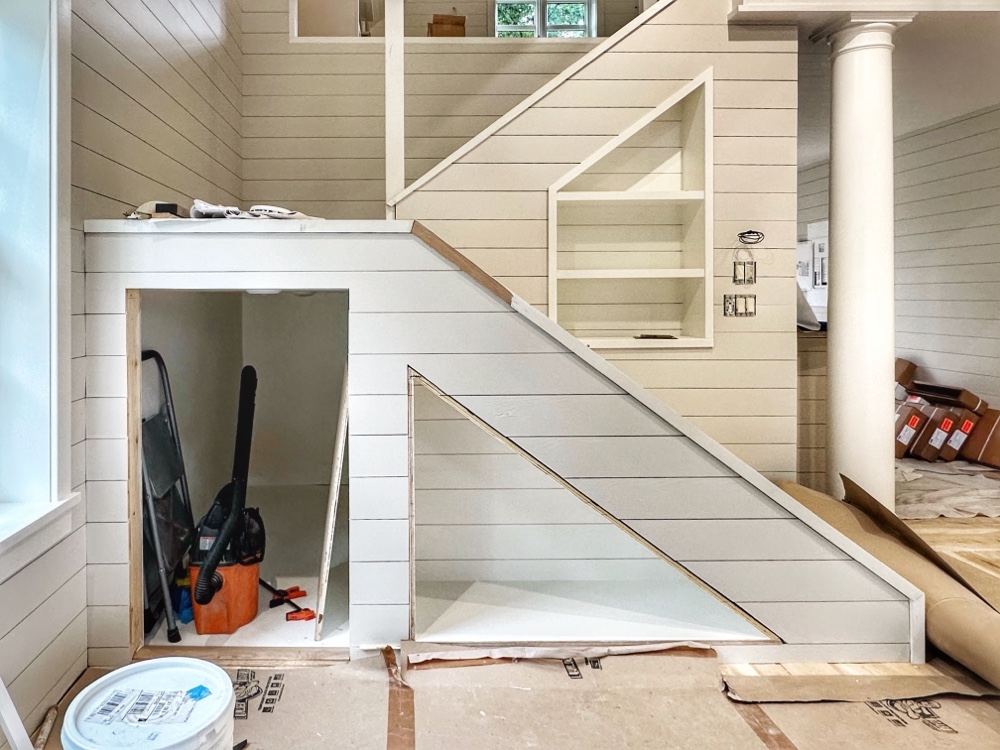
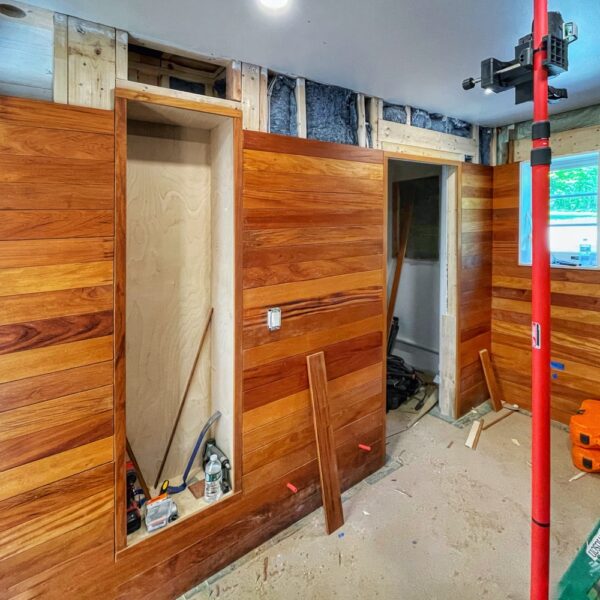
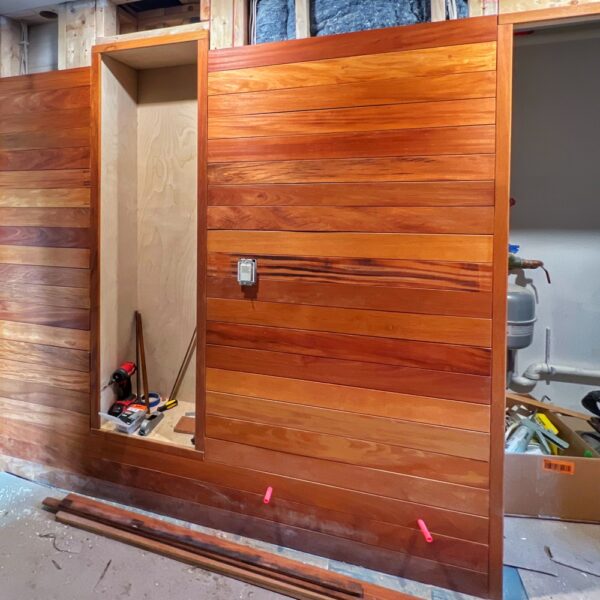
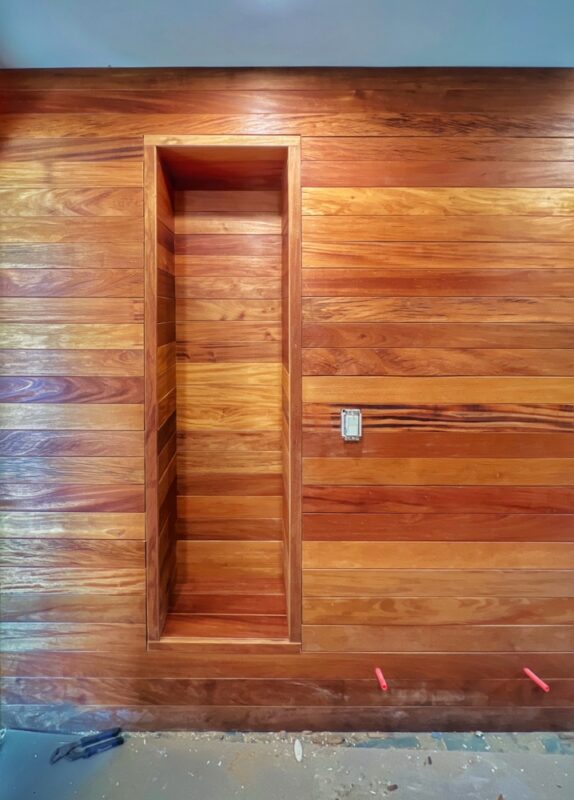
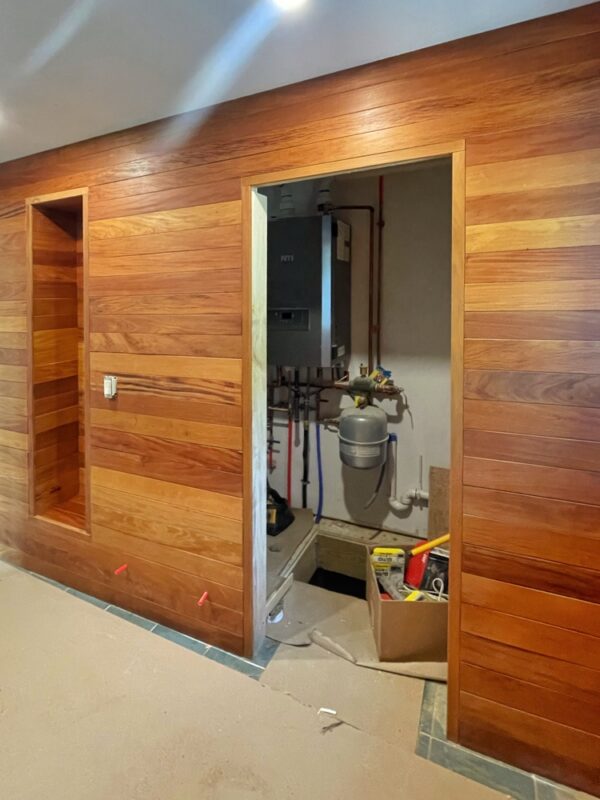
Nickel Gap Nooks & Crannies in Coffee Bar (Photo: R.P. Murphy)
This next pair of photos focuses on the interior wall behind the coffee bar. Note nickel gapping up from the cabinet carcass, just reaching the two apertures in the wall. These will both be finish into niches, the right trimmed into shelves, and the left trimmed into a cabinet with interior shelves.
Cabinet and Niche in Coffee Bar (Photo: R.P. Murphy)
In this final photograph the wall and niches are beginning to reveal themselves. And yet a sneak peek through the left opening reveals the backside of the staircase and newly installed nickel gapping in the stairwell. A fleeting view that will soon vanish as we finish up the stairs and the cabinetry.
Still nooks and crannies today. But nickel gapping and trimming in the days ahead will transform these mercurial rough spots into seamless details that collectively contribute to a seamless, cohesive, and unified interior design. Or so we hope!
An endoskeleton for the soon-to-be loft shelving has begun to take shape.
Loft Shelving (Photo: R.P. Murphy)
Shop-built carcasses fabricated by Bernie Liberty have been delivered and installation has begun. Lining the north and south knee walls, these reading repositories will soon be lined with bound words. One further step toward completion of my icehouse loft study.
Loft Shelving Haiku
Book bound words in a
reading repository,
icehouse loft shelving.
A little forward leaning, I suppose. Aspirational. Projecting, courtesy of my imagination, a few weeks forward…